LandingAI Docker
- 07 Apr 2025
- 14 Minutes to read
- Print
- DarkLight
- PDF
LandingAI Docker
- Updated on 07 Apr 2025
- 14 Minutes to read
- Print
- DarkLight
- PDF
Article summary
Did you find this summary helpful?
Thank you for your feedback!
This article applies to these versions of LandingLens:
| LandingLens | LandingLens on Snowflake |
| ✓ | ✓ (see exceptions below) |
You can deploy LandingLens models using Docker, which enables DevOps users to integrate the model inference programmatically.
The Docker approach is headless, which means that it has no user interface. This allows you to manage inference programmatically and scale deployments quickly.
After deploying the model, you can make inference calls using API commands or the LandingLens Python library.
Here’s a quick summary of the benefits that the Docker deployment offers:
- Deployable in a private cloud environment or on any operating system
- Total API control (including remote access) for inference
- Can manage deployments programmatically
- Not limited to a certain amount of inferences per minute
- Can be used with or without a GPU
- All communication with the LandingAI server is via an HTTPS connection
Notes:
- Deploying LandingLens models with Docker is intended for developers who are familiar with Docker and programming languages. If that's not you, that's okay! In that case, we recommend that you explore our other deployment options.
- LandingAI Docker v2.8.8 and later does not require a deployment license. If you have an earlier version, please upgrade to the latest version.
- Deploying Anomaly Detection models with Docker requires LandingAI Docker 2.11.1 or later.
Deploy the Model Online or Offline
With our Docker approach, you can deploy the model online or offline.
If you deploy the model online, the model is downloaded directly from LandingLens, which requires an internet connection.
If you deploy the model offline, you first manually download the model from LandingLens (which does require an internet connection), and then programmatically upload it to the container (which doesn't require an internet connection).
Regardless of whether you run the model online or offline, inference is run locally.
Requirements
Ensure that you meet all the requirements before installing and running the LandingAI Deploy Docker image:
- Required applications
- System support and requirements
- NVIDIA Jetson support (if using those devices)
- GPU support (if using those devices)
Required Applications
Install the following applications and systems in order to install and run the LandingAI Deploy Docker image:
- Python
- Docker Engine: Install the correct version for your operating system. If you plan to use an Amazon instance, we recommend using Ubuntu AMI.
- LandingLens Python Library: You will use the library to run inference.
System Support and Requirements
| Item | Requirement |
|---|---|
| Supported Operating Systems | Linux, macOS, Windows |
| Memory |
|
| Supported Processors and Architecture | x86-64, ARM64 X86-64 includes, but is not limited to:
ARM64 includes, but is not limited to:
|
| Internet Connection | Required to download the Docker image and model. Not required to run inference. |
NVIDIA Jetson Support
NVIDIA Jetson devices are supported but not required. If you choose to use an NVIDIA Jetson device:
- Minimum: NVIDIA Jetson Orin Nano (or better/similar)
- Recommended: NVIDIA Jetson Orin AGX (or better/similar)
Notes:
- The LandingAI Deploy Docker image for devices on NVIDIA Jetpack 4.x does not support most Object Detection models. It only supports Object Detection models created with the RtmDet-[9M] Model Size in Custom Training.
- Docker might require you to run commands or download libraries specific to your NVIDIA device and driver version. We recommend reading the NVIDIA documentation to understand requirements and compatibility.
GPU Support
Note:
Install the Image
To install the LandingAI Docker image, you will pull the image from Amazon Elastic Container Registry (Amazon ECR), a library of containerized applications. The image size is about 6GB. You can see all of the LandingAI "Deploy" images here.
You only need to install (pull) the image once. After you've downloaded the image, you're ready to launch an instance of it.
To pull the image, run this command:
docker pull public.ecr.aws/landing-ai/deploy:latestInstall the Image on Jetson Devices
We provide separate images for users on NVIDIA Jetson devices. To pull the image you need, run the command based on your JetPack version.
For NVIDIA Jetson devices with JetPack 4.x.x:
Go to the LandingAI repository in Amazon ECR and download the most recent version with the -jp4 suffix.
docker pull public.ecr.aws/landing-ai/deploy:VERSION-jp4For NVIDIA Jetson devices with JetPack 5.x.x:
Go to the LandingAI repository in Amazon ECR and download the most recent version with the -jp5 suffix.
docker pull public.ecr.aws/landing-ai/deploy:VERSION-jp5Docker Deployment Quick-Start Guide
To run inference on a model after installing the LandingAI Docker image, go through this checklist:
- Ensure you have a model in LandingLens that you want to run inference on. (New to LandingLens? Learn how to train a model here.)
- Activate the project that has the model you want to run inference with. You must activate a project in LandingLens first, regardless if you will run the model online or offline.
- If you want to run the model offline, download the model.
- Locate the Model ID for the model you want to run inference on.
- Locate your LandingLens API key. (This isn't applicable if you're using LandingLens on Snowflake. Instead, you'll use a key pair generated when installing LandingLens on Snowflake.)
- If you want to run the model online, run the run-model-id command. (If you're using LandingLens on Snowflake, include specific Snowflake flags.)
- If you want to run the model offline, run the run-local-model command.
- Run inference with the LandingLens Python library.
Locate Your Model ID
The Model ID is included in the command to deploy the model via Docker. The Model ID tells the application which model to download from LandingLens.
To locate your Model ID, follow the instructions here.
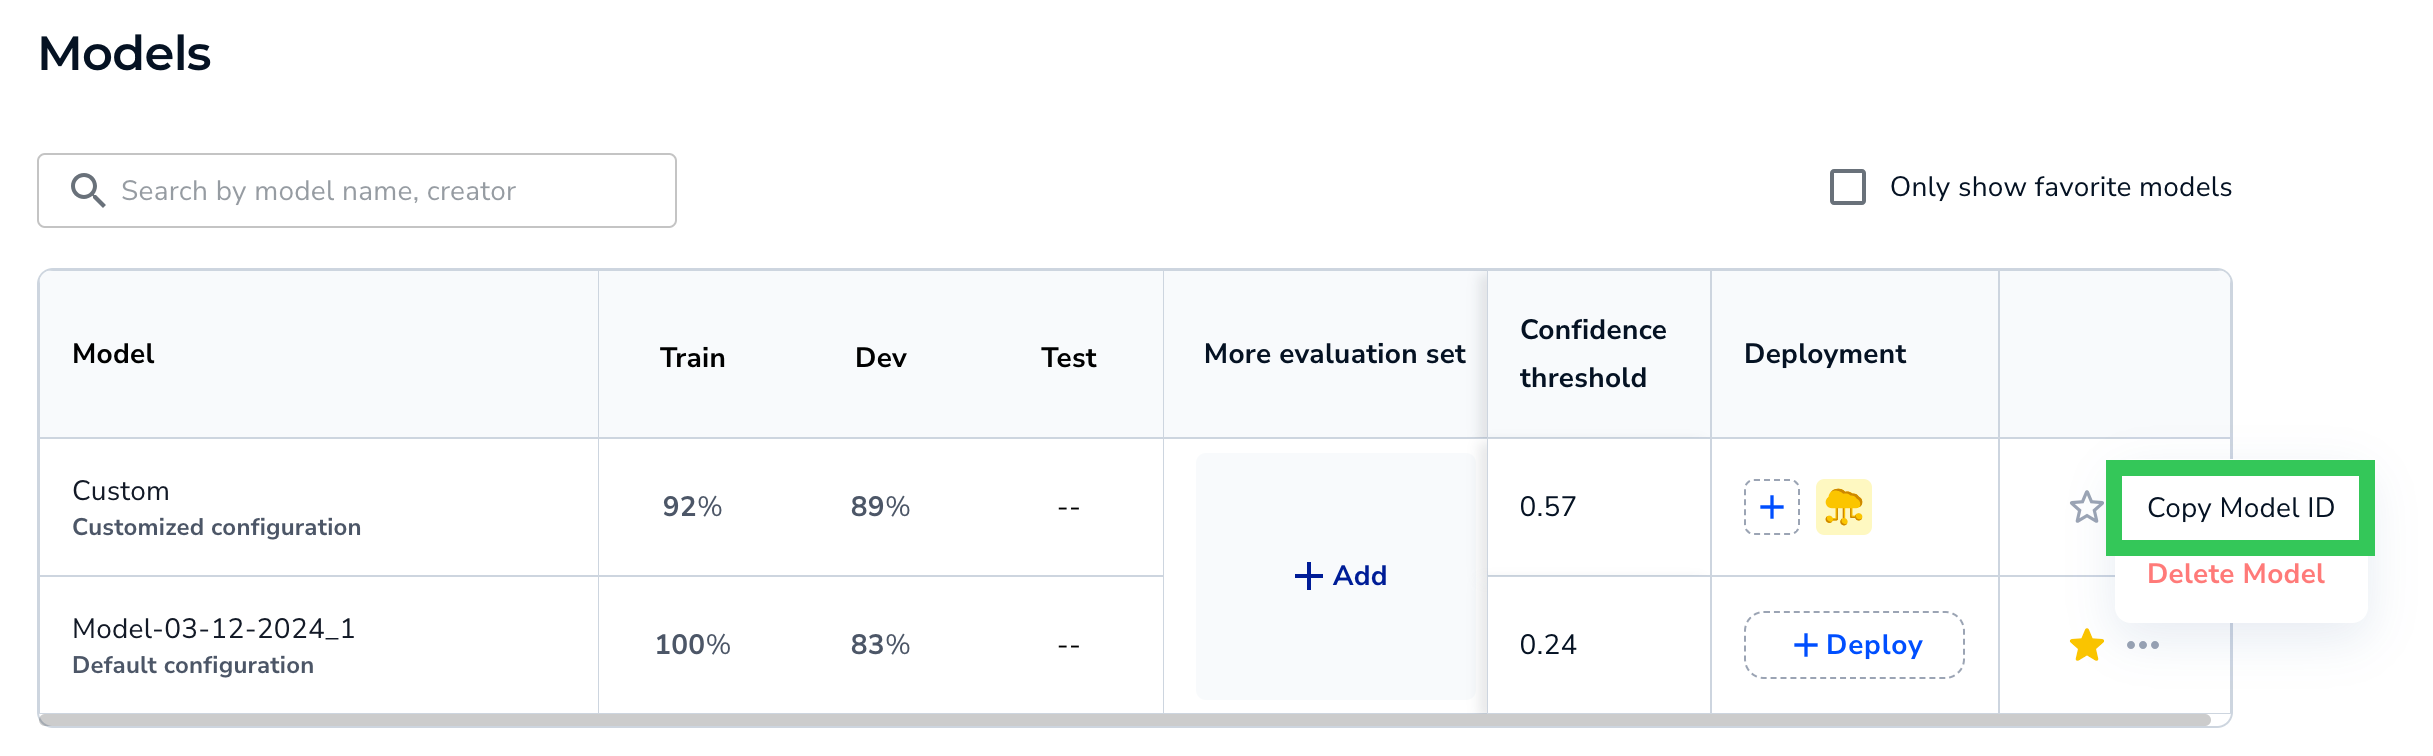 Copy the Model ID
Locate Your LandingLens API Key
Note:
This is not applicable when using LandingLens on Snowflake.
LandingLens uses API keys to authenticate access to the system. You will use an API Key in the command to download your computer vision model from LandingLens.
LandingLens API keys are managed on the API Keys page. To learn how to locate your LandingLens API key, go to Retrieve API Key.
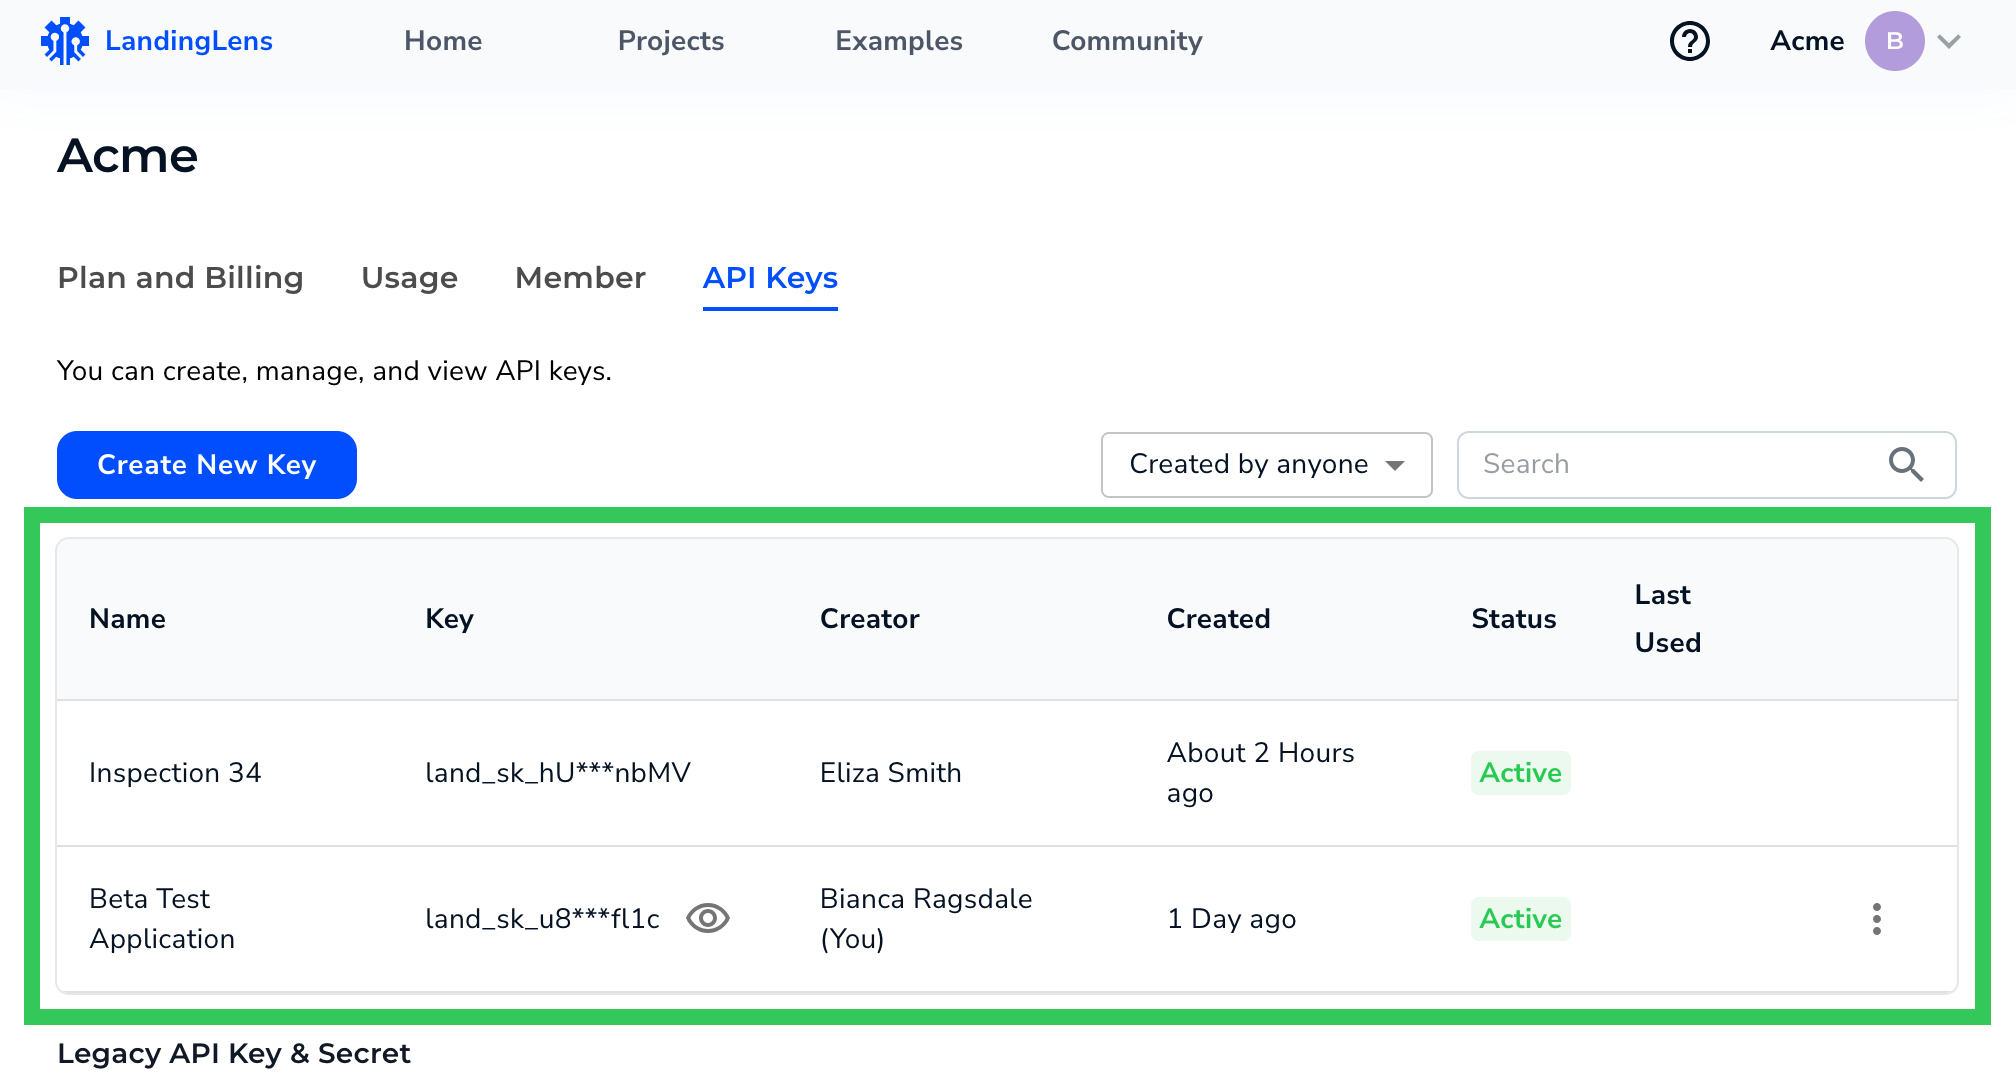 "New" API Credentials Only Use the API Key
Deploy the Model Online
Note:
If using LandingLens on Snowflake, follow the instructions in Deploy the Model Online (for LandingLens on Snowflake).
If you want to deploy the model online, run the run-model-id command to launch a container with the model.
By default, the inference endpoint port is 8000. In the code snippet below, the port flag (-p) sets the ports for the host and the container. The port on the left is the host port, and the port on the right is the container port.
To run the run-model-id command:
docker run \
	-p 8000:8000 \
	--rm public.ecr.aws/landing-ai/deploy:latest run-model-id \
	--apikey API_KEY \
	--model MODEL_ID
When you run the command, the Deploy application downloads your model from LandingLens. When it’s done, this message displays:
[INF] Model loading status: [Ready]Examples
Deploy the model when you have only an API Key (and not an API Key and API Secret):
docker run \
	-p 8000:8000 \
	--rm public.ecr.aws/landing-ai/deploy:latest run-model-id \
	--apikey API_KEY \
	--model MODEL_ID
Deploy the model when you have an API Key and an API Secret:
docker run \
	-p 8000:8000 \
	--rm public.ecr.aws/landing-ai/deploy:latest run-model-id \
	--apikey API_KEY \
	--apisecret API_SECRET \
	--model MODEL_ID
Deploy the model. When you send images for inference, save those images and the predictions to the corresponding project in LandingLens:
docker run \
	-p 8000:8000 \
	--rm public.ecr.aws/landing-ai/deploy:latest run-model-id \
	--apikey API_KEY \
	--model MODEL_ID \
	--upload
Deploy the model. When you deploy a model, the name of the device displays on the Deploy page in LandingLens. Set a device name:
docker run \
	-p 8000:8000 \
	--rm public.ecr.aws/landing-ai/deploy:latest run-model-id \
	--apikey API_KEY \
	--model MODEL_ID \
	--name "my edge device" \
	--upload
Flags
| Flag | Description |
|---|---|
-k, --apikey | Required. Set an API Key for your LandingLens organization. Can also set through the Note: Up until June 30, 2023, LandingLens required both an API Key and API Secret to be used to run inference. As of that date, LandingLens only generates API Keys (and not API Key and API Secret pairs). For more information, go to API Keys. |
-s, --apisecret | If you’re using a “legacy” API Key and API Secret pair, set the API Secret. Can also set through the Note: Up until June 30, 2023, LandingLens required both an API Key and API Secret to be used to run inference. As of that date, LandingLens only generates API Keys (and not API Key and API Secret pairs). For more information, go to API Keys. |
-m, --model | Required. Set the Model ID of the model you want to load. To locate your Model ID, go to Locate Your Model ID. Can also set through the 'MODEL_ID' environment variable. |
-p, --port | The port number to use for communicating with the deployed model via API. Can also set through the Default: |
-e, --external | Allow external hosts to access the API. Can also set through the If running in a container, the default is |
-u, --upload | When you send images for inference, save those images and the predictions to the corresponding project in LandingLens. Can also set through the Default: |
-g, --gpus | Select the GPUs you want to use to run inference. Include a space-separated list of the GPU indices. If you select multiple GPUs, the system will balance the load between the processors. Can also set through the Default: use all GPUs available. |
-n, --name | When you deploy a model, the name of the device displays on the Deploy page in LandingLens. Use this flag to set the device name. Can also set through the If unspecified the default is |
--help | Display more information about the command. |
--version | Display version information. |
Deploy the Model Online (for LandingLens on Snowflake)
If you're using LandingLens on Snowflake and want to deploy the model online, run the run-model-id command with specific Snowflake flags to launch a container with the model.
By default, the inference endpoint port is 8000. In the code snippet below, the port flag (-p) sets the ports for the host and the container. The port on the left is the host port, and the port on the right is the container port.
To run the run-model-id command for LandingLens on Snowflake:
docker run \
	-v /Users/user/keys:/keys \
	-p 8000:8000 \
	 public.ecr.aws/landing-ai/deploy:latest run-model-id \
	--model MODEL_ID \
	--use-snowflake \
	--snowflake-account SNOWFLAKE_LOCATOR \
	--snowflake-user NAME \
	--snowflake-private-key-path /keys/private-key.p8 \
	--snowflake-app-url https://example.snowflakecomputing.app/
When you run the command, the Deploy application downloads your model from LandingLens. When it’s done, this message displays:
[INF] Model loading status: [Ready]Flags
| Flag | Description |
|---|---|
--use-snowflake | Required if using LandingLens on Snowflake. Can also set through the Default: |
--snowflake-account | Required if using LandingLens on Snowflake. Enter your Snowflake account locator. To learn how to get your locator, go to the Snowflake documentation. Can also set through the |
--snowflake-user | Required if using LandingLens on Snowflake. Enter your Snowflake username. This is the Can also set through the |
--snowflake-private-key-path | Required if using LandingLens on Snowflake. Enter the path to your RSA private key, which is used for authenticating with Snowflake. Can also set through the |
--snowflake-app-url | Required if using LandingLens on Snowflake. Enter the fully qualified domain of your instance of LandingLens on Snowflake. For example, the URL could be Can also set through the |
--snowflake-privatelink | Allow the use of AWS PrivateLink with Snowflake. Can also set through the Default: |
-m, --model | Required. Set the Model ID of the model you want to load. To locate your Model ID, go to Locate Your Model ID. Can also set through the 'MODEL_ID' environment variable. |
-p, --port | The port number to use for communicating with the deployed model via API. Can also set through the Default: |
-e, --external | Allow external hosts to access the API. Can also set through the If running in a container, the default is |
-u, --upload | When you send images for inference, save those images and the predictions to the corresponding project in LandingLens. Can also set through the Default: |
-g, --gpus | Select the GPUs you want to use to run inference. Include a space-separated list of the GPU indices. If you select multiple GPUs, the system will balance the load between the processors. Can also set through the Default: use all GPUs available. |
-n, --name | When you deploy a model, the name of the device displays on the Deploy page in LandingLens. Use this flag to set the device name. Can also set through the If unspecified the default is |
--help | Display more information about the command. |
--version | Display version information. |
Deploy the Model Offline
If you want to deploy the model offline, run the run-local-model command. Running the model offline is helpful if your system doesn't have internet access or has limited bandwidth (which could make it difficult to download the image from Docker). Also, running the model offline reduces startup time, because you don't have to wait to download the file.
When running this command, include the mount volume (-v) flag from Docker so that it can access the file you downloaded.
Examples
Deploy the model:
docker run -v /Users/user/Downloads:/folder public.ecr.aws/landing-ai/deploy:latest run-local-model --model /folder/model-bundle.zipDeploy the model. When you send images for inference, save those images and the predictions to the corresponding project in LandingLens:
docker run -v /Users/user/Downloads:/folder public.ecr.aws/landing-ai/deploy:latest run-local-model --model /folder/model-bundle.zip --uploadDeploy the model. When you deploy a model, the name of the device displays on the Deploy page in LandingLens. Set a device name:
docker run -v /Users/user/Downloads:/folder public.ecr.aws/landing-ai/deploy:latest run-local-model --model /folder/model-bundle.zip --name "my edge device" --uploadFlags
| Flag | Description |
|---|---|
-m, --model | Required. The model bundle to load. This will be a zip file. Can also set through the 'MODEL_PATH' environment variable. |
-p, --port | The port number to use for communicating with the deployed model via API. Can also set through the Default: |
-e, --external | Allow external hosts to access the API. Can also set through the If running in a container, the default is |
-u, --upload | When you send images for inference, save those images and the predictions to the corresponding project in LandingLens. Can also set through the Default: |
-g, --gpus | Select the GPUs you want to use to run inference. Include a space-separated list of the GPU indices. If you select multiple GPUs, the system will balance the load between the processors. Can also set through the Default: use all GPUs available. |
-n, --name | When you deploy a model, the name of the device displays on the Deploy page in LandingLens. Use this flag to set the device name. Can also set through the If unspecified the default is |
--help | Display more information about the command. |
--version | Display version information. |
Make Inference Calls with API Commands
Once the container with the model is ready, you can run inference with the model by using API commands.
Run Inference with the LandingLens Python Library
Once the container with the deployed model is ready, you can run inference by making calls to the container using the LandingLens Python library.
If your client code (in other words, your Python code) is on the same machine you’re running inference on, you can also use “localhost” instead of the IP address.
The following example shows how to run inference within an instance hosted on 192.168.1.12, port 8000). For more examples, see our Python library.
from landingai.predict import EdgePredictor
import PIL.Image

predictor = EdgePredictor(host="192.168.1.12", port=8000)
img = PIL.Image.open("/Users/username/Downloads/test.png")
predictions = predictor.predict(img)
Power Inference with GPUs
By default, the Docker deployment doesn’t use any GPUs in your system. However, you can configure the deployment to use some or all of your GPUs. See the list of supported GPUs here.
In this section, we’ll give you the basics about how to enable GPUs to power inference. However, Docker might require you to run commands or download libraries specific to your NVIDIA device and driver version. We recommend reading the Docker and NVIDIA documentation to understand requirements and compatibility.
To use all GPUs in your system to power inference, include the --gpus all flag as part of the docker command. For example:
docker run --gpus all -p 8000:8000 --rm -e public.ecr.aws/landing-ai/deploy:latest run-model-id --apikey API_KEY --model MODEL_IDTo use only specific GPUs in your system to power inference, include the --gpus flag and enter the indices of the GPUs you want to use as a comma-separated list. For example, in the snippet below, the deployment will use the GPUs with index 0 and index 2:
docker run --rm --gpus '"device=0,2"' -p 8000:8000 -e public.ecr.aws/landing-ai/deploy:latest run-model-id --apikey API_KEY --model MODEL_IDDeploy with Kubernetes
You can deploy the LandingAI Deploy image with Kubernetes and monitor the system with our status APIs.
Here is an example Kubernetes Pod YAML deployment file for the LandingAI Deploy image:
apiVersion: v1
kind: Pod
metadata:
  name: landingai-deploy
  namespace: default
  labels:
    app.kubernetes.io/name: landingai-deploy
    app: landingai-deploy
spec:
  containers:
  - name: landingai-deploy
    image: public.ecr.aws/landing-ai/deploy:latest
    args: ["run-model-id", "-m", "YOUR_MODEL_ID"]
    imagePullPolicy: IfNotPresent
    env:
      - name: LANDING_API_KEY
        value: "YOUR_API_KEY"
    ports:
      - containerPort: 8000
    resources:
      requests:
        memory: 2G
        cpu: 2
      limits:
        memory: 4G
        cpu: 5
    startupProbe:
      httpGet:
        port: 8000
        path: /status
    livenessProbe:
      httpGet:
        port: 8000
        path: /live
      initialDelaySeconds: 5
      periodSeconds: 5
    readinessProbe:
      httpGet:
        port: 8000
        path: /ready
      initialDelaySeconds: 5
      periodSeconds: 5
Web APIs in Swagger
To access the web APIs for the LandingAI Docker deployment solution in Swagger, go to http://localhost:[port], where [port] is the port you’re using to communicate with the Dockerized application.
Use the /status, /ready, and /live endpoints to monitor the status when using Kubernetes or another orchestration system.
Use the /images endpoint to run inference.
You can use these web APIs to programmatically start or monitor inference.
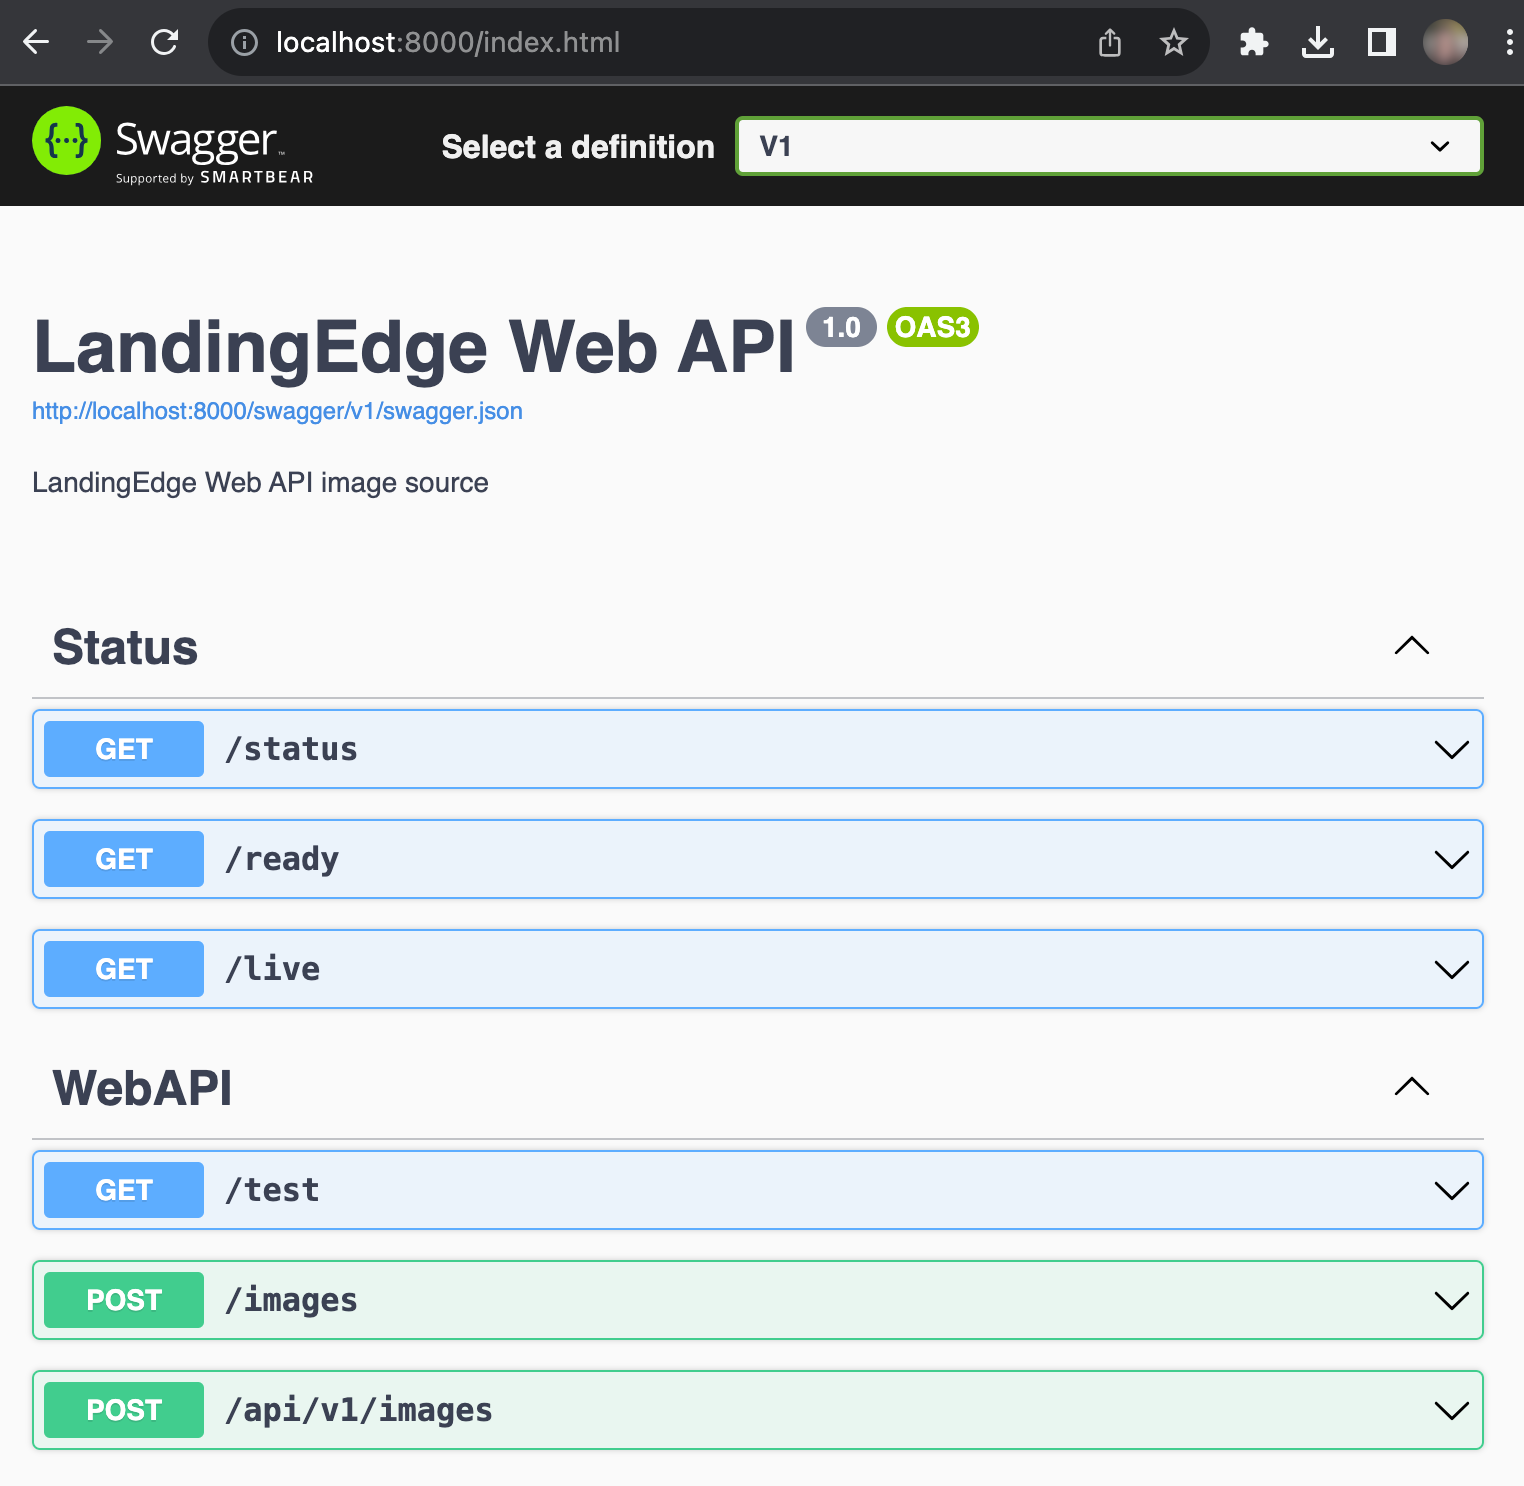 APIs in Swagger
/status
The /status endpoint always returns 200.
/ready
The /ready endpoint indicates if the model is ready to receive inference calls. It returns 200 if the model is loaded. Otherwise, it returns 503, which indicates that either the model hasn't loaded yet or the model failed to load.
/live
The /live endpoint returns 200 if the model is loading or loaded. Otherwise, it returns 503, which indicates that the container is dead and should be killed by the orchestrator (such as Kubernetes).
/images
Use the /images endpoint to run inference. Results are returned in JSON.
Note:
The
/api/v1/images endpoint is provided for compatibility with an older version of the LandingAI Docker image. It is supported, but the JSON results are formatted differently.Troubleshooting: User Declined Directory Sharing
Scenario
You receive the following error message when running the run-local-model command:
Error response from daemon: user declined directory sharing [directory path].Solution
This error indicates that the LandingAI Deployment application does not have permission to access the directory you included in the command. Add the directory to the File Sharing list in Docker Desktop. The way to do this depends on your operating system. See the instructions for your system: Mac, Windows, and Linux.
Was this article helpful?