Custom Processing
- 05 Aug 2024
- 7 Minutes to read
- Print
- DarkLight
- PDF
Custom Processing
- Updated on 05 Aug 2024
- 7 Minutes to read
- Print
- DarkLight
- PDF
Article summary
Did you find this summary helpful?
Thank you for your feedback!
This article applies to these versions of LandingLens:
| LandingLens | LandingLens on Snowflake |
| ✓ | ✓ |
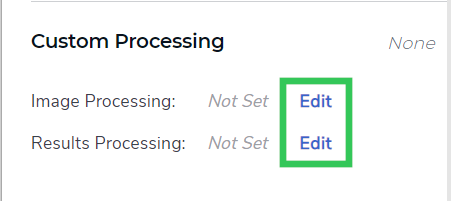
LandingEdge has a Custom Processing tool that automatically runs custom scripts before or after an image goes through inference. Custom Processing supports C# and Python scripts.
The two Custom Processing options are:
- Image Processing: LandingEdge runs the script before the image goes through inference.
- Results Processing: LandingEdge runs the script after the images goes through inference.
Set Up Custom Processing
To add custom scripts to LandingEdge:
- Click Edit next to Image Processing or Results Processing.
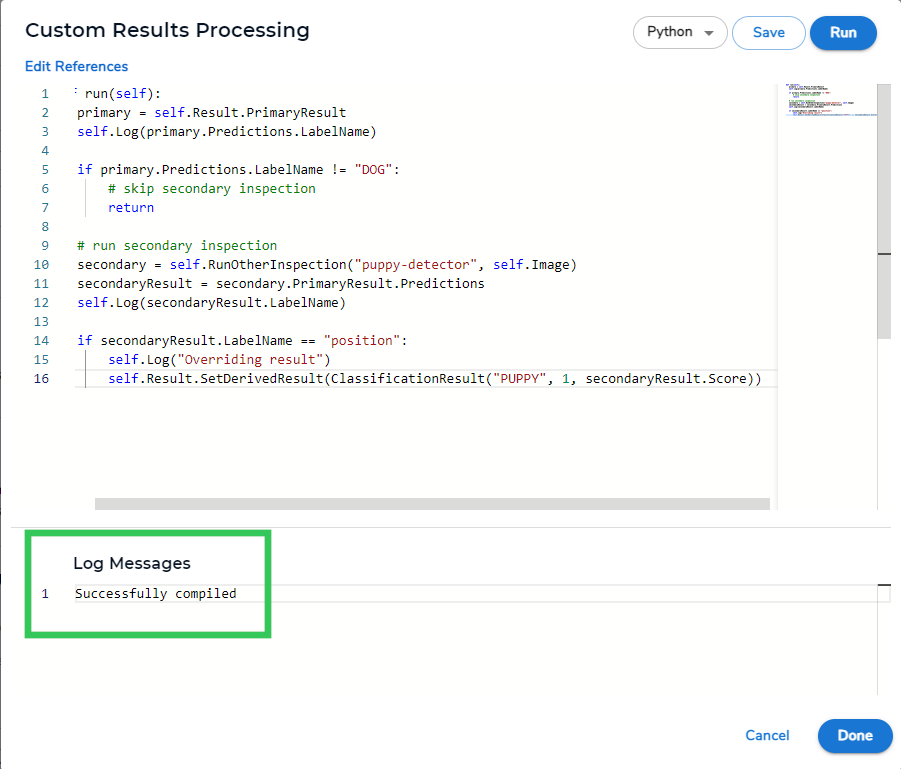
 Edit to Add a Custom Processing Script
 - Select C# or Python from the drop-down menu, depending on the type of script you have.
- Replace the instructions in the large field with your custom script.
- Click Save.
.png) Add the Script and Save
Add the Script and Save - The Log Messages field displays a success message if the script is accepted. If you received an error in this field, please check your script and try again.
 Success Message
 - Click Done.

.png)

Run Images Through Two Inspection Points
- Script type: Results processing
- Model type: Classification
- Language: Python
Use this script to run an image through a second Inspection Point if a certain class is predicted in the first Inspection point. The class predicted by the second Inspection Point can override the class predicted by the first Inspection Point.
This process is sometimes called "model-chaining" or "daisy-chaining", because you are programmatically chaining models together.
Here is the sample script. To see a use case, go to Use Case for Running Images Through Two Inspection Points.
def run(self):
   primary = self.Result.PrimaryResult
   self.Log(primary.Predictions.LabelName)

   if primary.Predictions.LabelName != "primary-trigger-class-name":
       # skip secondary inspection
       return

   # run secondary inspection
   secondary = self.RunOtherInspection("second-inspection-point-name", self.Image)
   secondaryResult = secondary.PrimaryResult.Predictions
   self.Log(secondaryResult.LabelName)

   if secondaryResult.LabelName == "secondary-inspection-class-name":
       self.Log("Overriding result")
       self.Result.SetDerivedResult(ClassificationResult("your-secondary-class-name", 1, secondaryResult.Score)
The table below describes the placeholders that you will need to update when using this script.
| Placeholder | Description |
|---|---|
primary-trigger-class-name | The name of the class that triggers the image to go through the second Inspection Point. For example, if you want an image to go through a second Inspection Point if the class "Dog" is detected, replace primary-trigger-class-name with Dog. |
second-inspection-point-name | The name of the second Inspection Point. For example, if the name of the second Inspection Point is called "puppy-inspection", replace second-inspection-point-name with puppy-inspection. |
secondary-inspection-class-name | The name of the predicted class in the second Inspection Point that triggers the "final" prediction to change. For example, if you want the class "Puppy" to override a previous prediction if the second Inspection Point predicts "puppy", then replace secondary-inspection-class-name with Puppy. |
overridden-class-name | The name of the class that will be the "final" predicted class if the criteria in secondary-inspection-class-name is met.For example, if you want the "final" predicted class to be "Puppy" if the other criteria is met, replace overridden-class-name with Puppy. |
Use Case for Running Images through Two Inspection Points
Let's say you work for an automatic dog door company, and you want your model to detect dogs and puppies so that when a dog or puppy approaches the dog door, the door will automatically open. Your model has these classes: Not Dog, Dog, and Puppy. You can use the "daisy-chaining" script below to solve this use case.
This is how the script works:
- The image goes through the first Inspection Point.
- The model in that Inspection Point predicts a class.
- If the prediction is "Not Dog", the image is not sent to a Second Inspection Point.
- If the prediction is "Dog", the image is sent to a second Inspection Point called "puppy-inspection" to check if the dog is a puppy.
- If the second Inspection Point also predicts a dog, the class stays as "Dog".
- If the second Inspection Point predicts a puppy, the class is overridden to "Puppy".
Here is the Python script for this use case:
def run(self):
    primary = self.Result.PrimaryResult
    self.Log(primary.Predictions.LabelName)

    if primary.Predictions.LabelName != "Dog":
        # skip secondary inspection
        return

    # run secondary inspection
    secondary = self.RunOtherInspection("puppy-inspection", self.Image)
    secondaryResult = secondary.PrimaryResult.Predictions
    self.Log(secondaryResult.LabelName)

    if secondaryResult.LabelName == "Puppy":
        self.Log("Overriding result")
        self.Result.SetDerivedResult(ClassificationResult("Puppy", 1, secondaryResult.Score))
Override the Class Name, Confidence Score, and Index
- Script type: Results processing
- Model type: Classification
- Language: Python
Use this script to override the class name and confidence score of a model's prediction. For example, use the script to override the final predictions based on the model's results and other logic you'd like to add.
Here is the sample script:
def run(self):
    newClass = "new-class"
    newScore = "number"
    newIndex = 1
    newResult = ClassificationResult(newClass, newIndex, newScore)
    self.Result.SetDerivedResult(newResult)
The table below describes the placeholders that you will need to update when using this script.
| Placeholder | Description |
|---|---|
new-class | The name of the class that will be the "final" predicted class. For example, if the model predicted the class "Cat", but it should be "Dog", replace new-class with Dog. |
number | The confidence score that will be the "final" confidence score. This value must be a number between 0 and 1. For example, if you want to change the confidence score to .876, replace number with .876. |
Add Metadata to Images
Note:
The ability to add metadata to images through scripting is available in LandingEdge v2.3.93 and later.
- Script type: Results processing
- Model type: Any
- Language: Python
If you save images to LandingLens (by enabling Upload Results to LandingLens), you can see the image metadata on the Deploy page (Deploy > Self-Hosted Deployment > Inspection Point > open image. This metadata is only accessible in LandingLens, and isn't embedded in the image.
You can run a script to customize the values for the following metadata
- Image ID
- Inspection Station ID
- Location ID
 Customized Metadata
Here is the sample script:
def run(self):
    self.Data.Metadata.ImageID = "1234"
    self.Data.Metadata.InspectionStationID = "Inspection Point A"
    self.Data.Metadata.LocationID = "Main Warehouse"
The table below describes the placeholders that you will need to update when using this script.
| Placeholder | Description |
|---|---|
1234 | The value for the Image ID. |
Inspection Point A | The value for the Inspection Station ID |
Main Warehouse | The value for the Location ID. |
Skip Saving Certain Images
Note:
The ability to skip saving certain images through scripting is available in LandingEdge v2.4.89 and later.
- Script type: Results processing
- Model type: Any
- Language: C#
If you save images to LandingLens (by enabling Upload Results to LandingLens), you can run a script to skip saving certain images.
Here is the sample script:
public void Run()
{
    Data.ForceSkipSaveImage = true; // will not save or upload this image+result
}
Read Out Raw Scores from a Classification Model
Note:
The ability to read out raw scores through scripting is available in LandingEdge v2.5.10 and later.
- Script type: Results processing
- Model type: Classification
- Language: C#
This sample script allows you to read out the raw scores from a Classification model. This script also includes AllClasses, which is a Dictionary with the class index as the key. The AllClasses Dictionary provides access to all names and indices of all classes in the model, so class information can be retrieved with AllClasses[index].
Here is the sample C# post-processing script for reading out the raw scores from a Classification model:
public void Run()
{
    if (Result.PrimaryResult is not ClassificationResult clf)
    {
        // not a classification result
        // this script is only applicable to classification, so exit the script
        return;
    }

    Log($"All classes in model: {string.Join(", ", AllClasses)}");
    Log($"Class scores for image: [{string.Join(", ", clf.Predictions.RawScores)}]");

    for (int i=0; i<AllClasses.Count; i++)
    {
        Log($"Class '{AllClasses[i].Name}' score = {clf.Predictions.RawScores[i]}");
    }
}
Sample Script for Reading Out Raw Scores
Return Class Name for Object Detection Models
- Script type: Results processing
- Model type: Object Detection
- Language: Python and C#
Let's say you are using LandingEdge to run inference with an Object Detection model and sending the results to a Programmable Logic Controller (PLC). You want LandingEdge to send the name of the predicted class, but that action is only supported for Classification models. LandingEdge doesn't directly support sending the class name for Object Detection models because there could be multiple objects and classes detected in each image. When it’s only possible for one object to be detected (like with Classification models), then the process is straightforward.
As a workaround, you can use the C# and Python scripts below to:
- First, determine which box (the bounding box of the prediction around the object) has the highest confidence score.
- Then, return the class name of the box with the highest confidence score.
The scripts can be customized to use different criteria to determine which class is sent.
C# Script
Here is the sample C# script for returning the class name of the prediction with the highest confidence score:
public void Run()
{
    if (Result.PrimaryResult is not ObjectDetectionResult od)
    {
        // not an object detection result
        // this script is only applicable to object detection, so exit
        return;
    }

    Log($"Total number of boxes found: {od.Predictions.Count}");

    if (od.Predictions.Count == 0)
    {
        // no boxes, just return, but could also create a default response
        return;
    }

    // need to choose which class index to report from all the boxes
    // arbitrarily, let's pick the box with the highest score
    float maxScore = float.MinValue;
    string className = string.Empty;
    int classIndex = -1;

    foreach (var pred in od.Predictions)
    {
        if (pred.Value.Score > maxScore)
        {
            // this box is the highest so far, remember it
            maxScore = pred.Value.Score;
            className = pred.Value.LabelName;
            classIndex = pred.Value.LabelIndex;
        }
    }

    // now, create a derived classification result with the values from above
    // change 'true' in 'isOk: true' to 'false' if appropriate
    var newResult = new ClassificationResult(className, classIndex, maxScore, isOk: true);
    Result.SetDerivedResult(newResult);
}
Python Script
Here is the sample Python script for returning the class name of the prediction with the highest confidence score:
def run(self):
    if not isinstance(self.Result.PrimaryResult, ObjectDetectionResult):
        # not an object detection result
        # this script is only applicable to object detection, so exit
        return

    od: ObjectDetectionResult = self.Result.PrimaryResult

    self.Log(f"Total number of boxes found: {od.Predictions.Count}")

    if od.Predictions.Count == 0:
        # no boxes, just return, but could also create a default response
        return

    # need to choose which class index to report from all the boxes
    # arbitrarily, let's pick the box with the highest score
    maxScore = -1
    className = ''
    classIndex = -1

    for _, box in od.Predictions:
        if box.Score > maxScore:
            # this box is the highest so far, remember it
            maxScore = box.Score
            className = box.LabelName
            classIndex = box.LabelIndex

    # now, create a derived classification result with the values from above
    # change 'True' in 'isOk=True' to 'False' if appropriate
    newResult = ClassificationResult(className, classIndex, maxScore, isOk=True)
    self.Result.SetDerivedResult(newResult)
Was this article helpful?