Custom Training
- 06 May 2025
- 17 Minutes to read
- Print
- DarkLight
- PDF
Custom Training
- Updated on 06 May 2025
- 17 Minutes to read
- Print
- DarkLight
- PDF
Article summary
Did you find this summary helpful?
Thank you for your feedback!
This article applies to these versions of LandingLens:
| LandingLens | LandingLens on Snowflake |
| ✓ | ✓ (see exceptions below) |
In many cases, Fast Train is the optimal method for creating a model. However, some advanced use cases require granular control over pre-processing and hyperparameter tuning. In these situations, you can use the Custom Training method (also called "Advanced Training") to create models. With Custom Training, you can control how the image is sized and cropped before model training, what augmentations are applied during training, and how many epochs (cycles) the training goes through.
The Custom Training process is designed for users who are familiar with machine learning concepts and understand how the different settings impact the resulting model. If you don't have a background in machine learning, we recommend using the Fast Train method instead.
Note:
Custom Training is not supported for Anomaly Detection.
Run Custom Training
- Open the project you want to train.
- Click the downward-facing arrow next to Train and select Custom Training.
.png) Select Custom Training
Select Custom Training - Select a dataset from the drop-down menu. You can select from the dataset currently on the Build page (the current version) or an existing dataset snapshot. If you select the current version, LandingLens creates a dataset snapshot of that data.
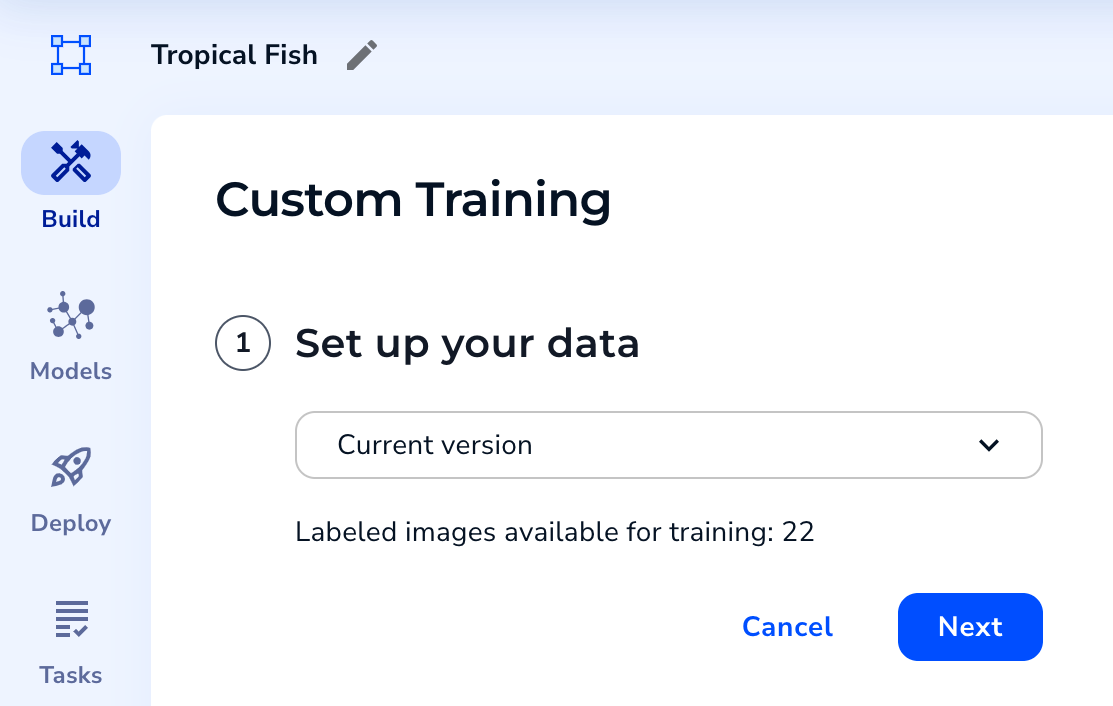 Select a Dataset
 - If you selected the current version dataset and some labeled images don't have splits assigned, assign splits. Otherwise, the splits display and cannot be changed. For detailed information, go to Split Setup.
- Click Next.
 Set Up or Review Splits
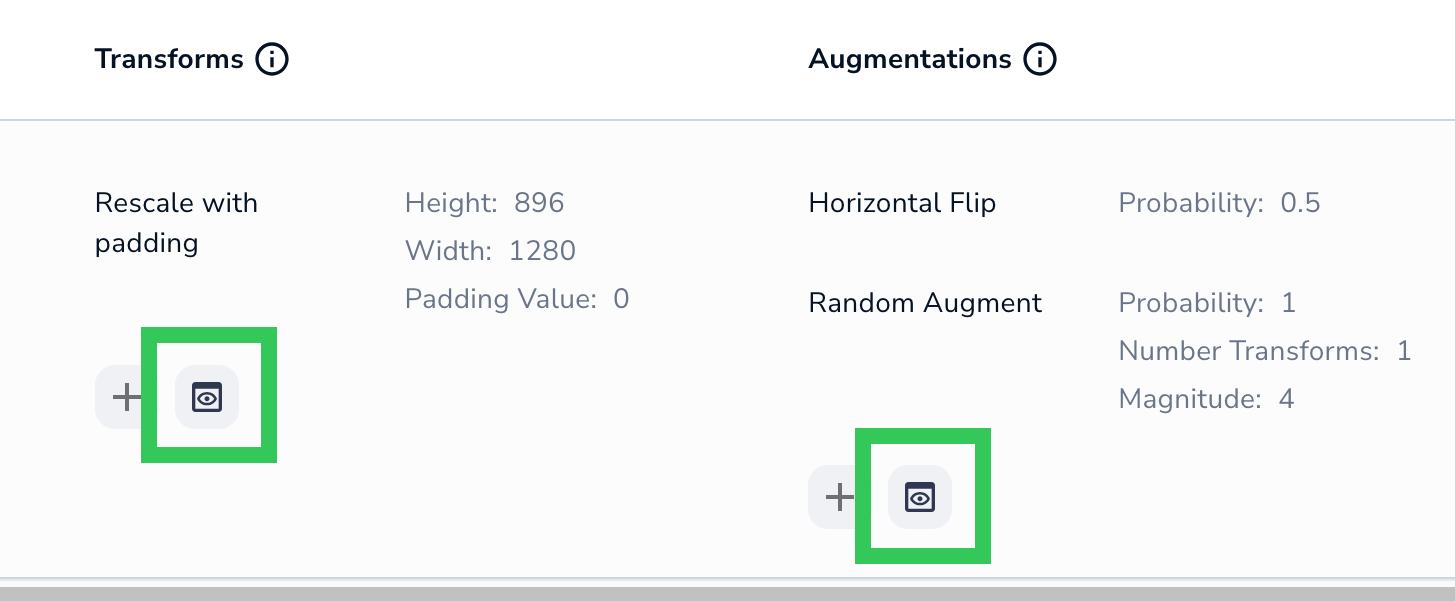
 - Configure the hyperparameters, transforms, and augmentations. When processing images, LandingLens applies changes in the following order: rescale/resize, crop, augmentations.
- To edit a setting, hover over the value and click the Edit icon that appears.
- To add a setting, click the Add icon.
- To see how the settings impact the images, click the Preview icon. For more information, go to Preview Transforms and Augmentations.
.png) Manage Training Settings
Manage Training Settings
- Review the credits that your organization will be charged for the training process and future predictions (inferences). You might need to scroll to the right to see the credit calculations. For more information, go here. (The credit cost is not applicable when using LandingLens on Snowflake.)
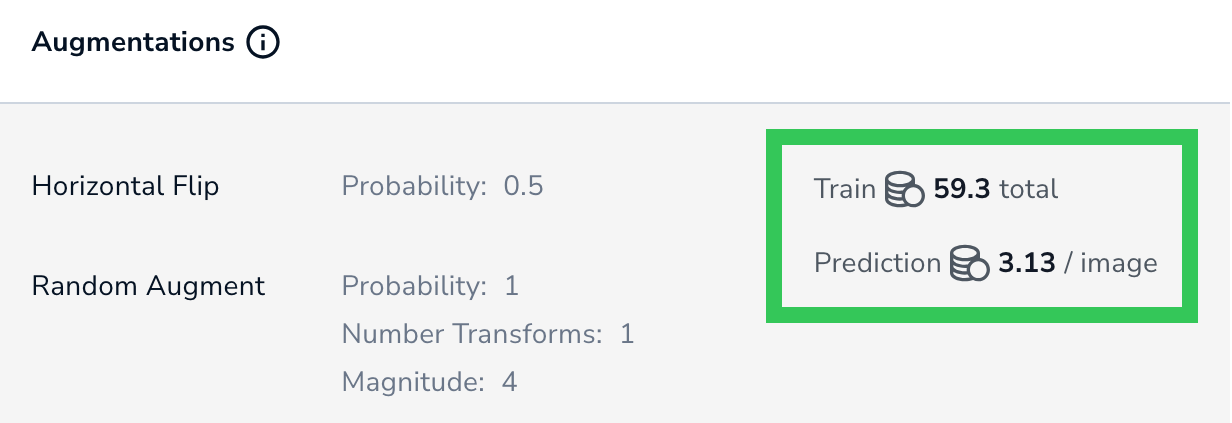 Review Credits for Training and Predictions
 - After configuring the settings, click Train.
.png) Start Custom Training
Start Custom Training - LandingLens runs the Model Training process and creates a model. Once training completes, you can view and compare the model's performance on the Models page.
.png)


.png)

.png)
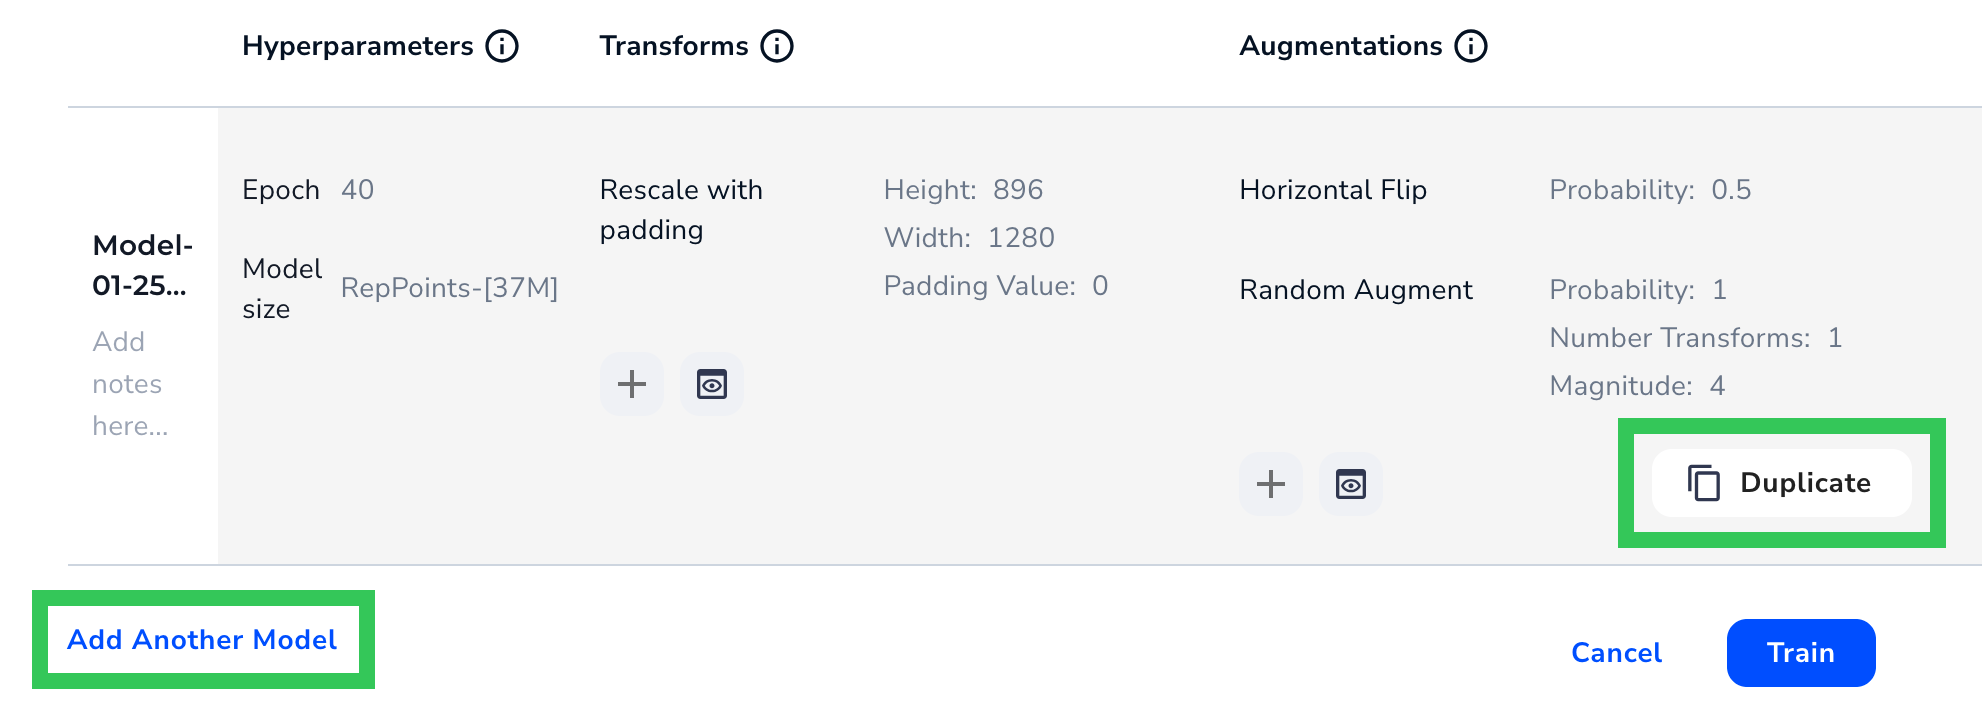
Add or Duplicate Models
Custom Training allows you to create multiple models for a dataset at once, each using different training settings. The selected dataset and splits remain the same. This is useful if you want to see how a certain setting impacts model performance.
There are two ways to do this:
- Click Add Another Model. This adds a row with the default settings.
- Hover over a row and click Duplicate. This adds a row with the same settings as that row.
 Add a Set of Training Settings
Split Setup
The second step of Custom Training is setting up or reviewing splits. The options depend on which dataset you selected, and if images have splits already:
- If You Selected the Current Version of the Dataset and Images Don't Have Splits Yet
- If You Selected a Snapshot or Images Already Have Splits
If You Selected the Current Version of the Dataset and Images Don't Have Splits Yet
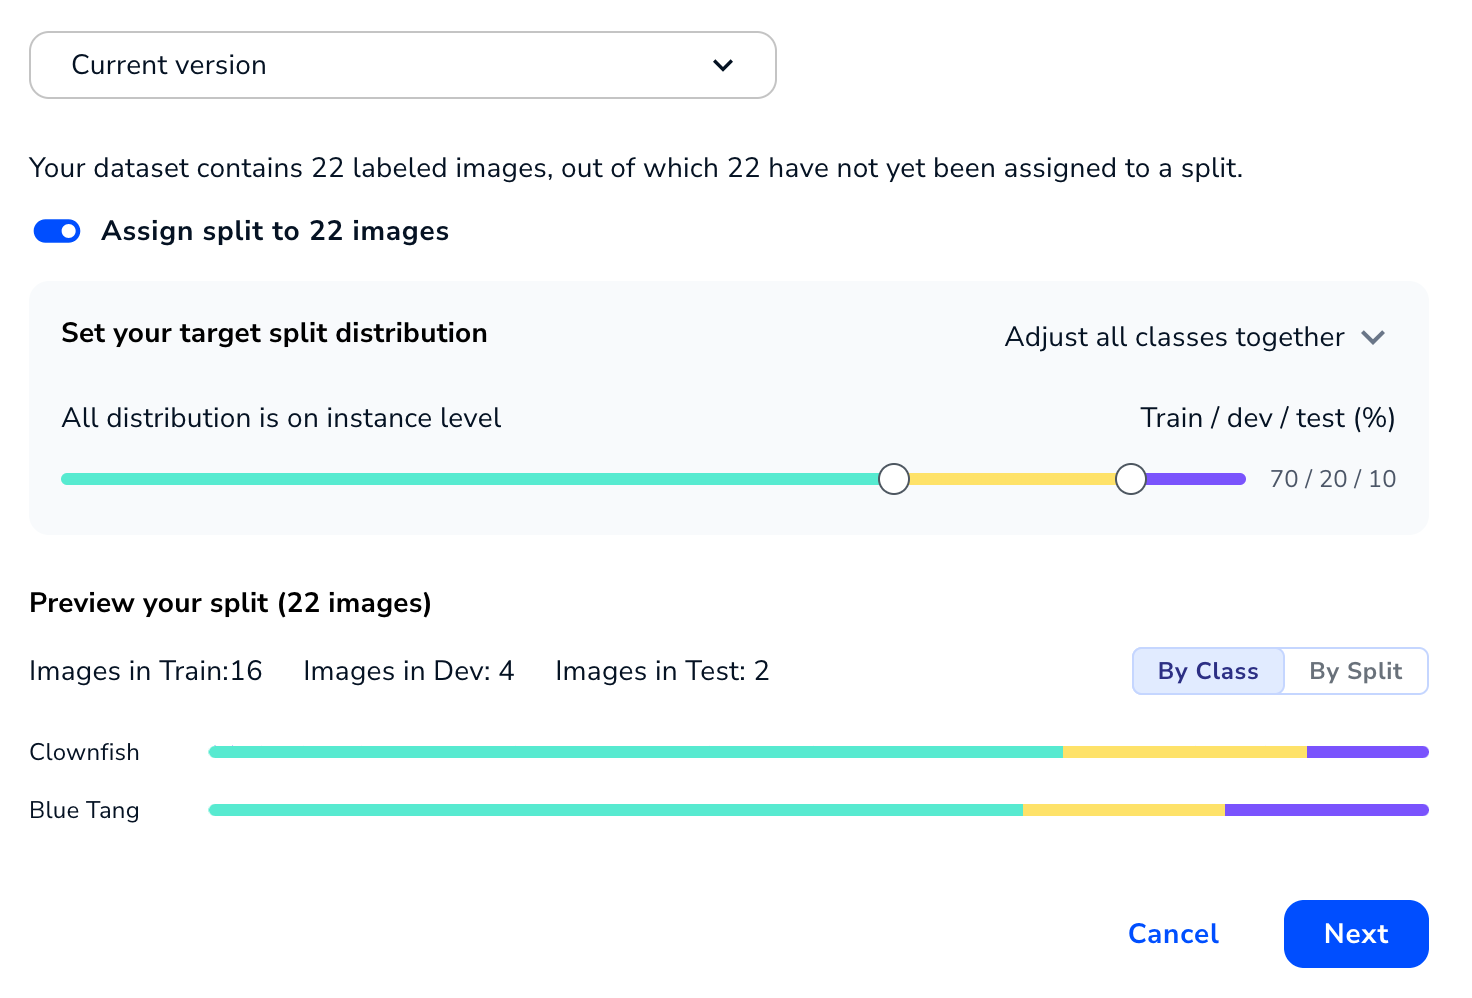
If you selected the current version of the dataset, you can assign splits to labeled images that don't have splits assigned to them yet. If some labeled images in the dataset already have splits, you can only assign splits to the remaining images that don't have splits.
By default, the Assign Split setting is toggled on. This setting automatically assigns labeled images in each class into splits based on these percentages:
- Train: 70%
- Dev: 20%
- Test: 10%
In situations in which the resulting number of images isn't a whole number, the algorithm rounds up or down to the nearest whole number of images. For example, if Class A has 11 images, 70% of that is 7.70 images. Multiple splits can't be applied to an image, so the algorithm would add 8 images to the Train split.
The Preview section shows how the images are assigned. You can view the splits By Class or By Split.
 Assign Splits
If You Selected a Snapshot or Images Already Have Splits
If you selected a snapshot or you selected the current version of the dataset and images in that dataset already have splits applied to them, LandingLens uses the assigned splits. Split assignment is part of a dataset snapshot, and data in a snapshot can't be changed.
In these situations, you can preview your splits (if you're using the current version of the dataset, you can return to the Build page and change split assignment there). You can view the splits By Class or By Split.
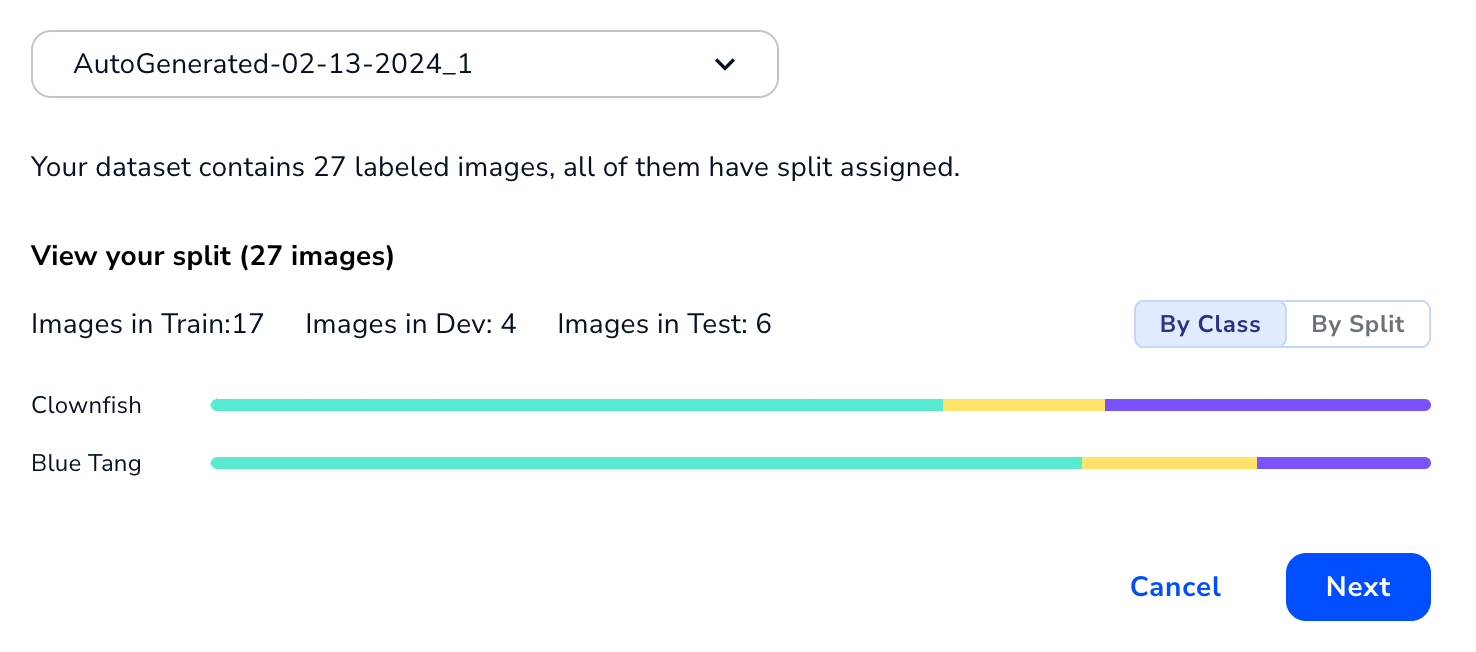 Review Splits
Hyperparameters
A hyperparameter is a setting used to control the speed and quality of the learning process. Hyperparameters include these settings:
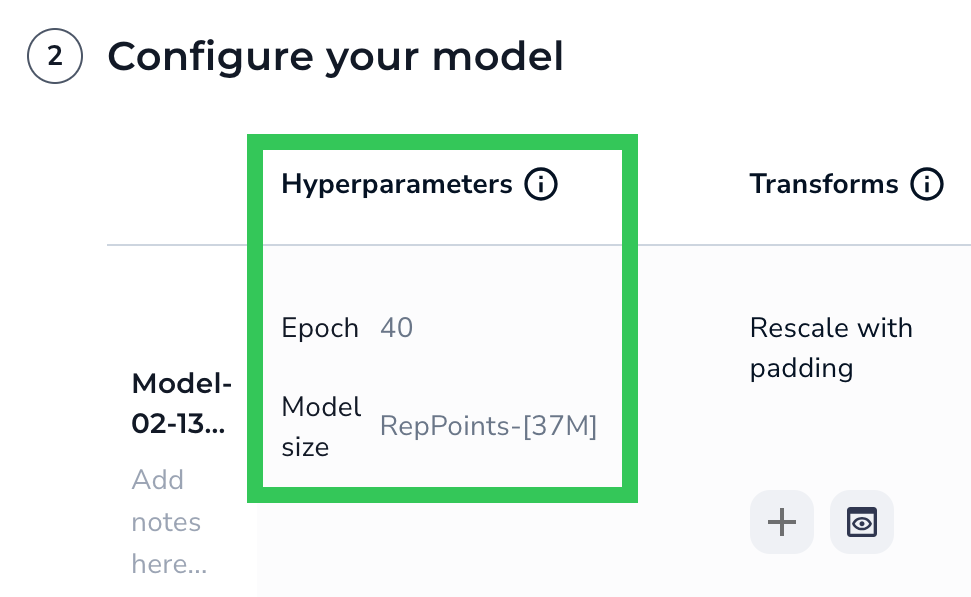 Hyperparameters
Epoch
When your model trains, it works through your dataset multiple times. The completion of one cycle is called an epoch. Enter the number of cycles you want the model to perform in the Epoch field.
Model Size
The Model Size refers to the architecture and number of parameters used to train the model. The options depend on your project type, but each has a trade-off between speed and performance.
Object Detection
- RtmDet-[9M]: This option leads to the fastest training and inference times. Uses the RTMDet architecture and 9 million parameters.
- RepPoints-[20M]: Train and run inferences faster than with RepPoints-[37M]. Uses the RepPoints architecture and 20 million parameters.
- RepPoints-[37M]: Capture more complex patterns in the training data. Training and running inferences will take longer. Uses the RepPoints architecture and 37 million parameters.
- ODEmbedded-[23M]: Only use this architecture when deploying to embedded devices. For detailed information, go to Embed-Optimized Models.
Segmentation
- FastViT-[14M]: Train and run inferences faster. Uses the FastViT transformer architecture and 14 million parameters.
- SegFormer-[14M]: Capture more complex patterns in the training data. Training and running inferences will take longer. Uses the SegFormer semantic segmentation framework and 14 million parameters.
Classification
- ConvNeXt-[16M]: Train and run inferences faster. Uses the ConvNeXt architecture and 16 million parameters.
- ConvNeXt-[29M]: Capture more complex patterns in the training data. Training and running inferences will take longer. Uses the ConvNeXt architecture and 29 million parameters.
- ConvNextEmbedded-[16M]: Only use this architecture when deploying to embedded devices. For detailed information, go to Embed-Optimized Models.
Transforms
A transform setting allows you to rescale, resize, and crop all the images in your dataset before model training starts. This is an important feature because all training images need to be a standard input size for your model. When processing images, LandingLens applies changes in the following order: rescale/resize, crop, augmentations.
Any transforms applied here are also applied to images you run inference on.
Make sure that the objects or regions you are trying to detect are clearly visible after applying these transforms. For example, if you crop images, make sure that the objects of interest are not cropped out.
You must apply either a Resize or a Rescale with Padding, but not both.
Rescale Images (Maintain the Aspect Ratio)
The Rescale with Padding setting scales the images to the Height and Width you enter, while maintaining the original aspect ratio. If the dimensions entered don't match the aspect ratio, LandingLens adds padding—rows or columns of pixels—to either the top and bottom or sides to maintain the aspect ratio.
If you enter dimensions that maintain the original aspect ratio, LandingLens doesn't add any padding.
For example, let’s say the original size of an image is 1200x800, which is a 4:3 aspect ratio. You then rescale it to 512x512, which is a 1:1 aspect ratio. To maintain the 4:3 aspect ratio, LandingLens scales down the actual image to 512x341, and then adds padding to the top and bottom.
By default, the color of the padding is black. You can change it to be black, white, or a shade of gray. To do this, enter the grayscale value for the color of the padding in the Padding Value field. The range is 0 (black) to 255 (white).
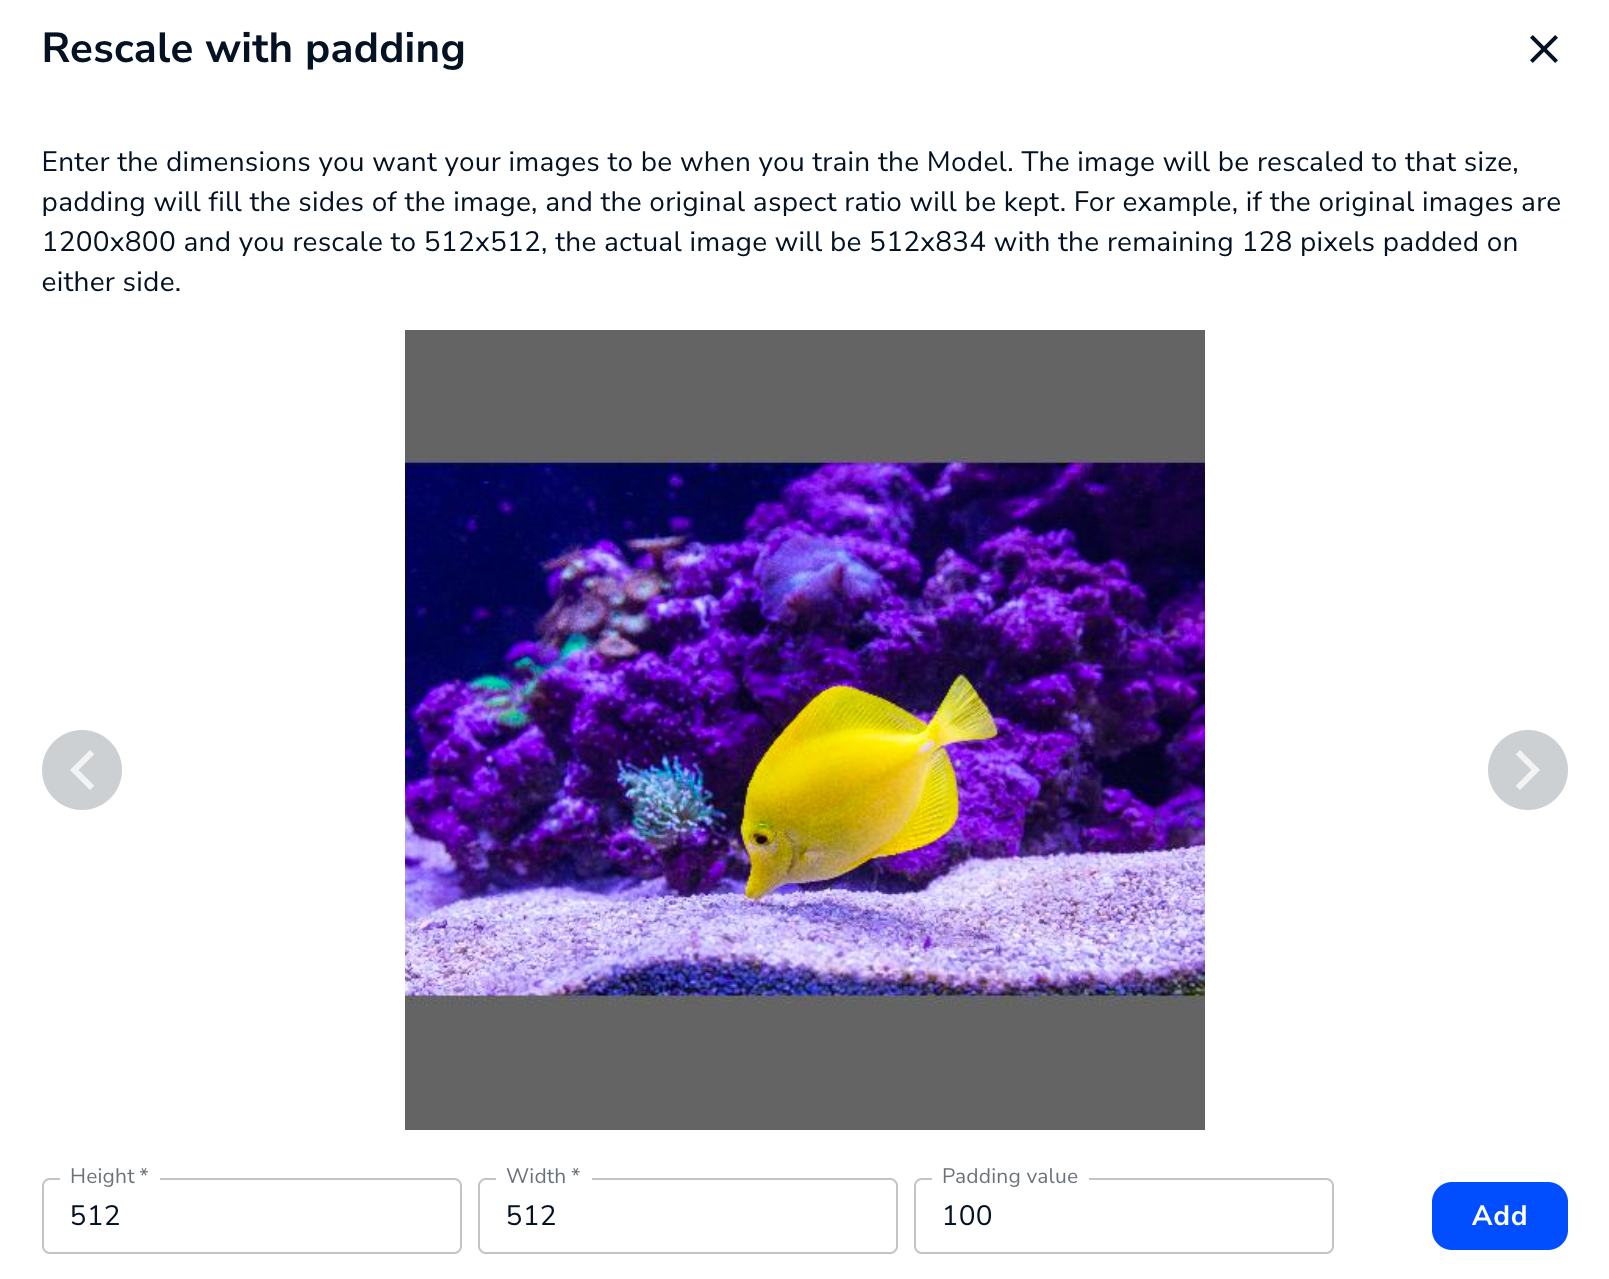 Enter the Dimensions and Padding Color
Resize Images
The Manual Resize setting resizes your images to the Height and Width you enter, and does not maintain the original aspect ratio. For example, if the entered dimensions don't match the original aspect ratio, the image will be squeezed or stretched.
For example, the screenshot below shows an image that was originally 1200x800 (a 4:3 aspect ratio) that was resized to 512x512 (a 1:1 aspect ratio). The image is stretched vertically to "fill in" the extra space at the top and bottom.
 Enter the Dimensions
Note:
If you want to preserve the original aspect ratio, rescale your images instead.
Maximum Size for Rescaling and Resizing
There is a maximum size for rescaling and resizing images. The specific size depends on the project type. The maximum is based on the total area, not a specific height or width. Example dimensions are provided in the following table as guidelines.
| Project Type | Maximum Area | Example Maximum Dimensions |
|---|---|---|
| Object Detection | 2,250,000px | 1500x1500px |
| Classification | 2,250,000px | 1500x1500px |
| Segmentation | 1,048,576px | 1024x1024px |
For example, let's say you want to resize images in an Object Detection project:
- A resize of 1000x600px will work because the area is 600,000px, which is smaller than 2,250,000px.
- A resize of 1500x1501px will not work because the area is 2,251,500px, which is bigger than 2,250,000px.
Notes:
- Images in some projects can be larger, but there are trade-offs. For more information, go to Resize: Large Image Support.
- If you rescale an image, the padding is included in the calculation of the image area.
Large Image Support
You can resize your images in Object Detection and Segmentation projects to be up to 36MP.
If you resize images to be larger than the following total area, the images are considered to be "large images":
- Object Detection: Over 2,250,000px (for example, anything larger than 1500x1500px)
- Segmentation: Over 1,048,576px (for example, anything larger than 1024x1024px)
Using "large images" in a computer vision model has these tradeoffs:
- These models can only be deploying using LandingEdge and Docker. Cloud Deployment doesn't support models that were created with large images.
- The Try Model tool isn't compatible with these models.
Crop Images
The Crop setting allows you to apply the same crop to all images. If you add a Crop, you must either rescale or resize the image first. This prevents the crop from falling outside the boundaries of images.
There are a few ways to select the locations and dimensions of the cropped area:
- Enter the points of each corner of the cropped area in the X min, Y min, X max, and Y max fields.
- Click and drag the handles of the crop box.
- Click inside the crop box and drag it.
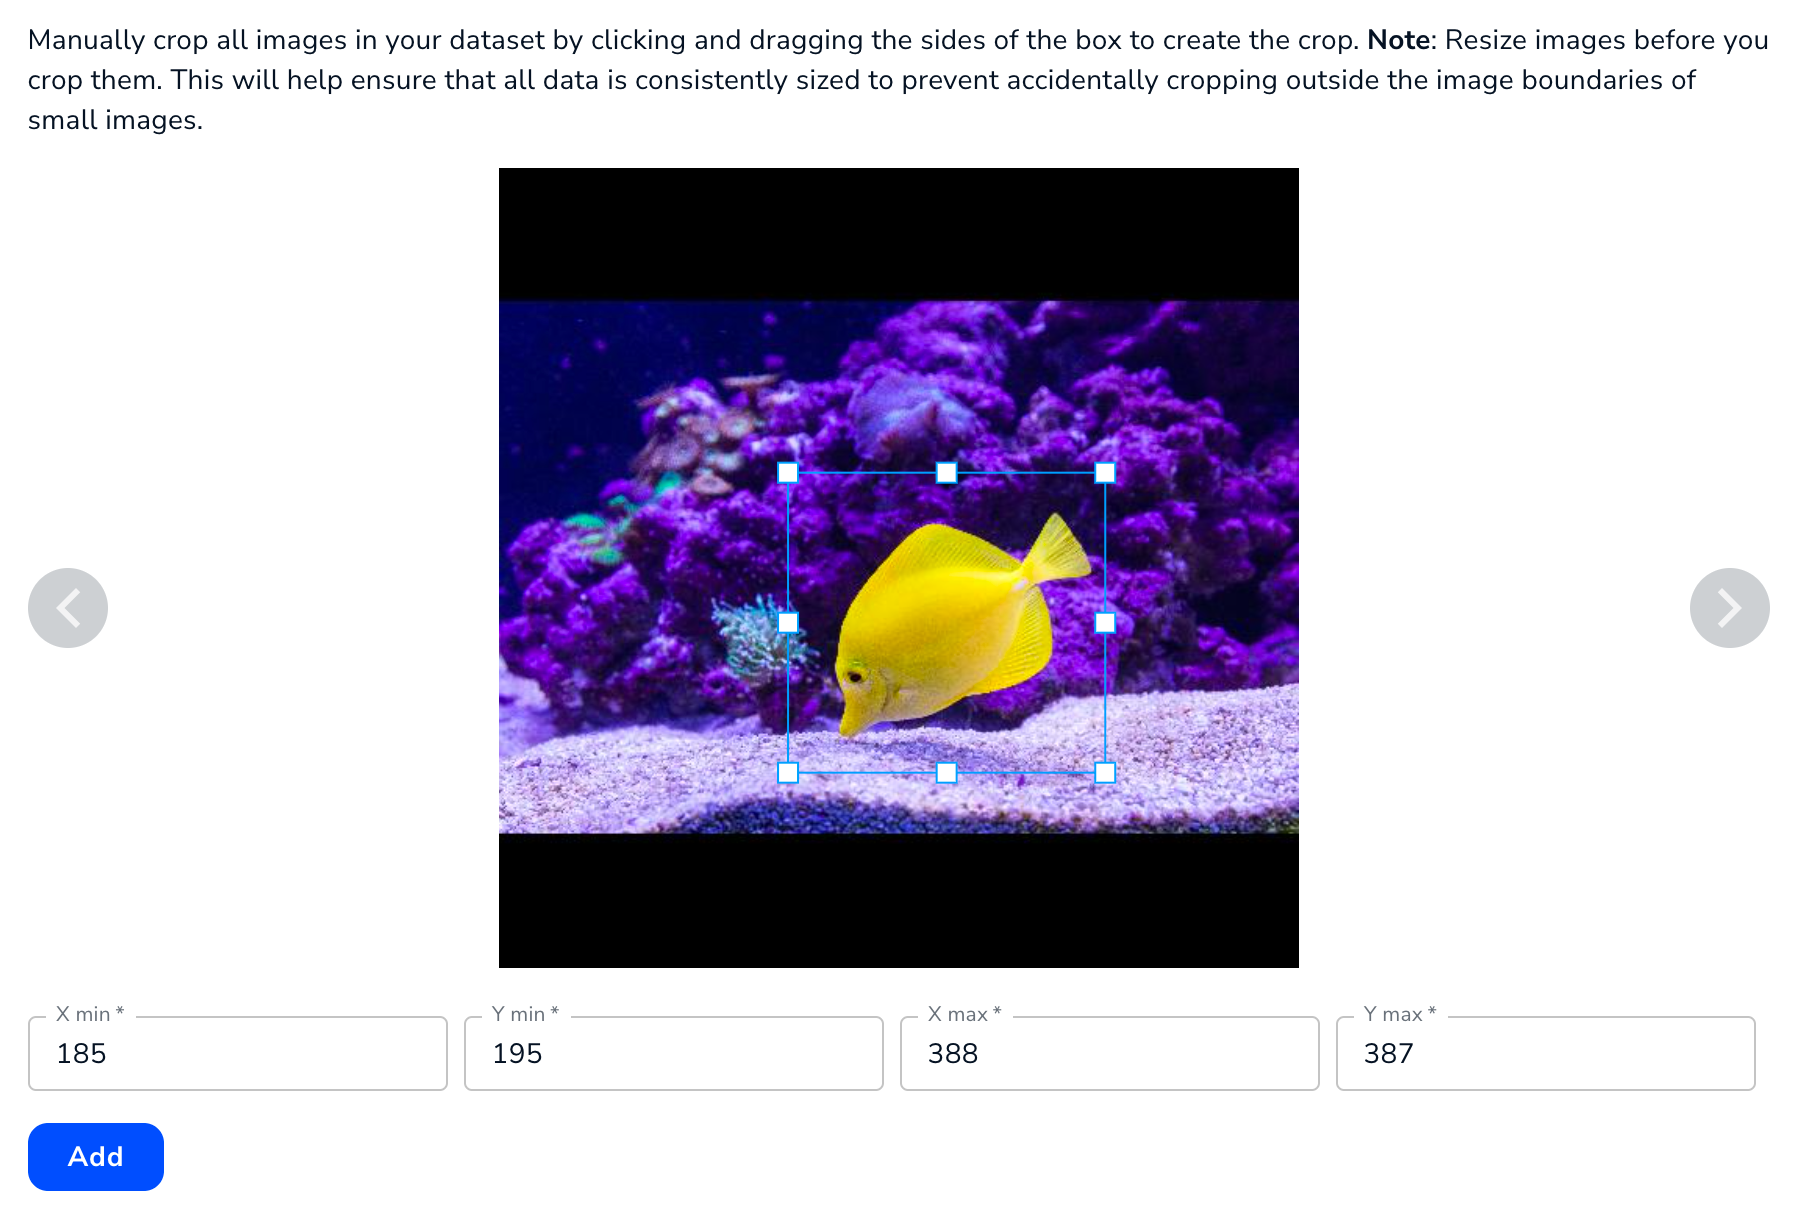 Enter the Dimensions or Move the Crop Box
Augmentations
The Augmentation settings apply changes to your images—like increasing brightness and adding blurs—before the model trains on the images. This increases the variations of your images, which allows the model to "prepare" for more situations, like changes in lighting. Augmentations are applied after resizes/rescales and crops.
When you set up an augmentation you choose the probability that the augmentation will be applied during training. The augmentations are applied at each epoch, which prevents overfitting. For example, if you add the Random Brightness augmentation with a probability of 50%, then half of the images might be brightened during the first epoch, another half during the second epoch, and so on.
By setting up automated augmentations in LandingLens, you get the benefits of a greater variety of images without having to take those images or edit them.
LandingLens offers these augmentations for Custom Training:
- Random Brightness
- Blur, Motion Blur, Gaussian Blur
- Hue Saturation Value
- Random Contrast
- Horizontal Flip
- Vertical Flip
- Random Augment
- Random Rotate
Random Brightness
Apply Random Brightness for a chance that the images in your dataset will randomly brighten.
The Random Brightness setting is helpful if the lighting conditions might change. For example, if you take images at night, the objects you want to detect might be dark. If it's possible that sometimes you will run inference on images taken during the day, then the Random Brightness setting can show your model what the images might look like during the day.
If the lighting conditions will be consistent, then the Random Brightness setting might not be relevant. For example, if you're taking images in a cleanroom with no windows, you might not need Random Brightness.
The image and table below describe the settings for Random Brightness.
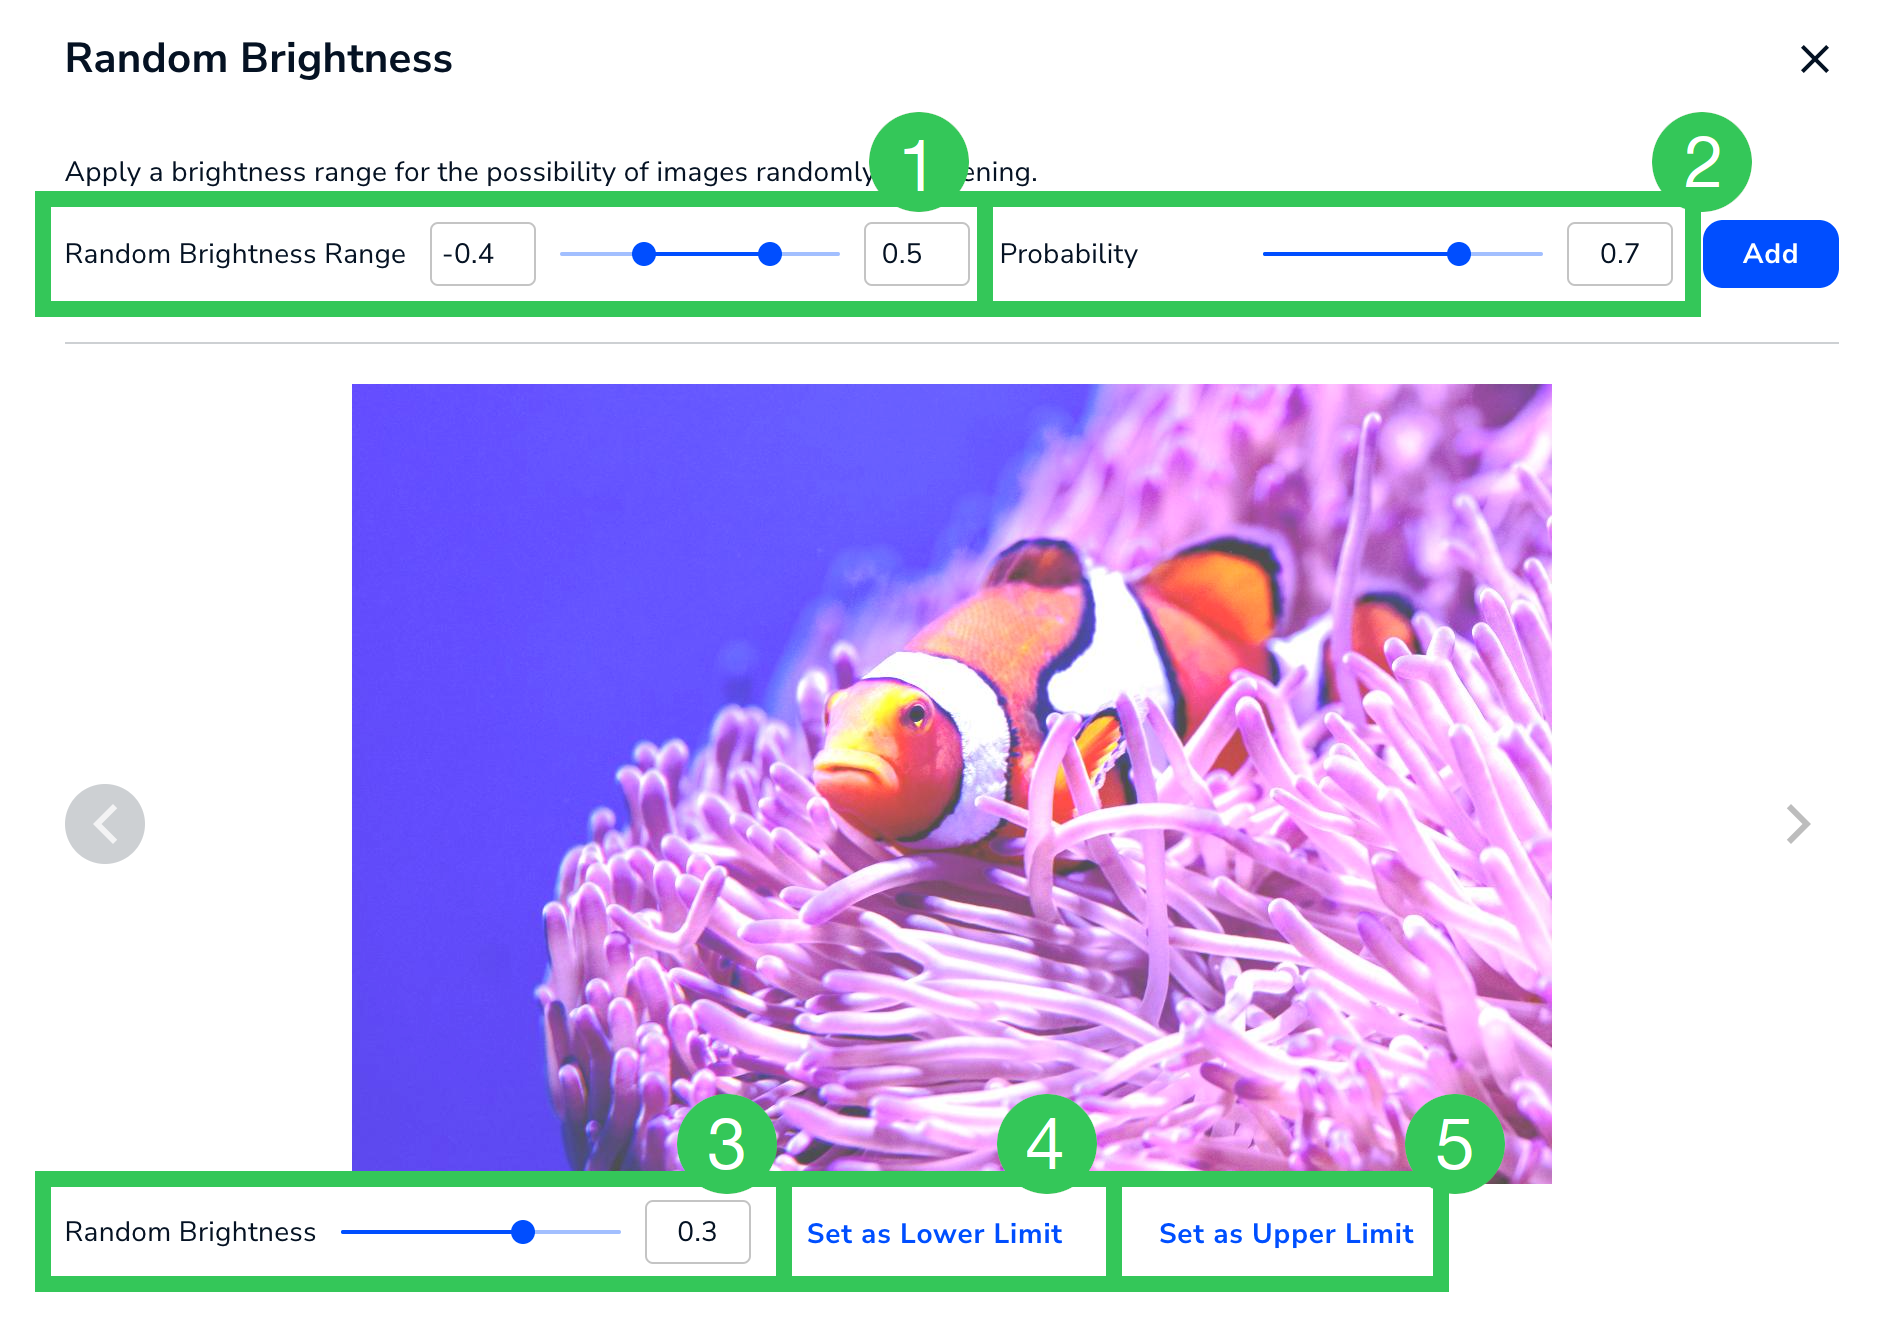 Random Brightness Settings
 | # | Setting | Description |
|---|---|---|
| 1 | Random Brightness Range | The range of brightness values that can be applied to an image. The range is -1 to 1. |
| 2 | Probability | The likelihood that brightness will be applied to an image. The range is 0 to 1. |
| 3 | Random Brightness | Preview how images will look in the selected value. |
| 4 | Set as Lower Limit | Set the lower limit of the range (#1) to the value selected in Random Brightness (#3). |
| 5 | Set as Upper Limit | Set the upper limit of the range (#1) to the value selected in Random Brightness (#3). |
Blur, Motion Blur, Gaussian Blur
Apply one of the blur modifications for a chance that the images in your dataset will randomly blur. LandingLens offers these types of blurs:
- Blur: Makes the entire image look out of focus. This is a heavy blur.
 Example: Blur
 - Motion Blur: Makes the entire image look like it's in motion.
 Example: Motion Blur
 - Gaussian Blur: Makes the entire image look out of focus. This is a natural blur.
 Example: Gaussian Blur


The image and table below describe the settings for Blur, Motion Blur, and Gaussian Blur.
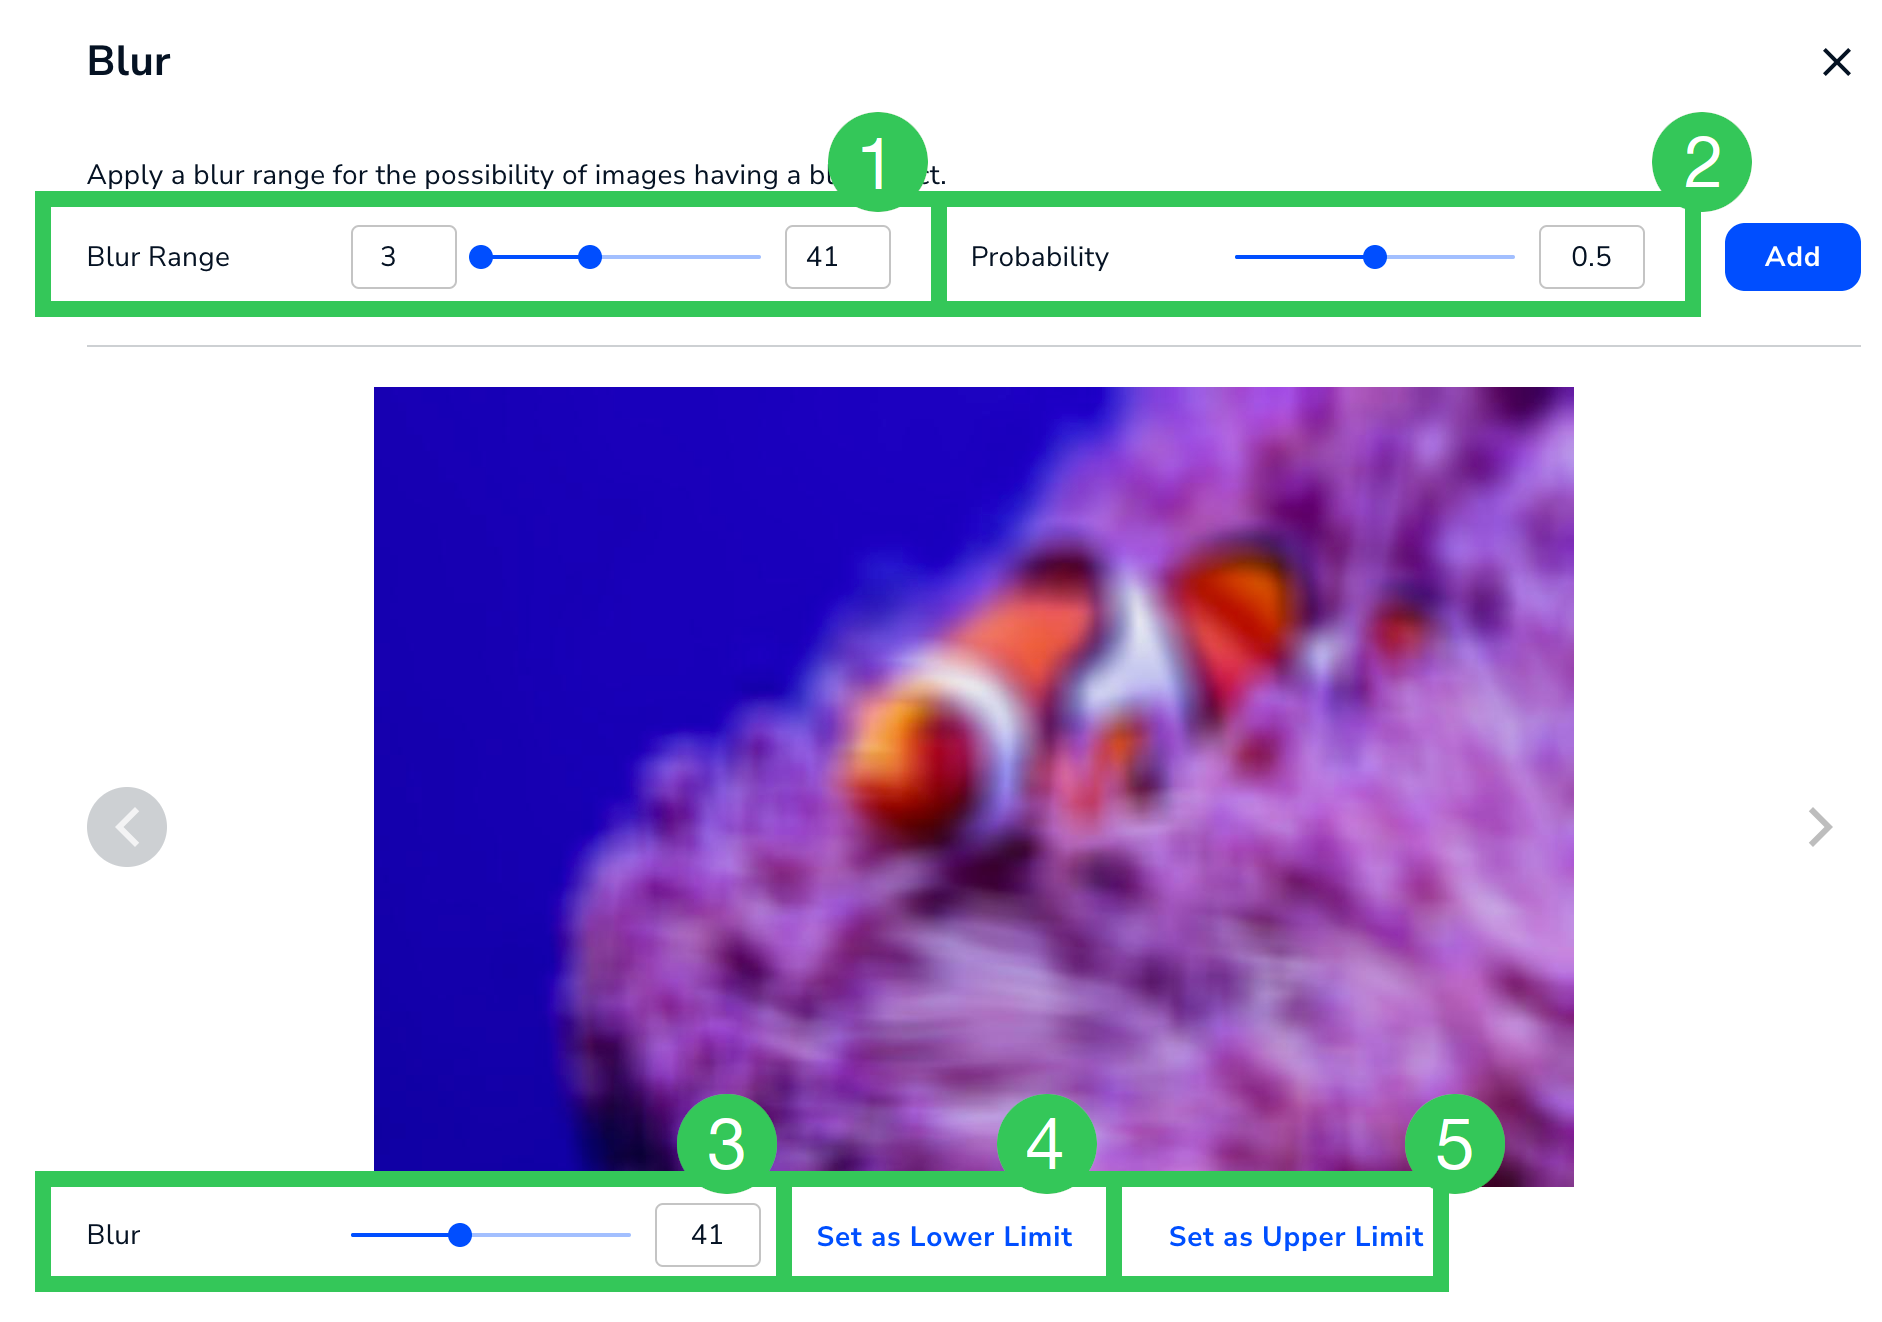 Blur Settings (Applicable to Blur, Motion Blur, and Gaussian Blur)
| # | Setting | Description |
|---|---|---|
| 1 | Blur Range Motion Blur Range Gaussian Blur Range | The range of blur values that can be applied to an image. The range is 3 to 100. |
| 2 | Probability | The likelihood that blur will be applied to an image. The range is 0 to 1. |
| 3 | Blur Motion Blur Gaussian Blur | Preview how images will look in the selected value. |
| 4 | Set as Lower Limit | Set the lower limit of the range (#1) to the value selected in Blur / Motion Blur / Gaussian Blur (#3). |
| 5 | Set as Upper Limit | Set the upper limit of the range (#1) to the value selected in Blur / Motion Blur / Gaussian Blur (#3). |
Hue Saturation Value
Apply Hue Saturation Value for a chance that the color intensity of the images will randomly change. Saturation is how "pure" the hue is. A saturation of 0 is black and white.
For example, some objects can be different colors, like a fish. You may want to change the hue (color of the image), so the model trains on fish with different colors.
The image and table below describe the settings for Hue Saturation Value.
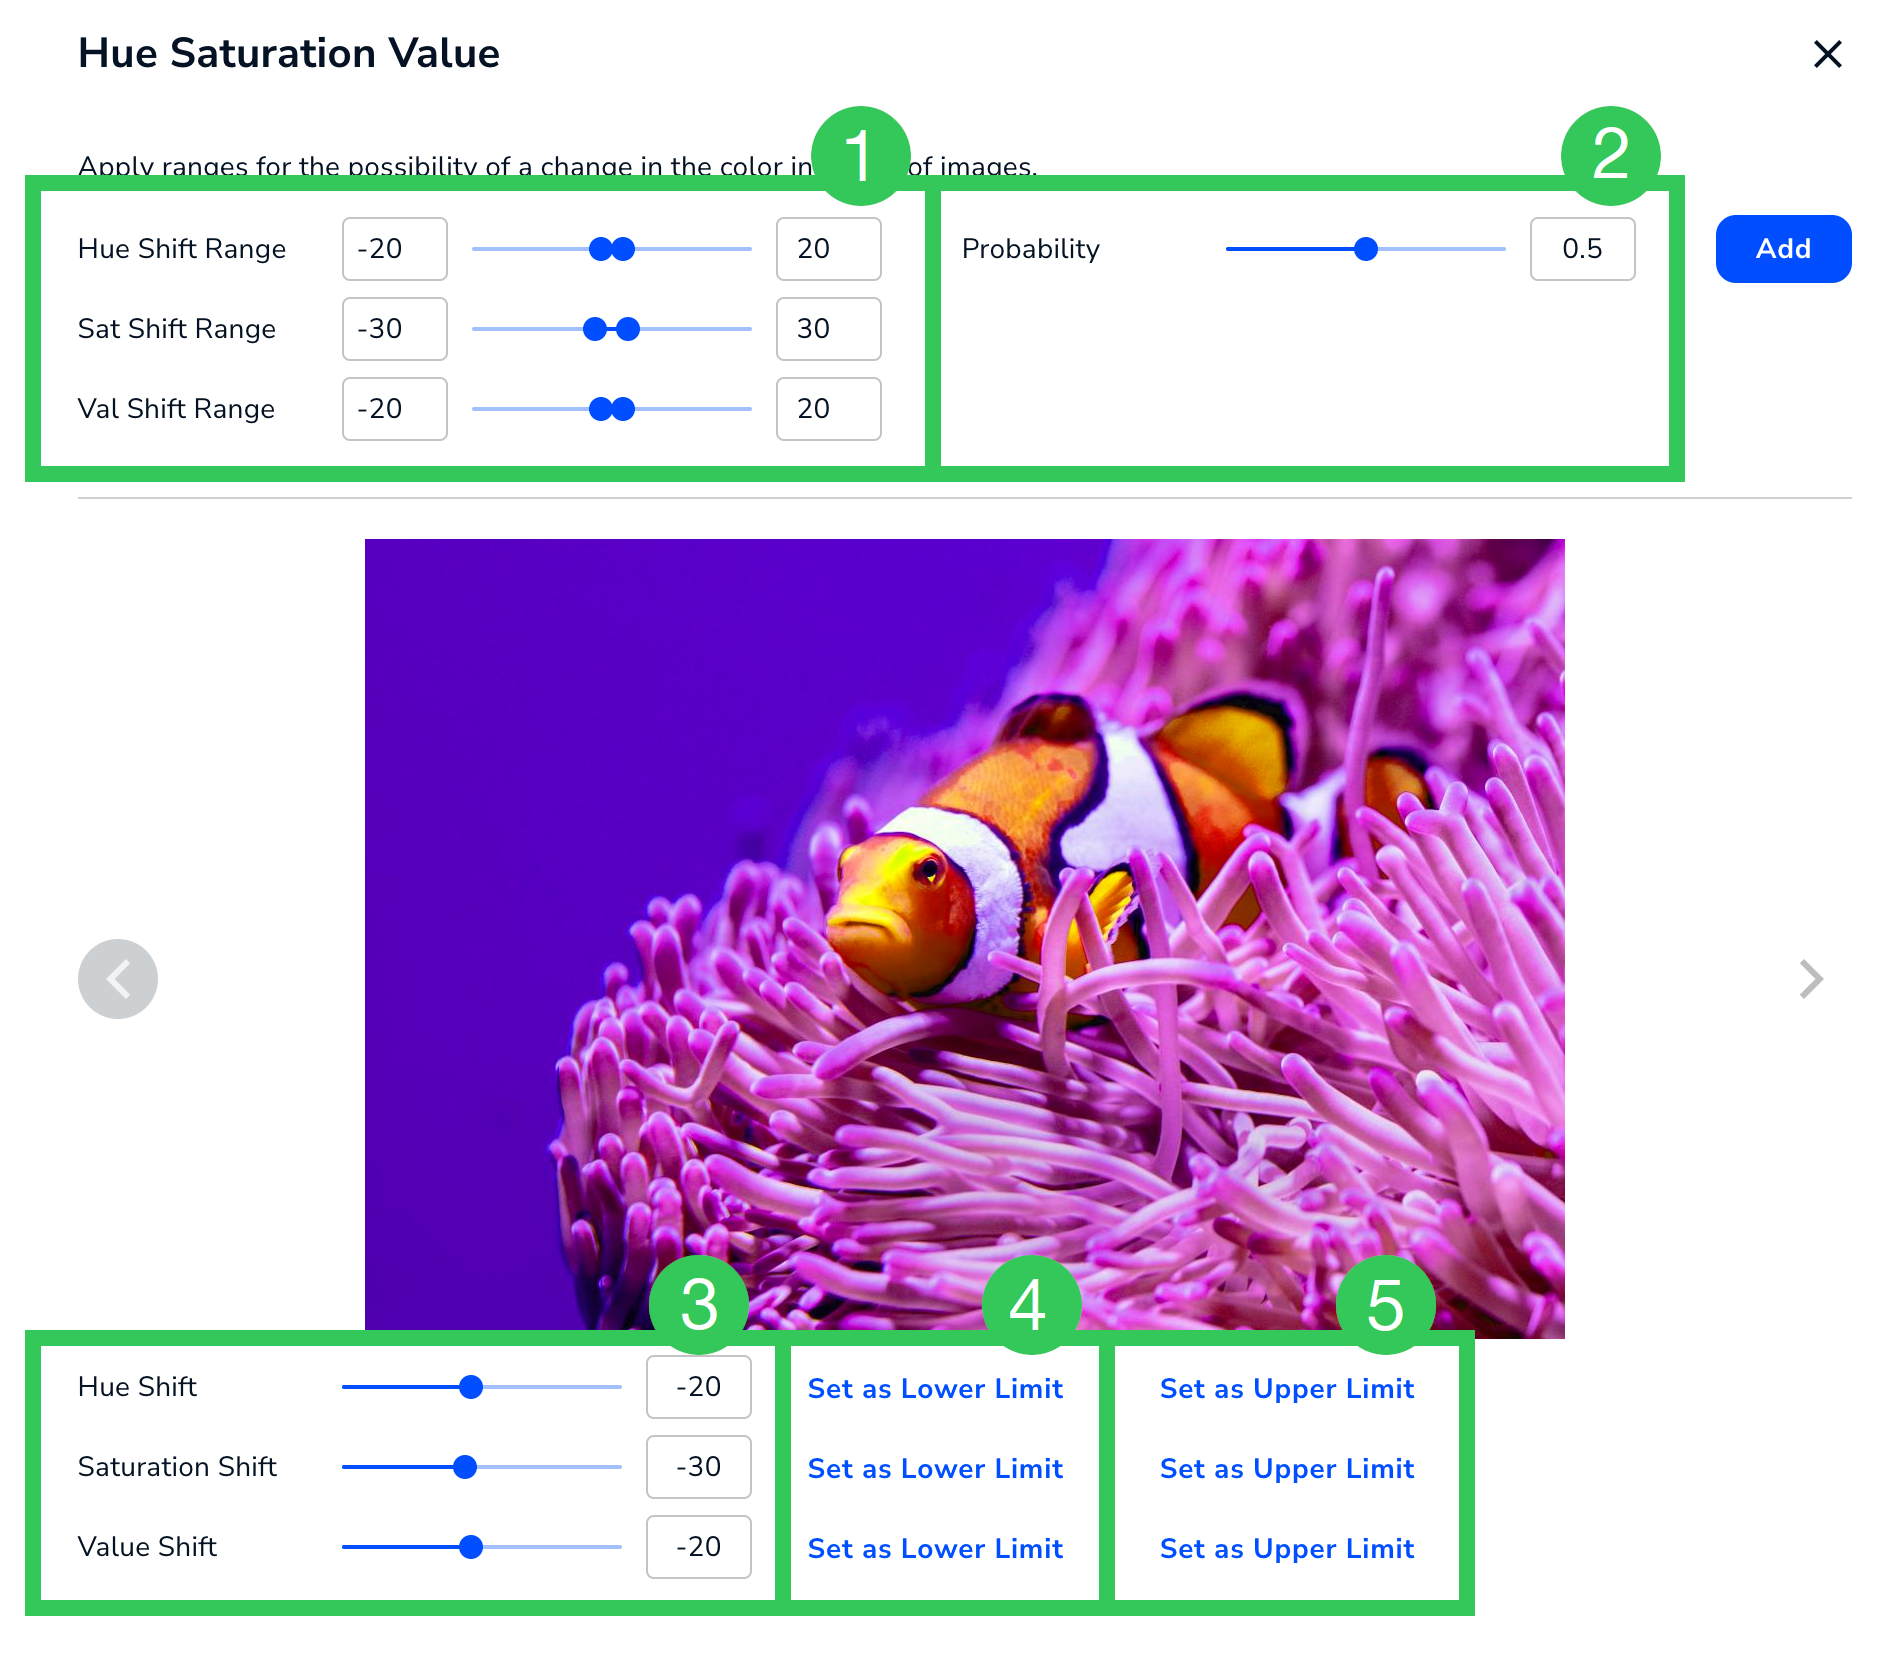 Hue Saturation Value Settings
| # | Setting | Description |
|---|---|---|
| 1 | Hue Shift Range Sat Shift Range Val Shift Range | The range of hue, saturation, and value shift values that can be applied to an image. The range for each is -255 to 255. |
| 2 | Probability | The likelihood that the hue, saturation, and value shift values will be applied to an image. The range is 0 to 1. |
| 3 | Hue Shift Saturation Shift Value Shift | Preview how images will look in the selected values. |
| 4 | Set as Lower Limit | Set the lower limit of the respective range (#1) to the value selected in the slider next to this (#3). |
| 5 | Set as Upper Limit | Set the upper limit of the respective range (#1) to the value selected in the slider next to this (#3). |
Random Contrast
Apply Random Contrast for a chance that the tone of the images will randomly change. Random Contrast helps simulate different camera settings or environments that a model might encounter.
- A low-contrast image looks washed out or slightly dimmed.
- A high-contrast image looks somewhat overexposed, and the colors merge into each other.
The image and table below describe the settings for Random Contrast.
 Random Contrast Settings
| # | Setting | Description |
|---|---|---|
| 1 | Random Contrast Range | The range of contrast values that can be applied to an image. The range is -1 to 1. |
| 2 | Probability | The likelihood that thecontrast values will be applied to an image. The range is 0 to 1. |
| 3 | Random Contrast | Preview how images will look in the selected value. |
| 4 | Set as Lower Limit | Set the lower limit of the range (#1) to the value selected in Random Contrast (#3). |
| 5 | Set as Upper Limit | Set the upper limit of the range (#1) to the value selected in Random Contrast (#3). |
Horizontal Flip
Apply Horizontal Flip for a chance that the image will randomly be mirrored (flipped) horizontally.
The Horizontal Flip augmentation has only one setting: Probability. Probability is the likelihood that the image will randomly be flipped horizontally. The range is 0 to 1.
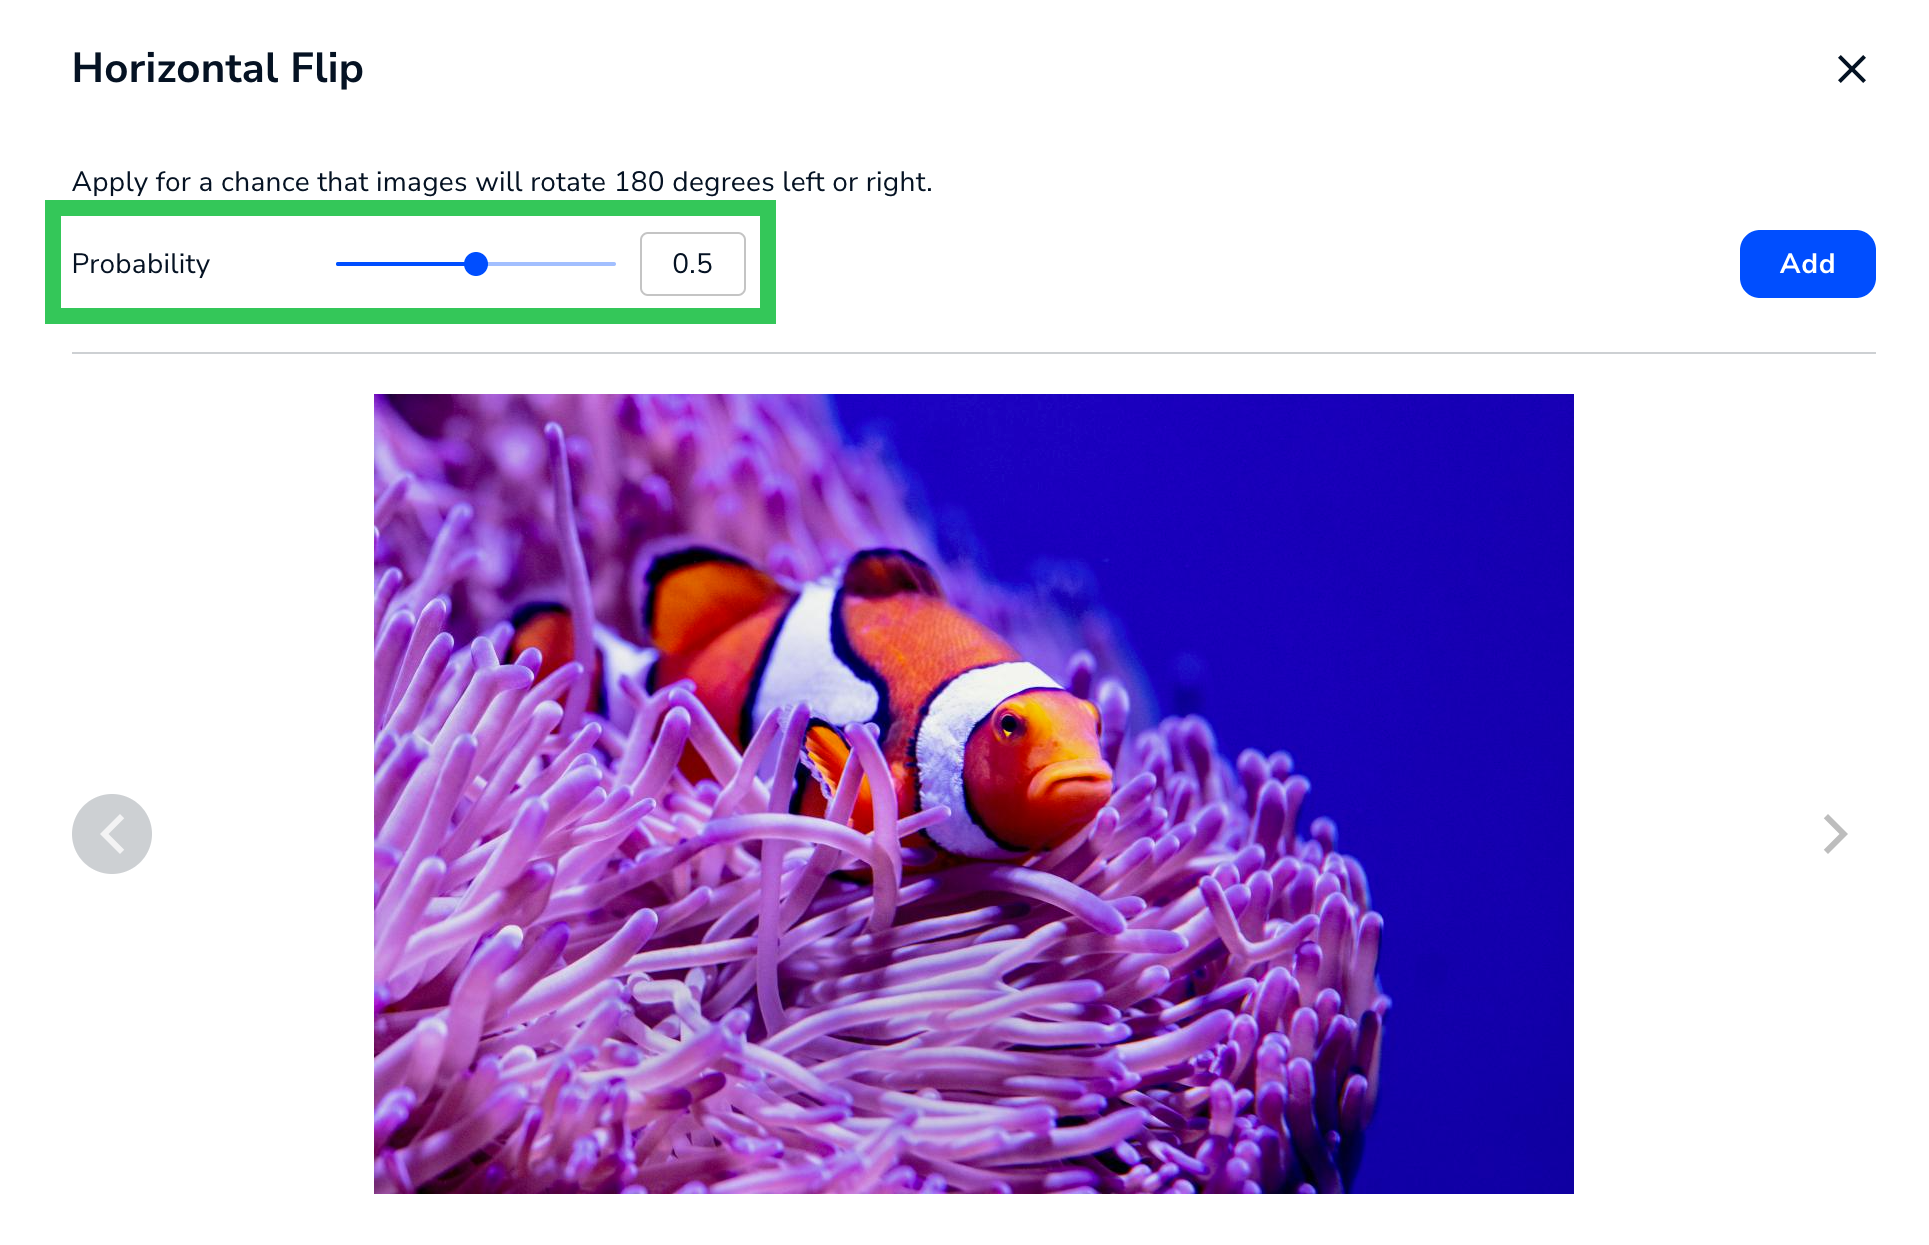 Horizontal Flip
Vertical Flip
Apply Vertical Flip for a chance that the image will randomly be mirrored (flipped) vertically.
The Vertical Flip augmentation has only one setting: Probability. Probability is the likelihood that the image will randomly be flipped vertically. The range is 0 to 1.
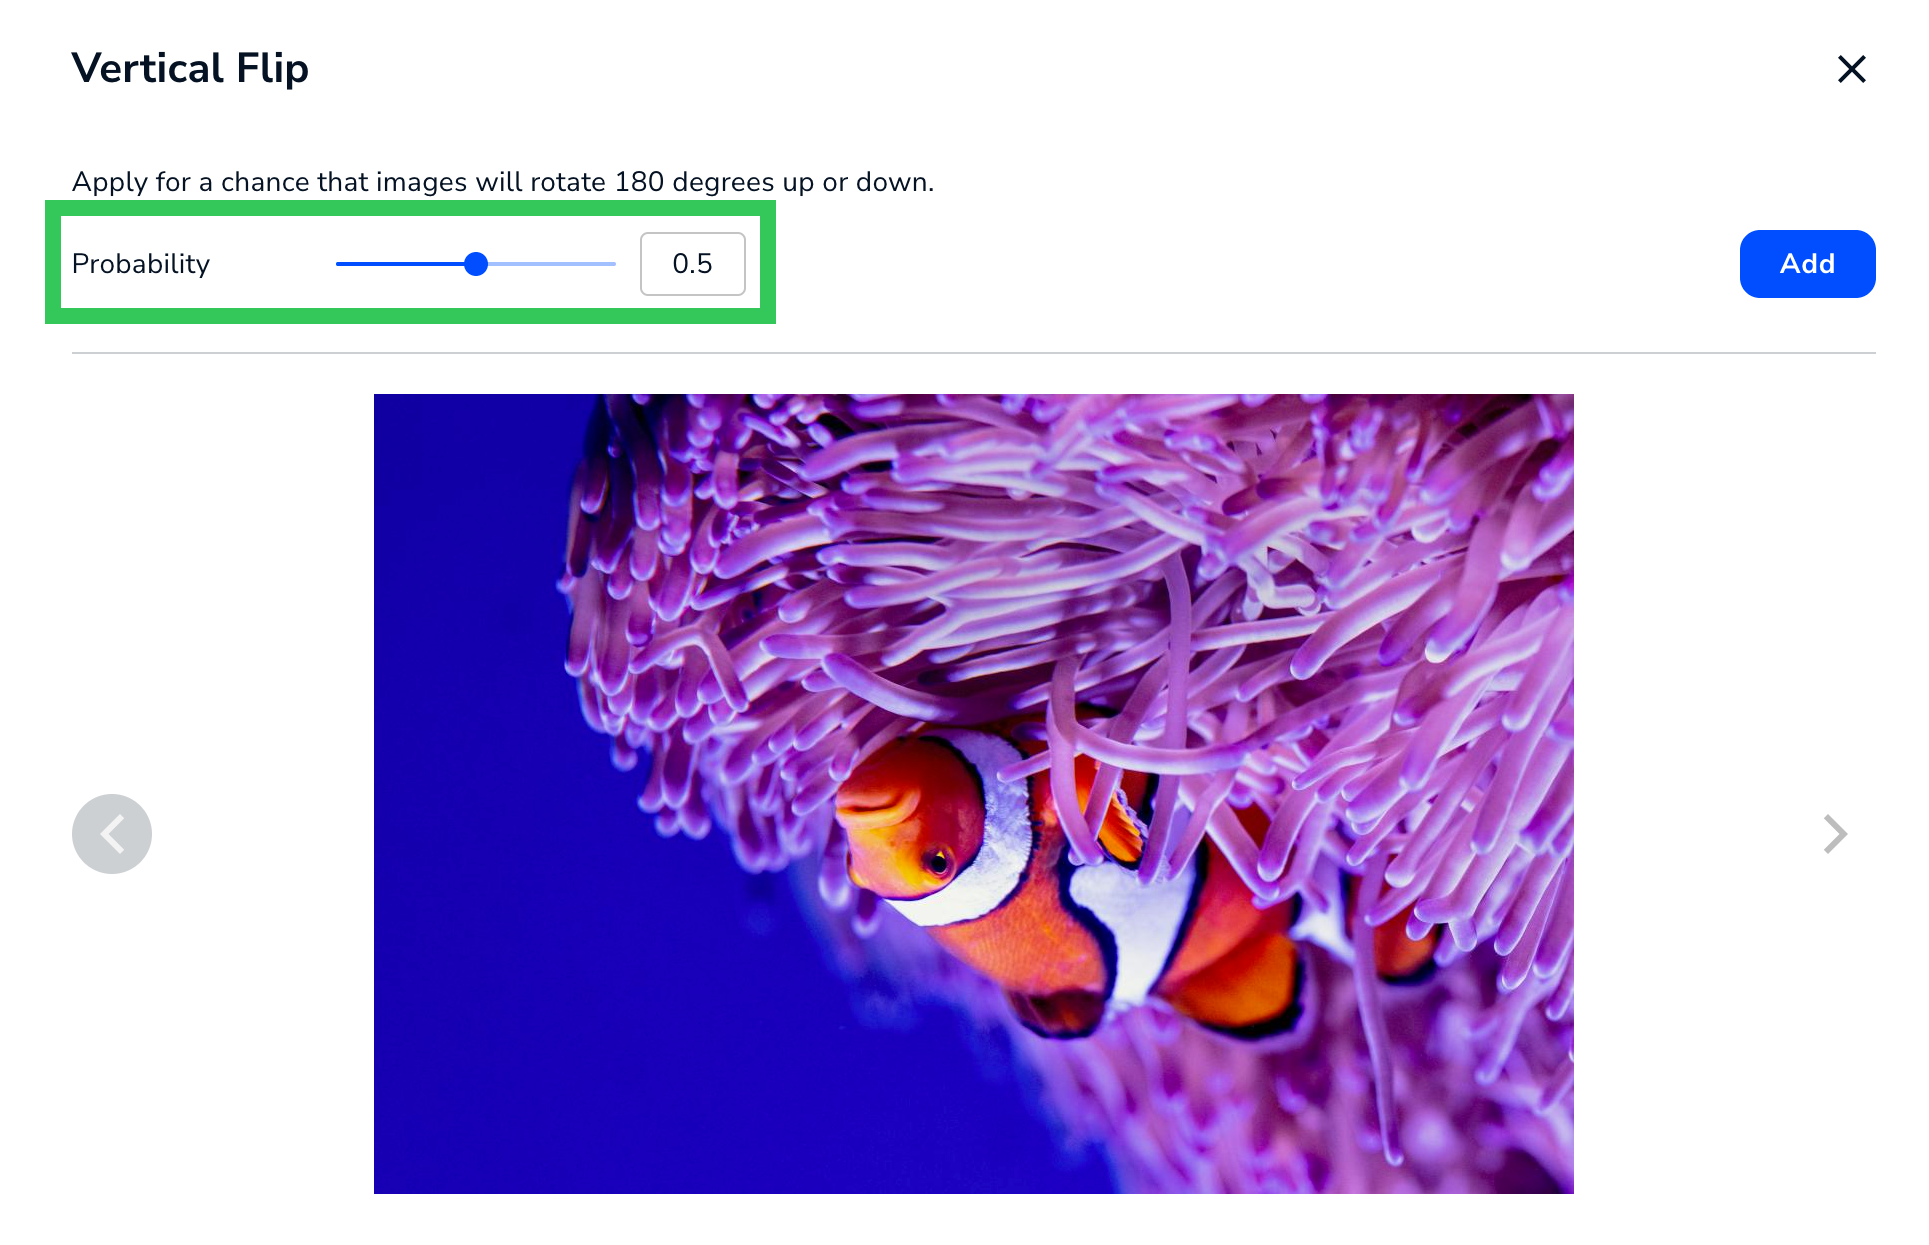 Vertical Flip
Random Augment
Select Random Augment to randomly apply a set of augmentations to your dataset. The table below describes the possible augmentations.
| Augmentation | Description |
|---|---|
| Identity | Applies no changes to the image. By adding some images to the dataset that still look like the original image, the Identity method decreases the chances of the model training only on augmented images, and prevents overfitting. |
| Equalize | Equalizes the image histogram, which increases contrast. This method is also referred to as histogram equalization. |
| Rotate | Rotates the image clockwise or counterclockwise by a random number of degrees. This can change the position of the image within its frame. |
| Posterize | Reduces the number of bits for each color channel. This method is also referred to as posterization. |
| Random Contrast | Increases or decreases the contrast of the image. |
| Random Brightness | Increases or decreases the brightness of the image. |
| ShearX | Shifts the pixels along the X-axis, so that the image looks slanted and stretched horizontally. This can change the position of the image within its frame. This method is also referred to as shear mapping, shear transformation, and shearing. |
| ShearY | Shifts the pixels along the Y-axis, so that the image looks slanted and stretched vertically. This can change the position of the image within its frame. This method is also referred to as shear mapping, shear transformation, and shearing. |
| TranslateX | Moves the pixels horizontally by the same distance. This can change the position of the image within its frame. This method is also referred to as translation. |
| TranslateY | Moves the pixels vertically by the same distance. This can change the position of the image within its frame. This method is also referred to as translation. |
Random Augment Settings
The image and table below describe the settings for Random Augment.
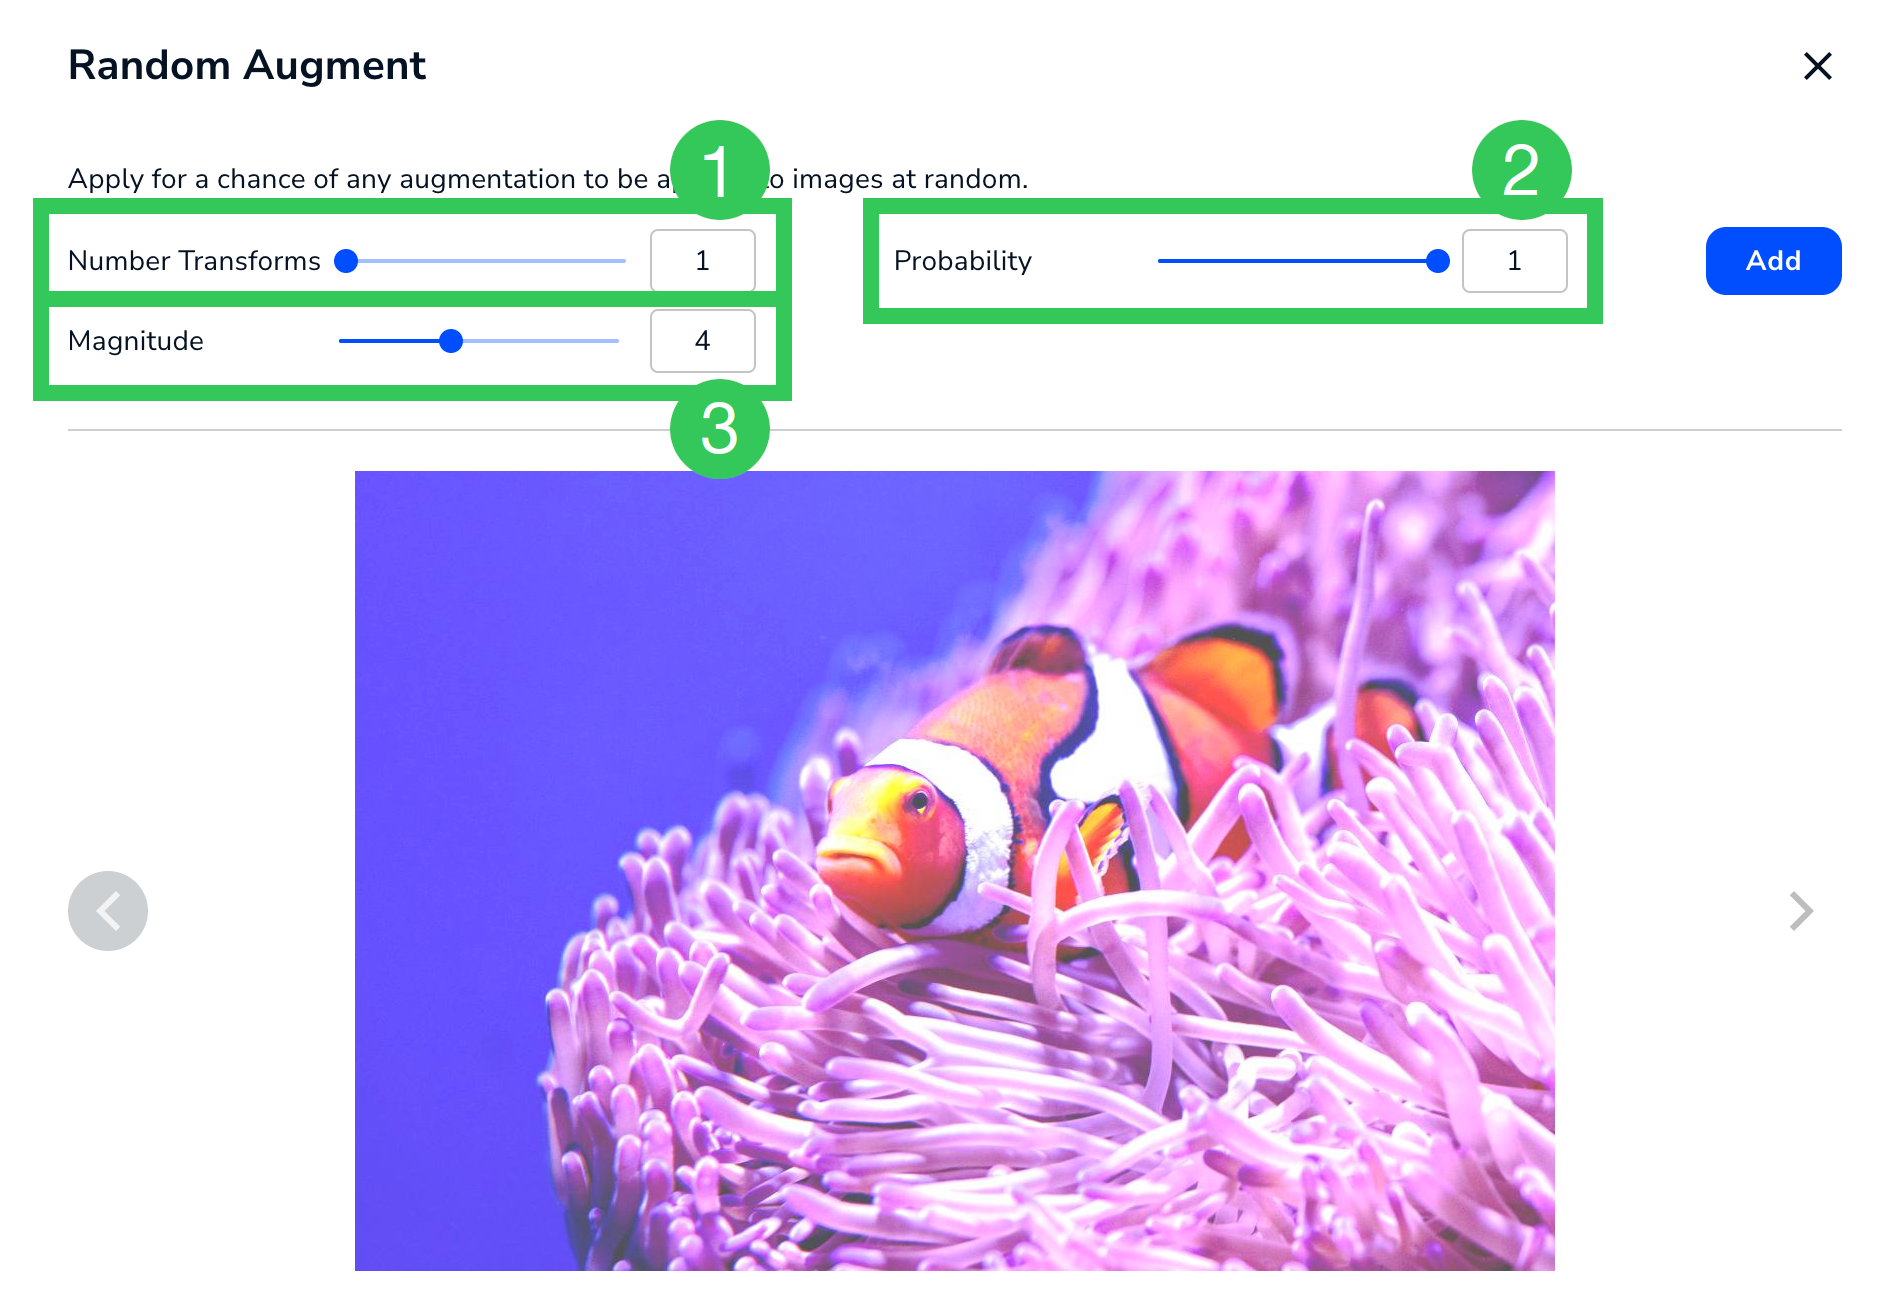 Random Augment
| # | Setting | Description |
|---|---|---|
| 1 | Number Transforms | The number of augmentations you want to be applied to images. LandingLens will randomly apply this number of augmentations to the images. The range is 1 to 10. |
| 2 | Probability | The likelihood that a random augmentation will be applied to an image. The range is 0 to 1. |
| 3 | Magnitude | How strong the applied augmentation will be. The range is 1 (weakest) to 10 (strongest). |
Random Rotate
Apply Random Rotate for a chance that images will randomly rotate.
The image and table below describe the settings for Random Rotate.
 Random Rotate
| # | Setting | Description |
|---|---|---|
| 1 | Random Rotate Range | The range (in degrees) that images can be rotated by. The range is -180° to 180°. |
| 2 | Interpolation | Use this setting to resize images. The options are:
|
| 3 | Border Mode | Use this setting to create a border around the image, like a photo frame. The options are:
|
| 4 | Probability | The likelihood that the image will be rotated. The range is 0 to 1. |
| 5 | Random Rotate | Preview how images will look in the selected value. |
| 6 | Set as Lower Limit | Set the lower limit of the range (#1) to the value selected in Random Rotate (#5). |
| 7 | Set as Upper Limit | Set the upper limit of the range (#1) to the value selected in Random Rotate (#5). |
Preview Transforms and Augmentations
Click the Preview icon in the Transforms and Augmentations columns to see how the effects can impact the images.
 Preview the Effects
Because most Augmentations have a chance of not being applied, or of having a range of intensities, you can click Re-Apply to see more possible variations. For example, the Random Brightness augmentation could have a range of -1 to 1, and a Probability of being applied of 0 to 1. If you multiply the ranges (20 x 11), there are 220 possible outcomes for each image.
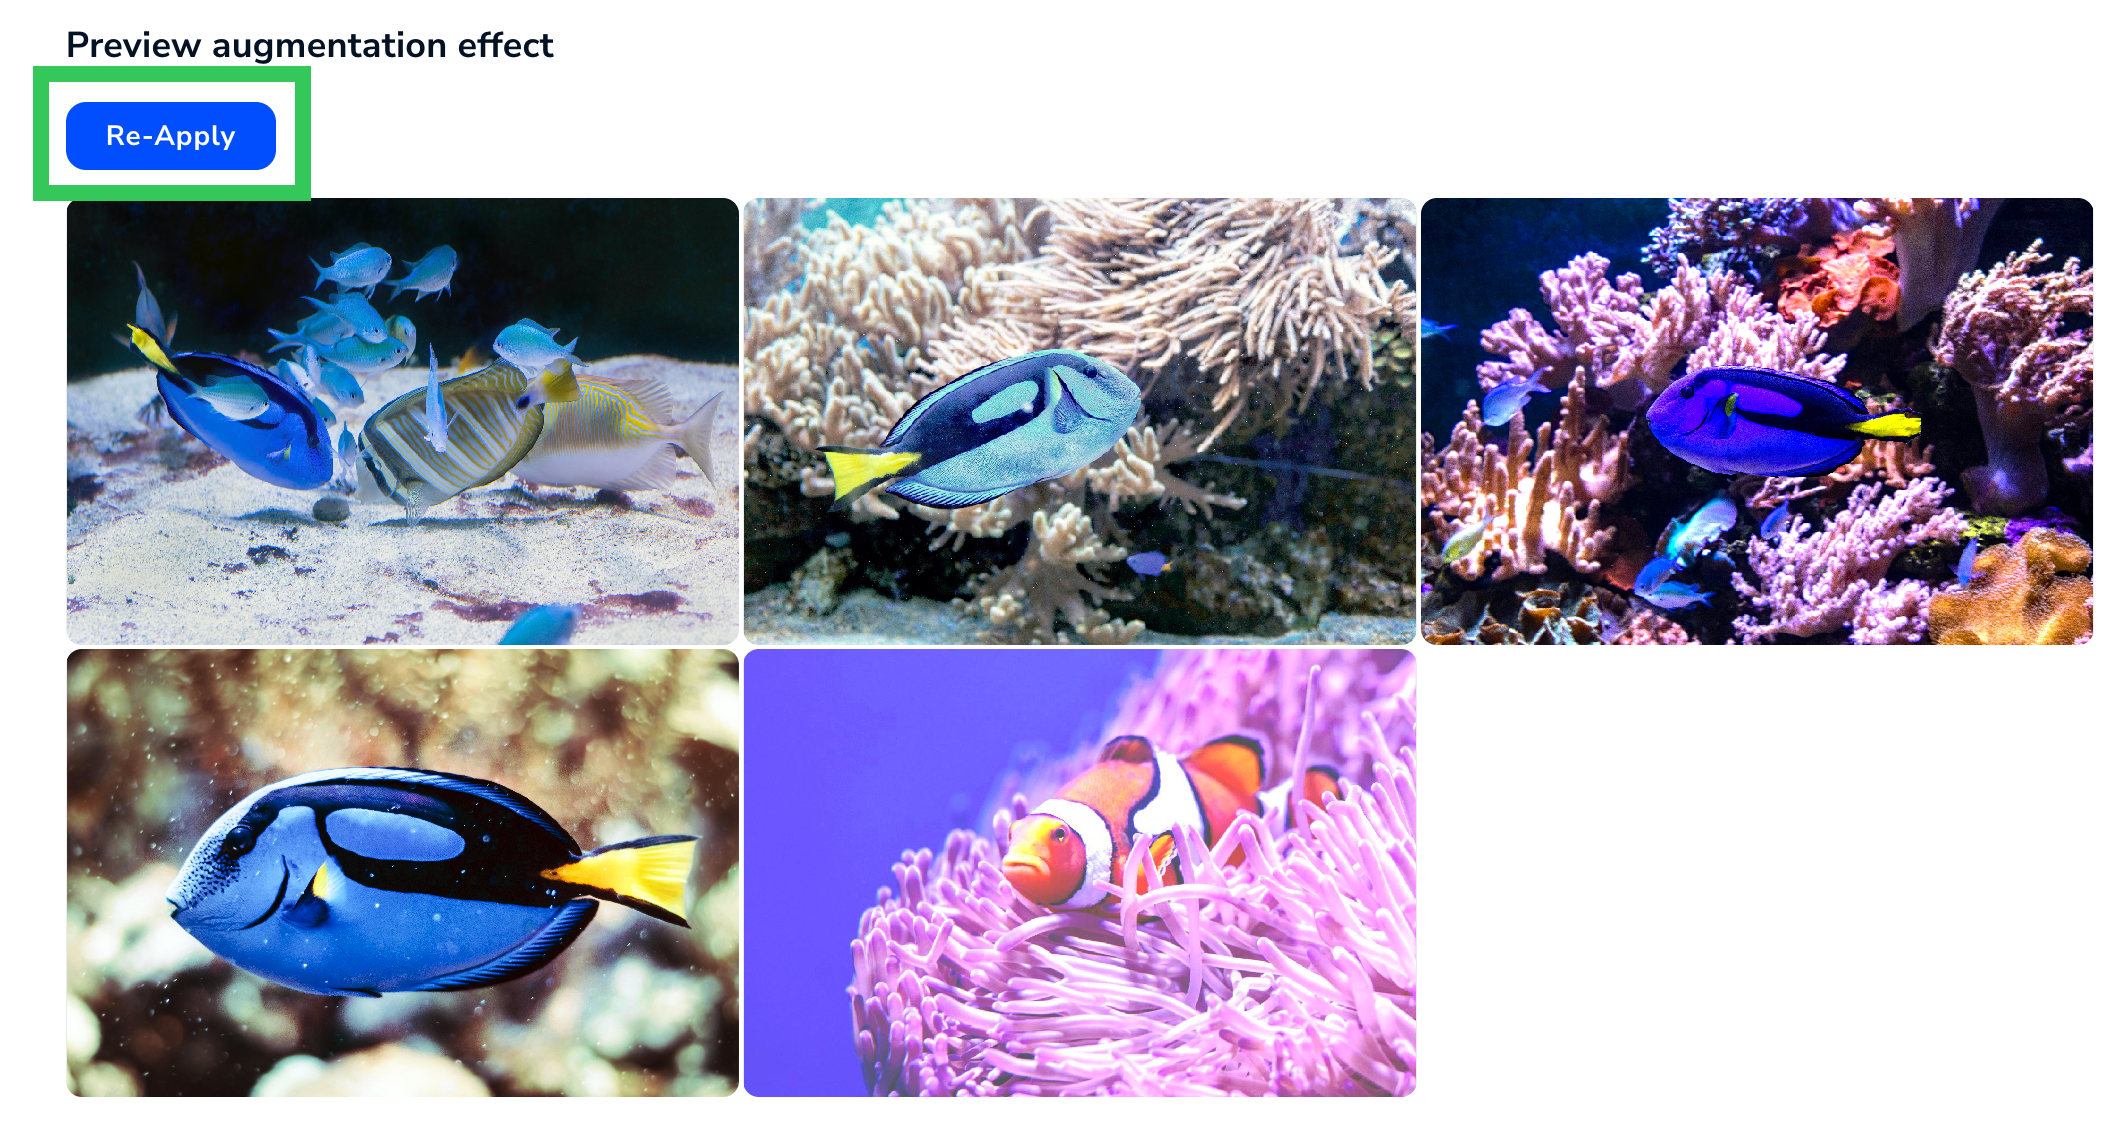 Apply a Different Variation of the Effects
Credit Calculation for Custom Training
Note:
The credit cost is not applicable when using LandingLens on Snowflake.
The credit cost for Custom Training is based on the project type and custom training settings selected. In general, increasing any of the settings (like increasing the epoch) increases the cost to train and run inference.
With Custom Training, the cost to train the model and run inference on that model might be more or less than 1 credit.
After you configure your settings—and before you train the model—LandingLens shows you the exact credit cost it will take to train the model and run inference on it.
.png) Custom Training: Preview the Cost for Training and Running Inference
Custom Training: Preview the Cost for Training and Running InferenceEach Model Can Have a Different Inference Cost
If you run Custom Training multiple times in the same project, each resulting model can have a different cost for running inference. This is because each round of Custom Training can have multiple different settings, each of which impact the cost.
For example, you could have three models with the following inference costs in the same project:
| Model | Training Type | Credit Cost for Inference |
|---|---|---|
| Model A | Fast Training (default training method) | 1 credit / image |
| Model B | Custom Training | 1.62 credits / image |
| Model C | Custom Training | 0.35 credits / image |
Custom Training FAQ
Is Advanced Training the same thing as Custom Training?
Yes.
When should I use Custom Training?
If the performance results of your model are unsatisfactory after a Fasting Train, switch to Custom Training.
Note:
Custom Training is intended for users who are knowledgeable in machine learning.
I'm unfamiliar with machine learning. Can I use Custom Training?
We recommend using Fast Training so that LandingLens can fine-tune your model settings for you.
What are your thoughts on "hyperparameter sweeps"?
After you create a model with Custom Training, you can fine-tune the Custom Training settings based on data and model performance. We do not recommend repeatedly training models with all possible settings (known as "hyperparameter sweeps") because that approach can quickly burn through your credits.
Was this article helpful?