View Predictions
- 29 Apr 2025
- 7 Minutes to read
- Print
- DarkLight
- PDF
View Predictions
- Updated on 29 Apr 2025
- 7 Minutes to read
- Print
- DarkLight
- PDF
Article summary
Did you find this summary helpful?
Thank you for your feedback!
This article applies to these versions of LandingLens:
| LandingLens | LandingLens on Snowflake |
| ✓ | ✓ (see exceptions below) |
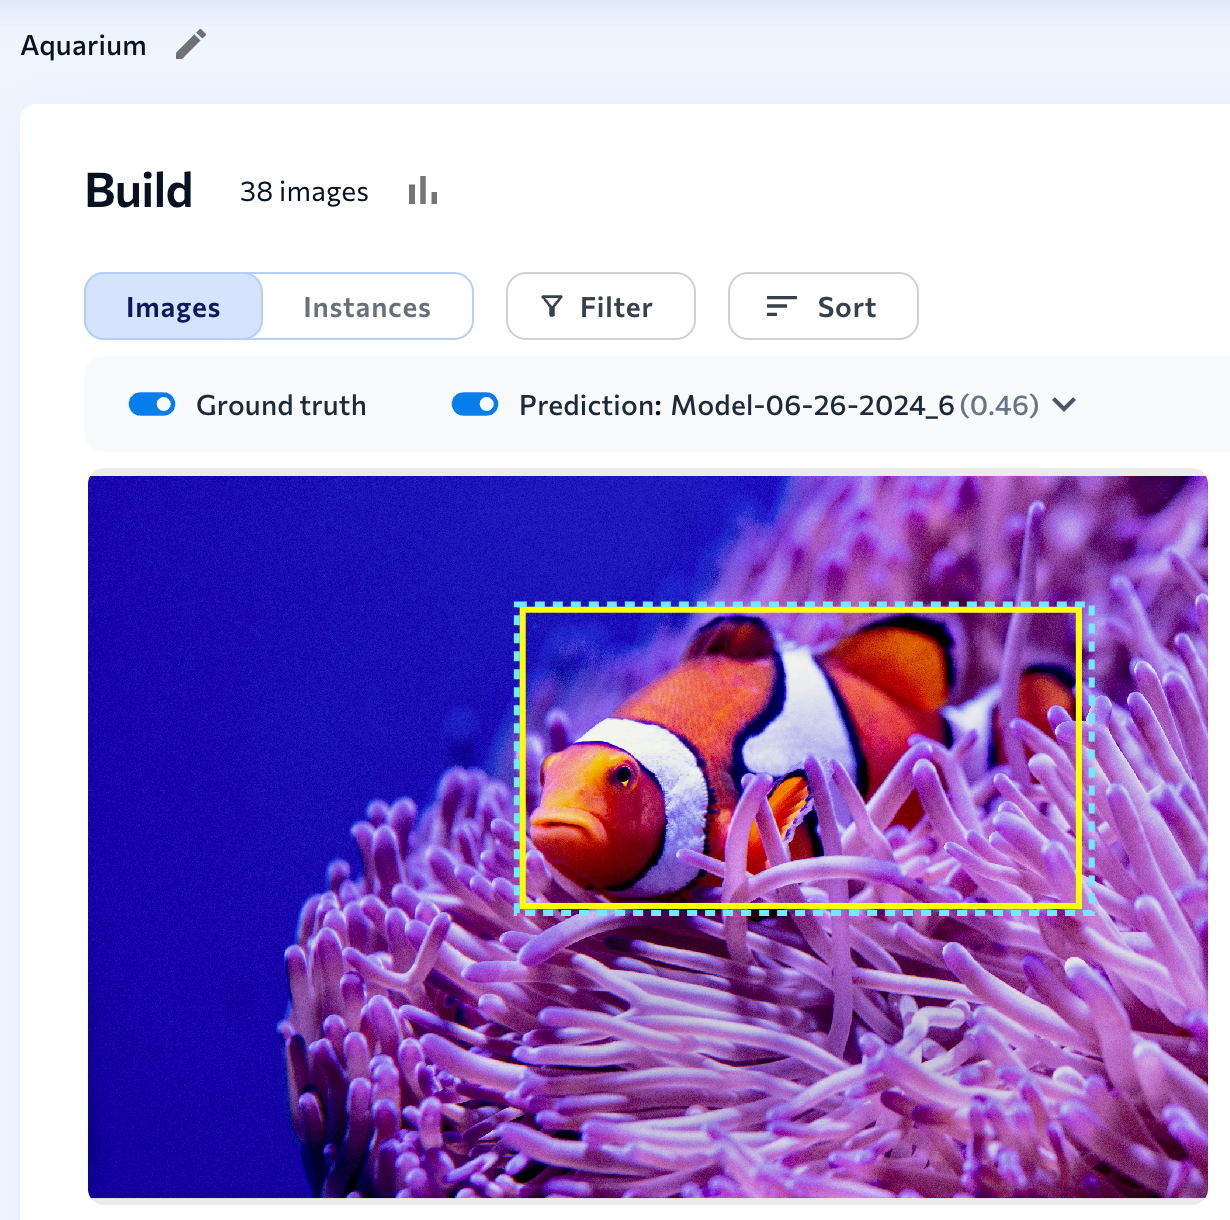
After training a model, you can see the model's predictions as overlays on the images in your dataset. The overlay format depends on the project type:
- Object Detection: Predictions are dotted bounding boxes that are the color of the class the model predicted.
- Segmentation: Predictions are highlights that are the color of the class the model predicted.
- Classification and Anomaly Detection: The predicted class name displays in the bottom left corner of the image. A green check mark means the prediction matches the label. A red "x" means the prediction doesn't match the label.


Note:
The information in this section is not applicable to Visual Prompting. For more information, go to Visual Prompting.
Use Prediction Overlays to Help You Troubleshoot
The predictions give you a visual indication of how your model performed. If the predictions are on top of or close to the labels, then the model performed well. If there's a discrepancy between the label and prediction, find out the root cause; resolving it will likely improve model performance.
For example, in the image below, there's a blue prediction over a yellow label. This could indicate that the object was mislabeled or that the model needs more labeled images of both classes to correctly detect them.
 An Image with a Ground Truth and Prediction Mismatch Is a Good Place to Start Troubleshooting
View Predictions for the Dataset
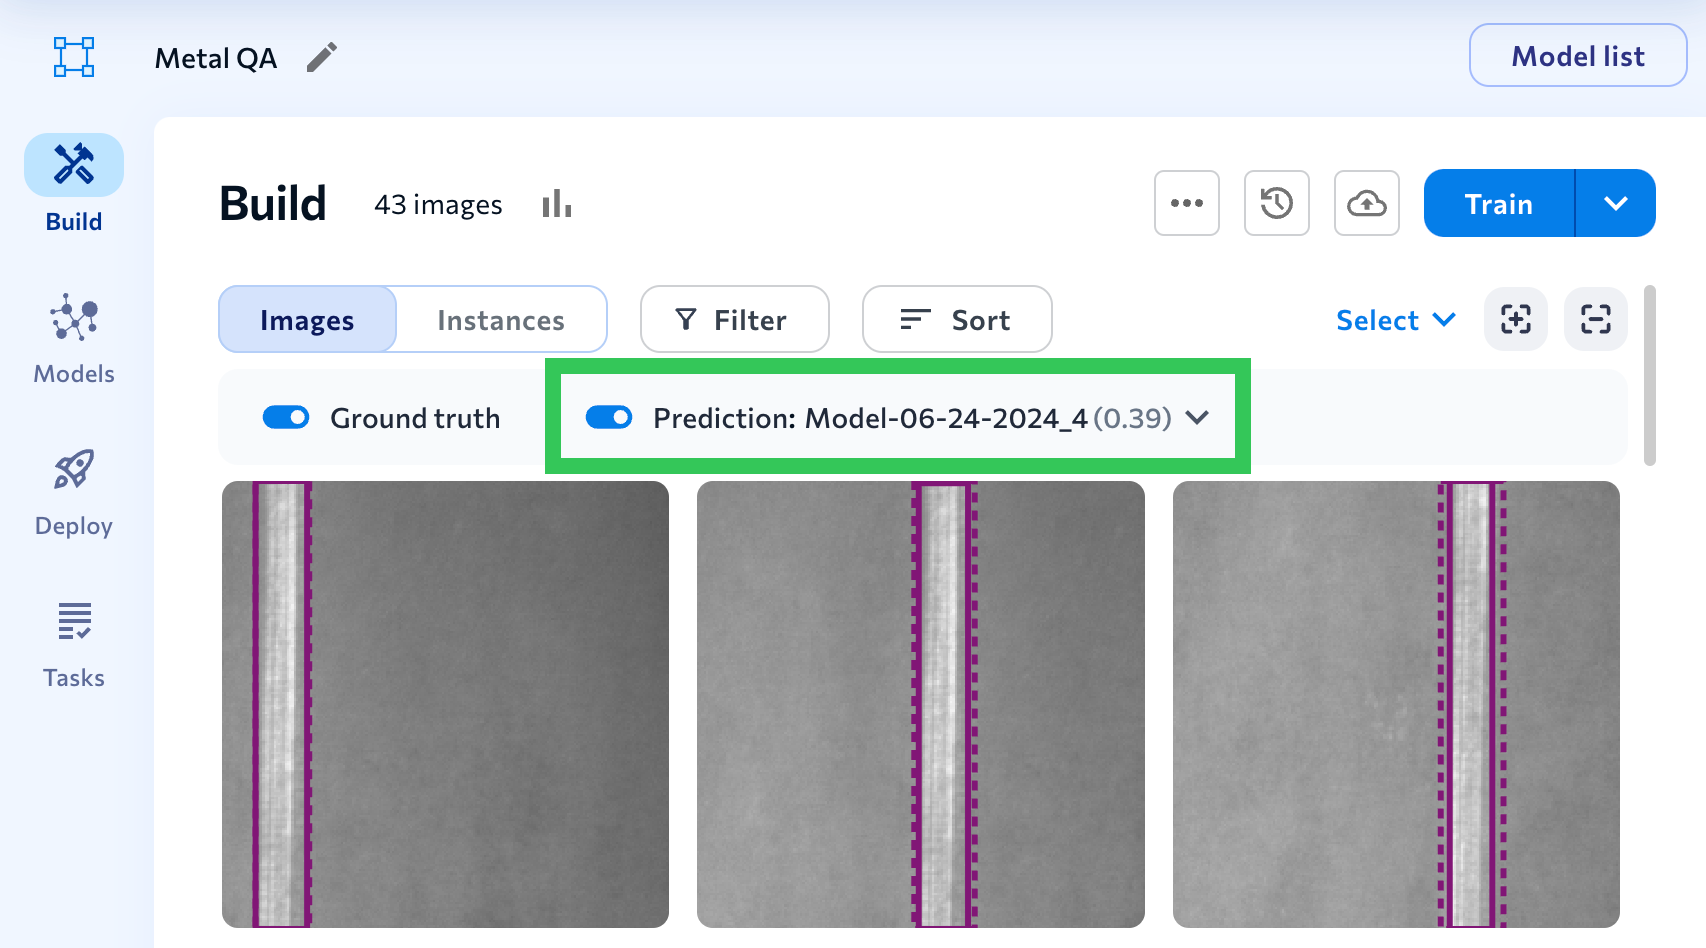
You can see a model's predictions for images in the Build tab. You can also change the applied model and its confidence threshold (for Object Detection and Segmentation) or anomaly threshold (for Anomaly Detection).
To do this:
- Open the project to the Build tab.
- Turn on the Prediction toggle.
- By default, the most recently used or trained model is applied. If you want to select a different model or adjust the threshold, click the model name.
 Turn on the Prediction Toggle
 - Select the model you want to apply to the dataset from the Model drop-down menu. Models are listed in the chronological order in which they were created.
- (Optional) Adjust the Confidence Threshold slider (for Object Detection and Segmentation) or the Anomaly Threshold slider (for Anomaly Detection).
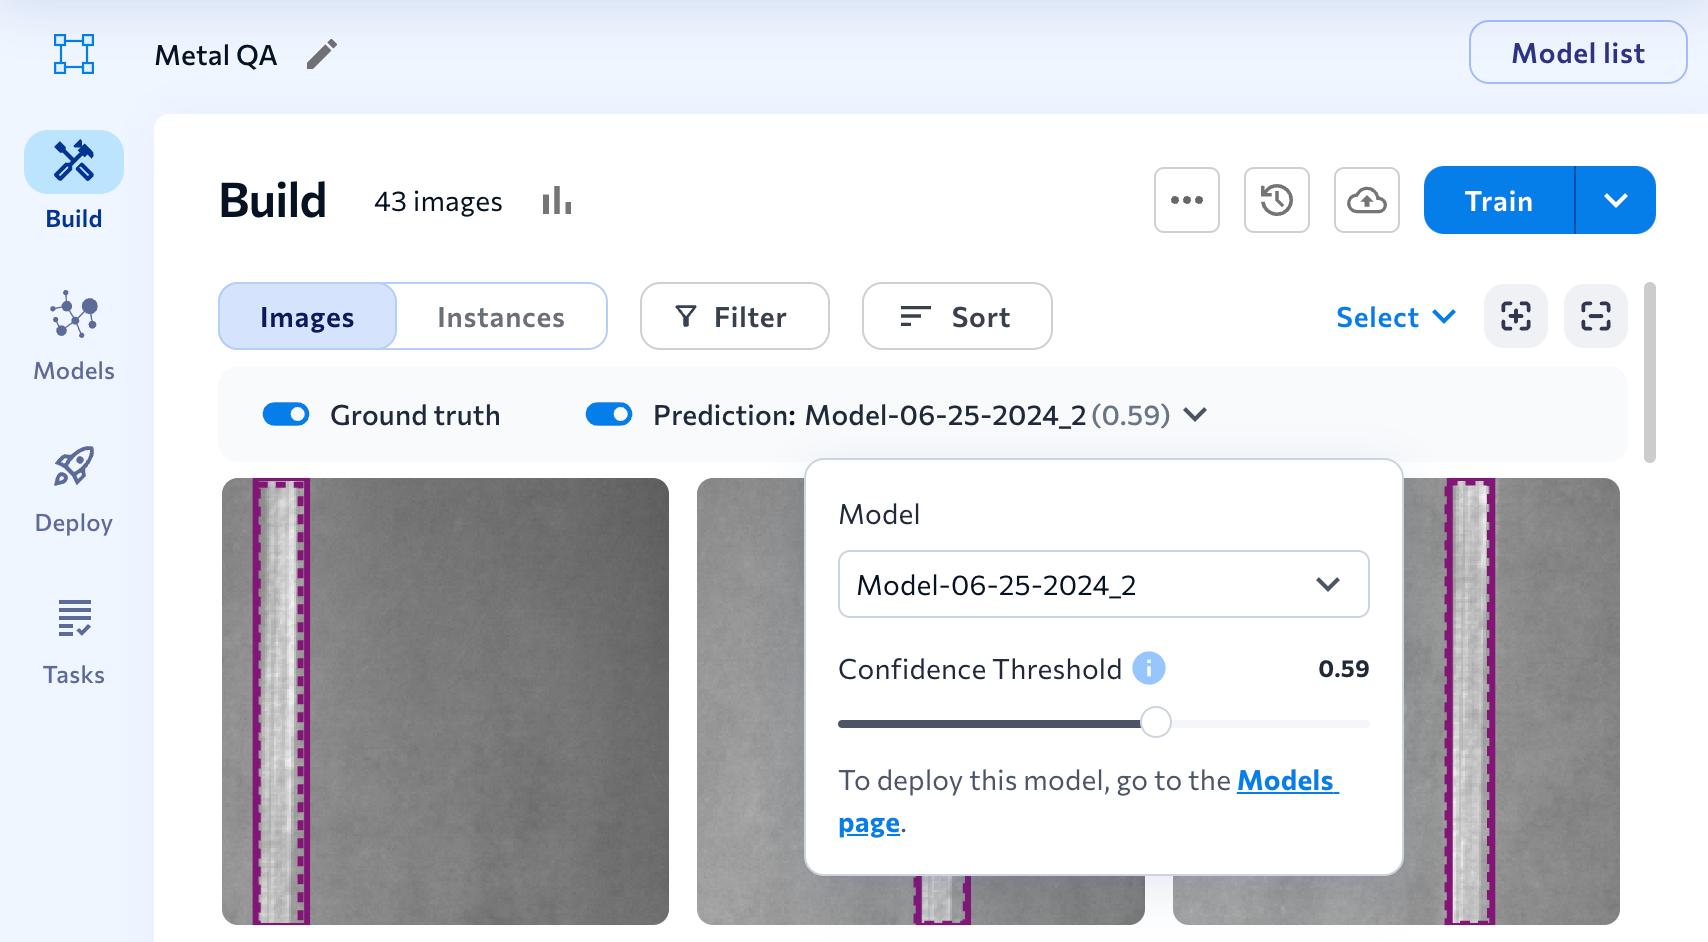 Select the Model and Confidence Threshold You Want to Apply to the Dataset
- To close the Prediction menu, click anywhere off of the menu.


Note:
Curious why some images do or don't have predictions? Get the answers here:
Confidence Threshold
The confidence score indicates how confident the model is that its prediction is correct.
The confidence threshold is the minimum confidence score the model must assign to a prediction in order for it to believe that its prediction is correct. Typically, a lower confidence threshold means that you will see more predictions, while a higher confidence threshold means you will see fewer.
When LandingLens creates a model, it selects the confidence threshold with the best F1 score for all labeled data.
Confidence thresholds are only applicable to Object Detection and Segmentation projects.
Anomaly Threshold
Anomaly Detection models have an anomaly threshold, which determines if an image is classified as Normal or Abnormal.
Each pixel in the image has an abnormality score. If any pixel's score exceeds the anomaly threshold, the image is classified as Abnormal.
Let's take a look at the screenshot below as an example. The Anomaly Threshold is set to 27%. If any pixel in an image has an abnormality score higher than 27%, the model will classify the image as Abnormal.
 Anomaly Threshold
Set the Anomaly Threshold to Minimize Missed Defects
Adjust the Anomaly Threshold to a value that correctly identifies all Abnormal images—even if it means incorrectly predicting some Normal images.
This approach helps ensure you don’t miss any true anomalies, which is often more critical than avoiding false positives.
For example, imagine you're inspecting pills for defects. If the threshold is set too low, the system might miss some defective pills and classify them as Normal—potentially allowing flawed products to reach customers. On the other hand, a higher threshold increases the chance of catching all defective pills, even if some Normal pills are mistakenly flagged. These false positives can be reviewed manually to prevent unnecessary waste or delays.
To achieve the best results, experiment with the Anomaly Threshold until you find a value that reliably detects all Abnormal images, accepting a small number of false positives as a trade-off.
Images vs. Instances (Object Detection)
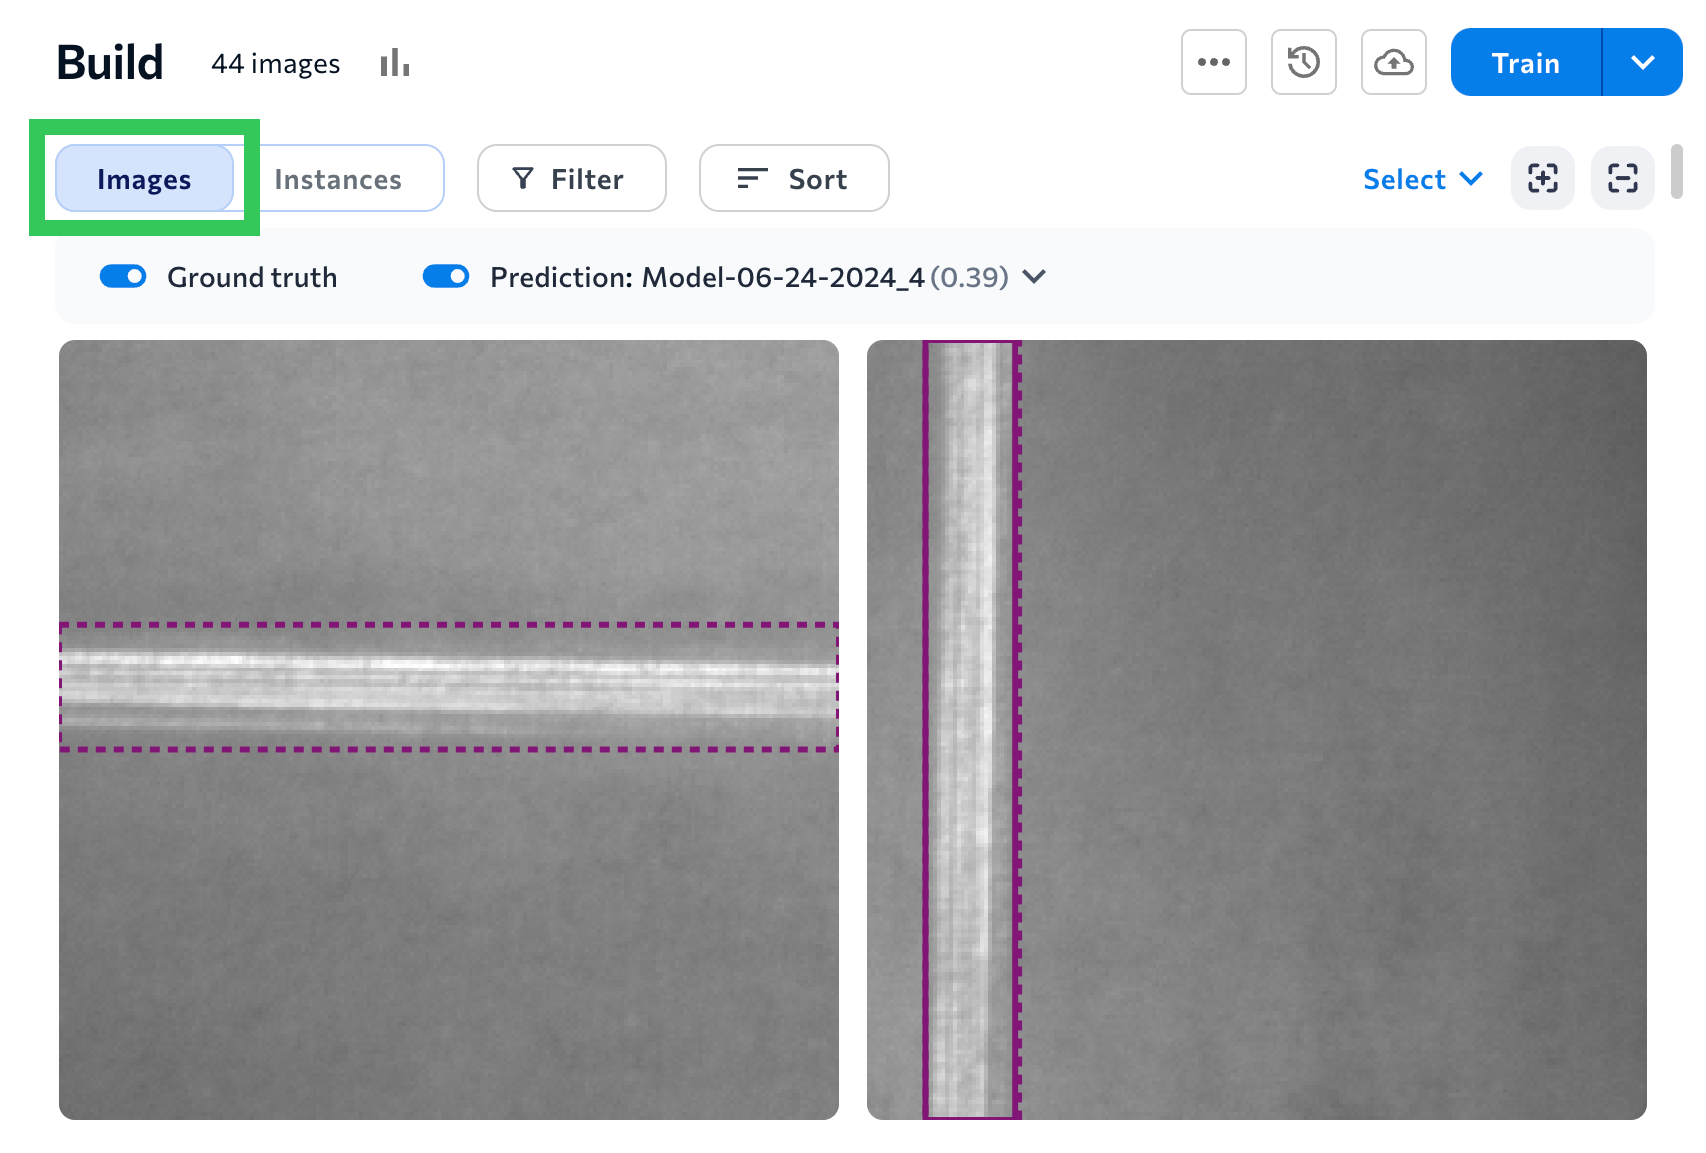
For Object Detection projects, when the Prediction toggle is on, you can choose to view predictions by image or by instance. These are controlled by the Images and Instances buttons on the Build tab.
Images View
When you select Images, all the images in the dataset display. This is the default view.
 Images View
Note:
To see the predictions more clearly, turn off the Ground Truth toggle.
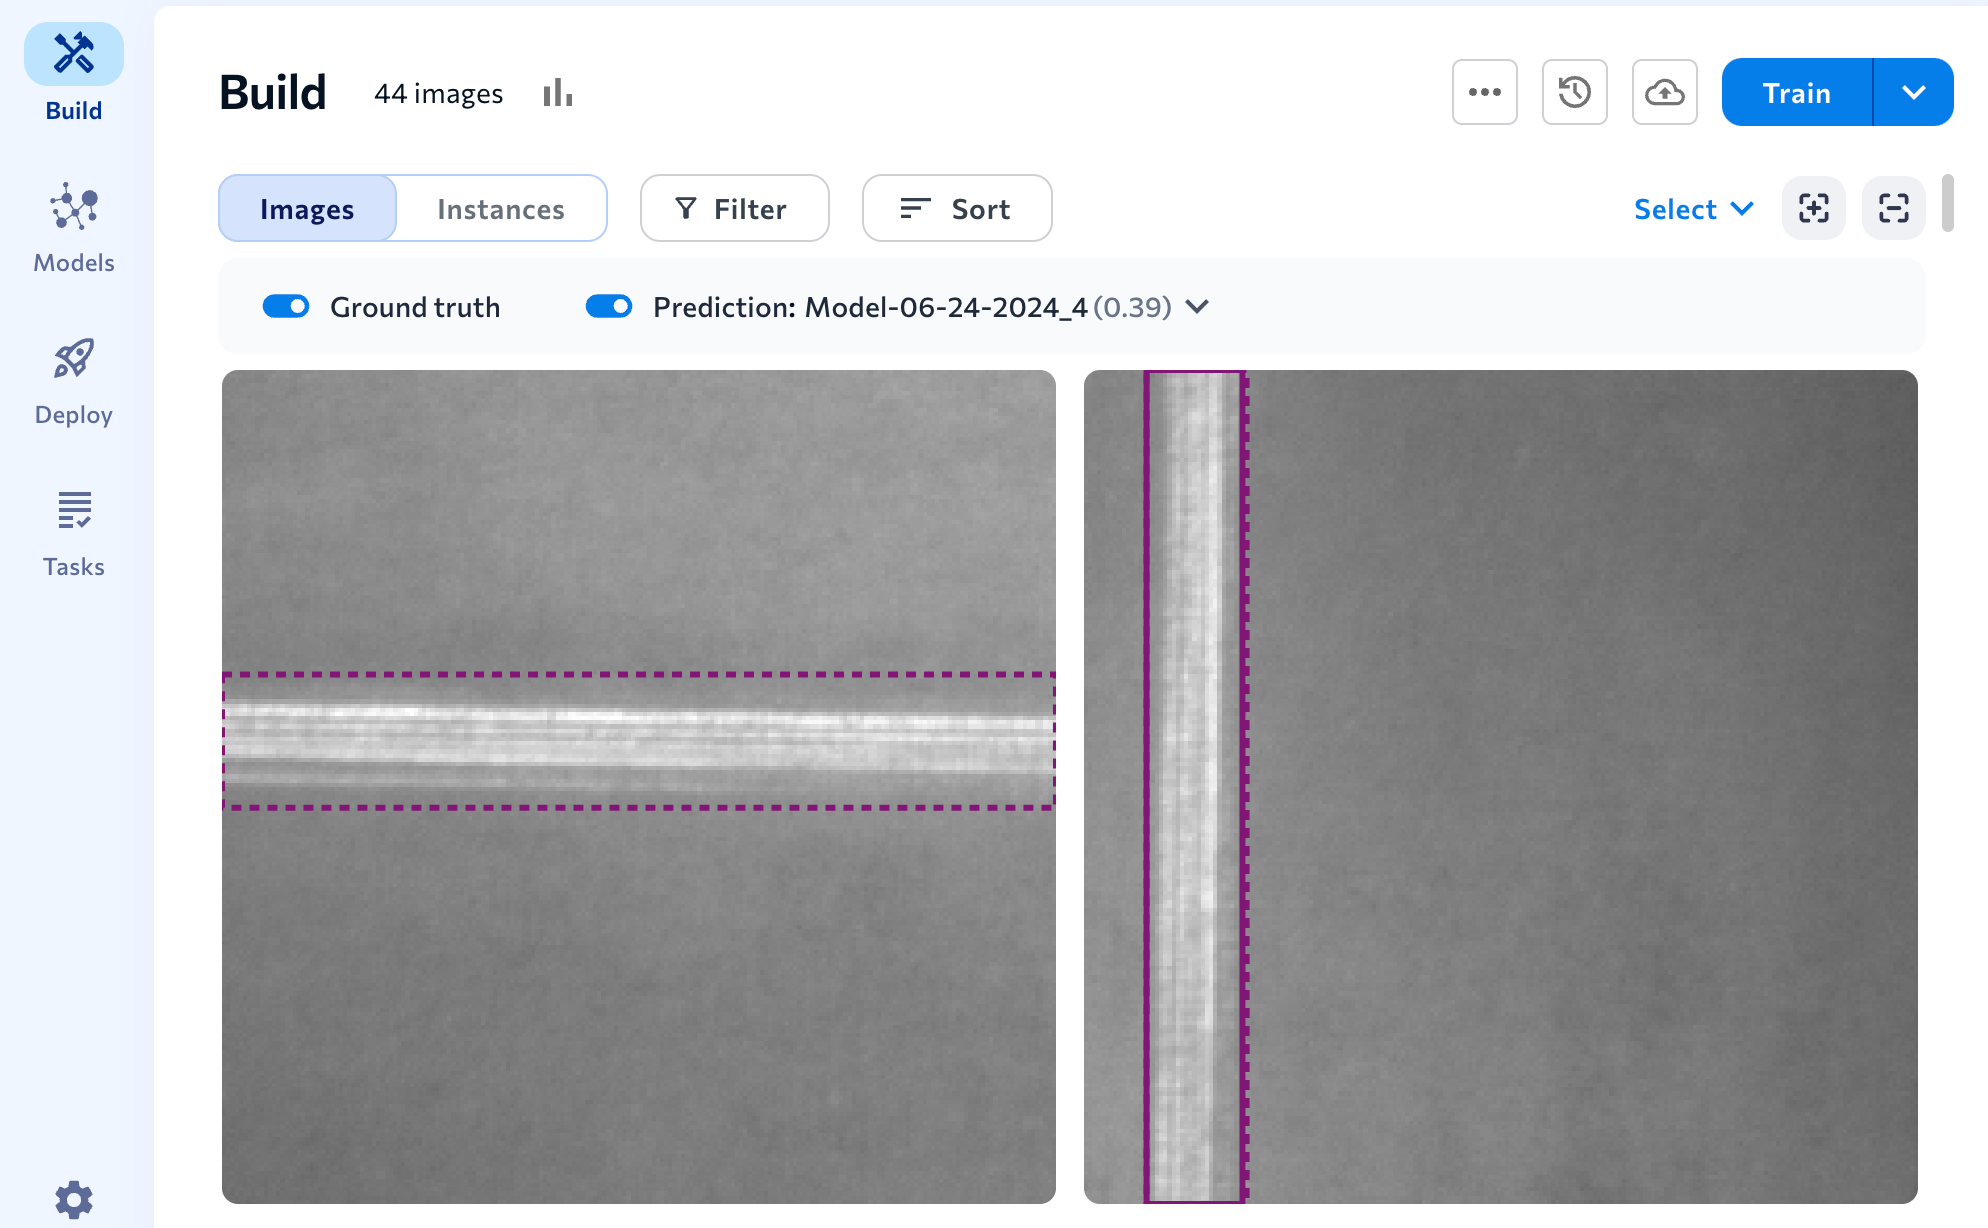
Instances View
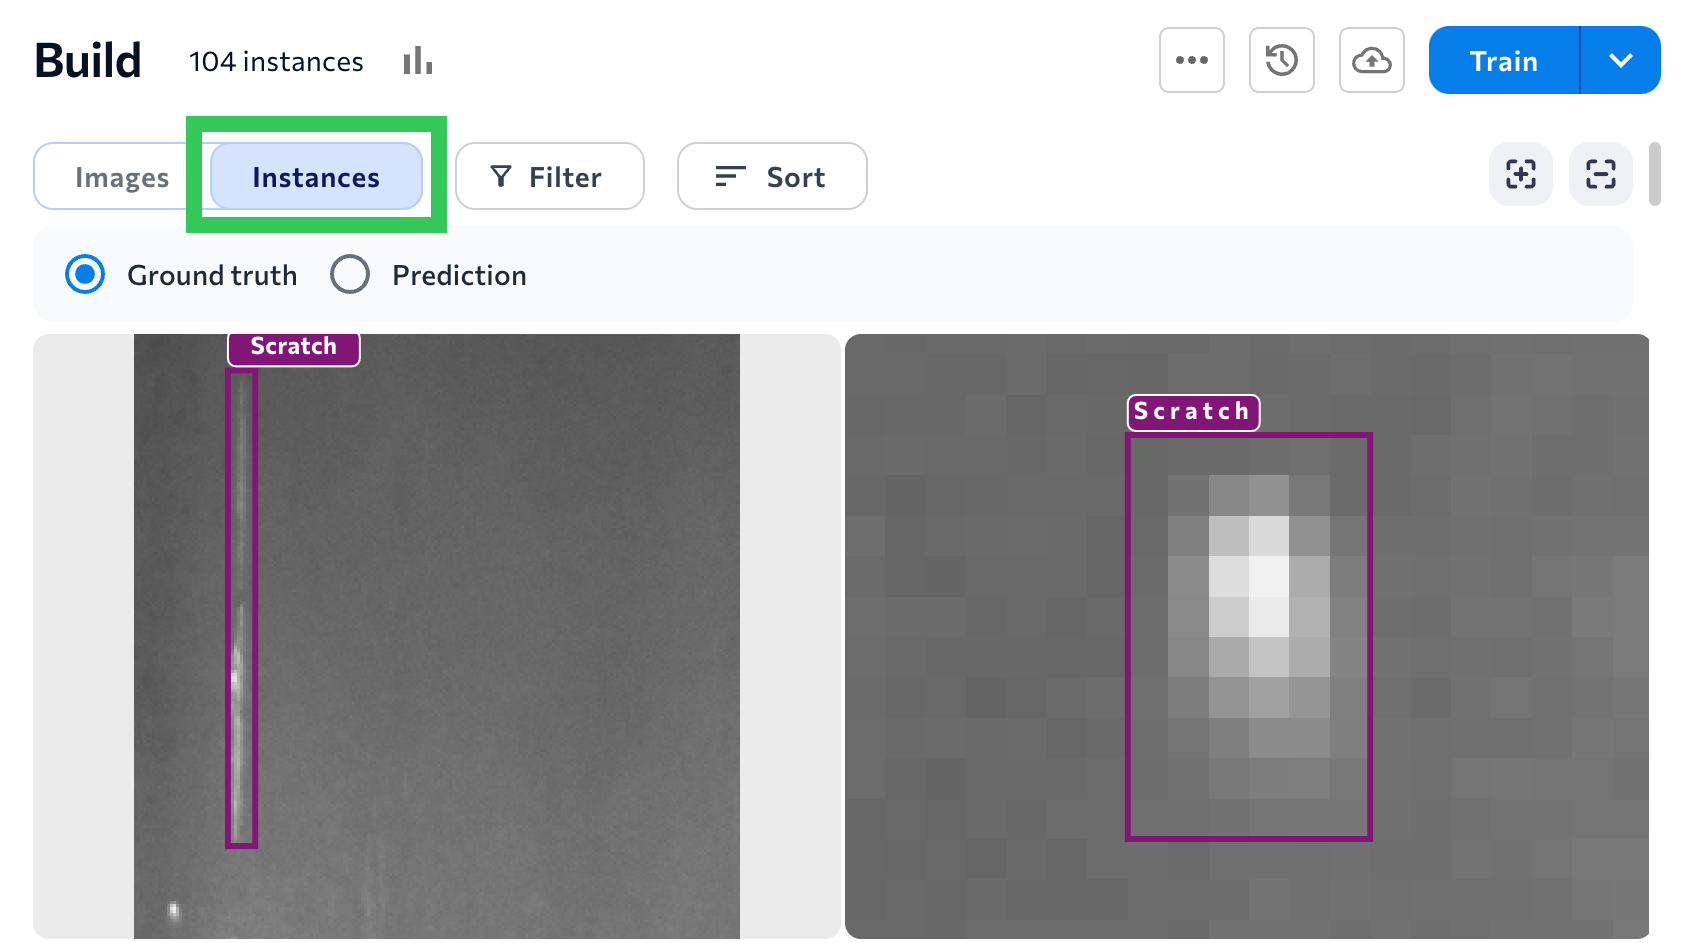
When you select Instances, each labeled or predicted area displays as a separate image. You can think of this as LandingLens displaying "one instance" of a label or prediction at a time. You can filter the instances by Ground truth (the label) or Prediction. The images are zoomed in to help you see the object. Instances view is helpful if the objects of interest are too small to see when viewing the dataset in Images view.
 Instances View of Ground Truth Labels
Select the Prediction radio button in Instances view to filter by model predictions. The predictions overlay includes the confidence score, which represents how certain (or "confident") the model is that its prediction is accurate. For example, in the screenshot below, the model is 39% confident that the prediction on the left is a Scratch.
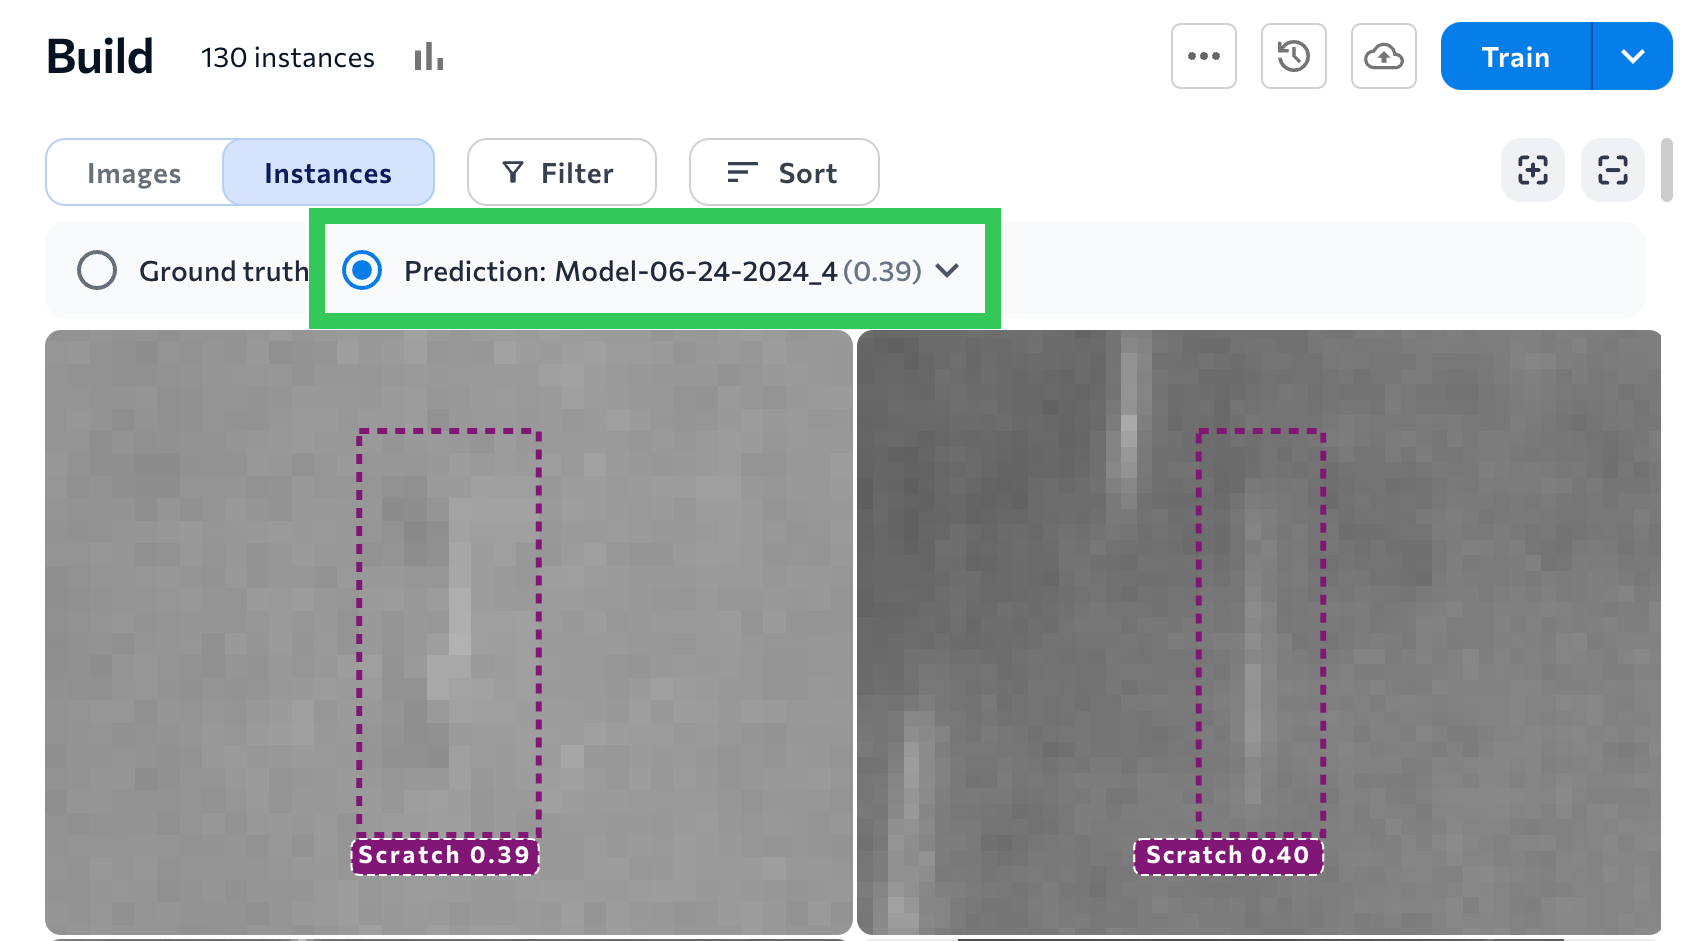 View Each Instance of a Prediction
Notes:
When Prediction is enabled in Instances view, instances are sorted by default from lowest confidence score to highest. Use the Sort feature if you want to use different sorting criteria.
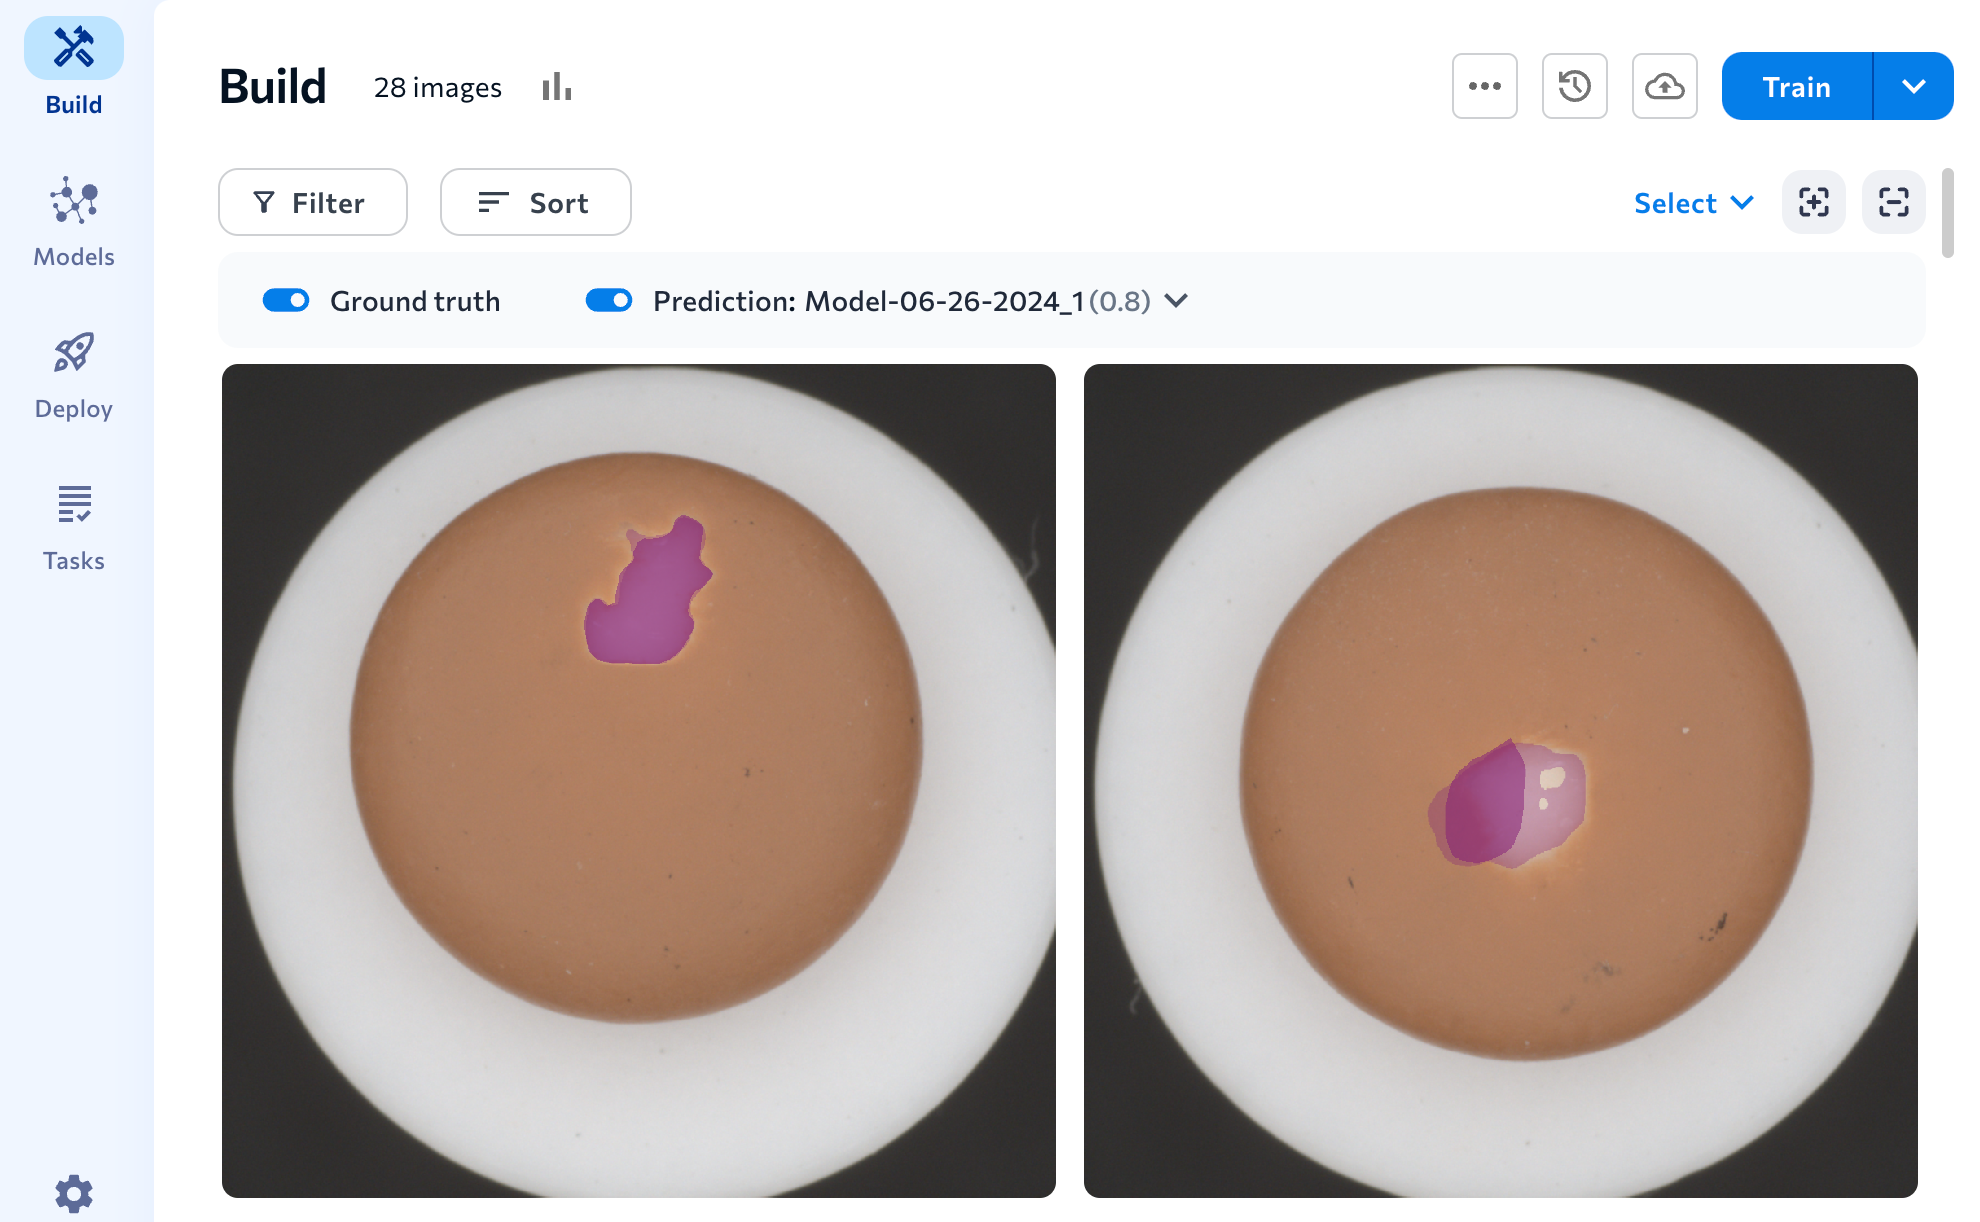
View Predictions for Each Image
Click an image to open it and see the model's predictions. You can toggle the Labels and Predictions on and off. To learn how to turn predictions into labels, go to Label Assist.
 View Predictions and Ground Truth Labels on Each Image
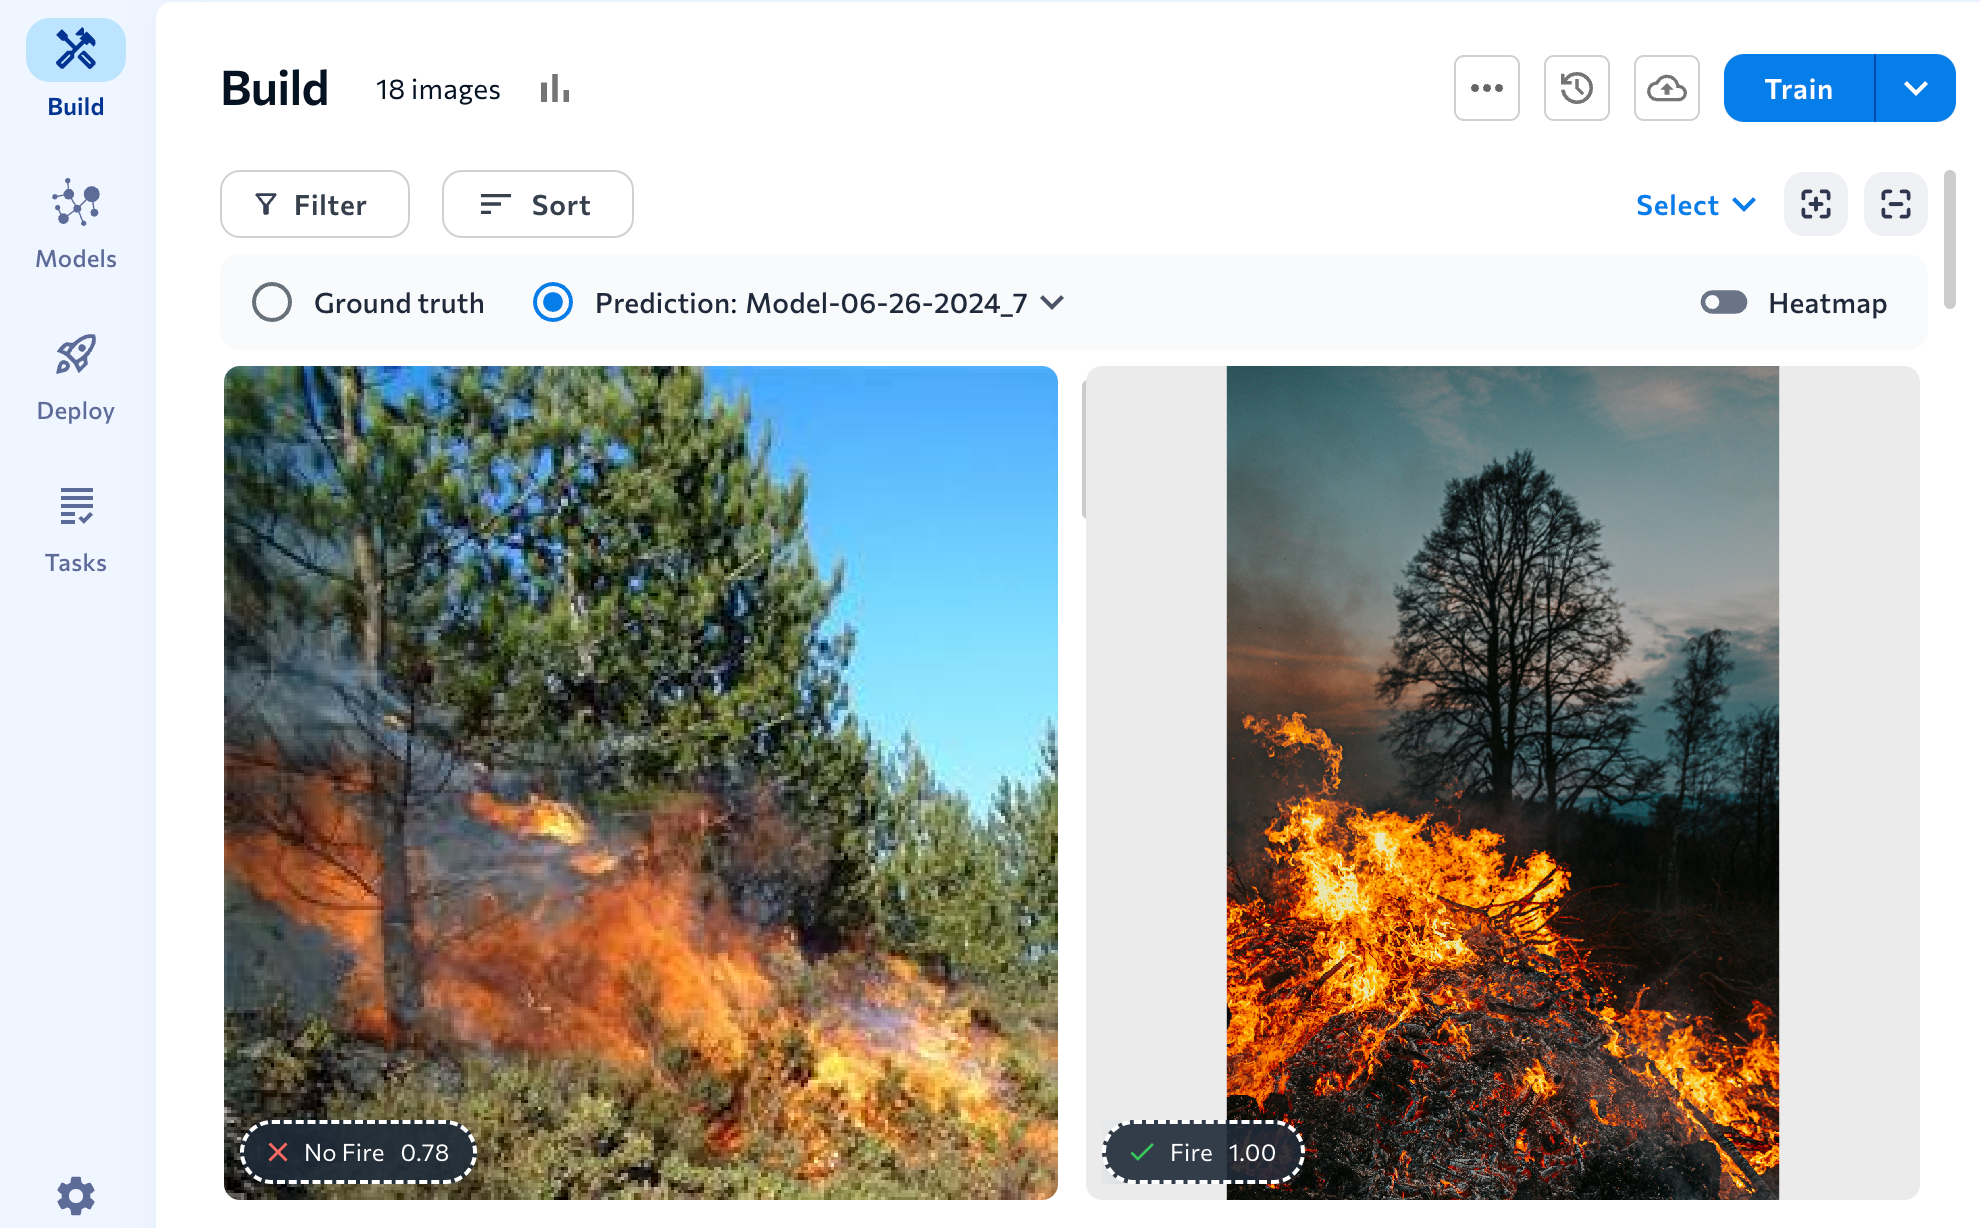
Why Do Some Images Not Have Predictions?
Some images in a dataset may not have predictions. In these situations, it's because the model did not have an opportunity to make predictions on those images. For example, if Predict at Upload is disabled and you upload an image after training a model, the model doesn't have an opportunity to make a prediction on that image. (Predict at upload is not available in LandingLens on Snowflake.)
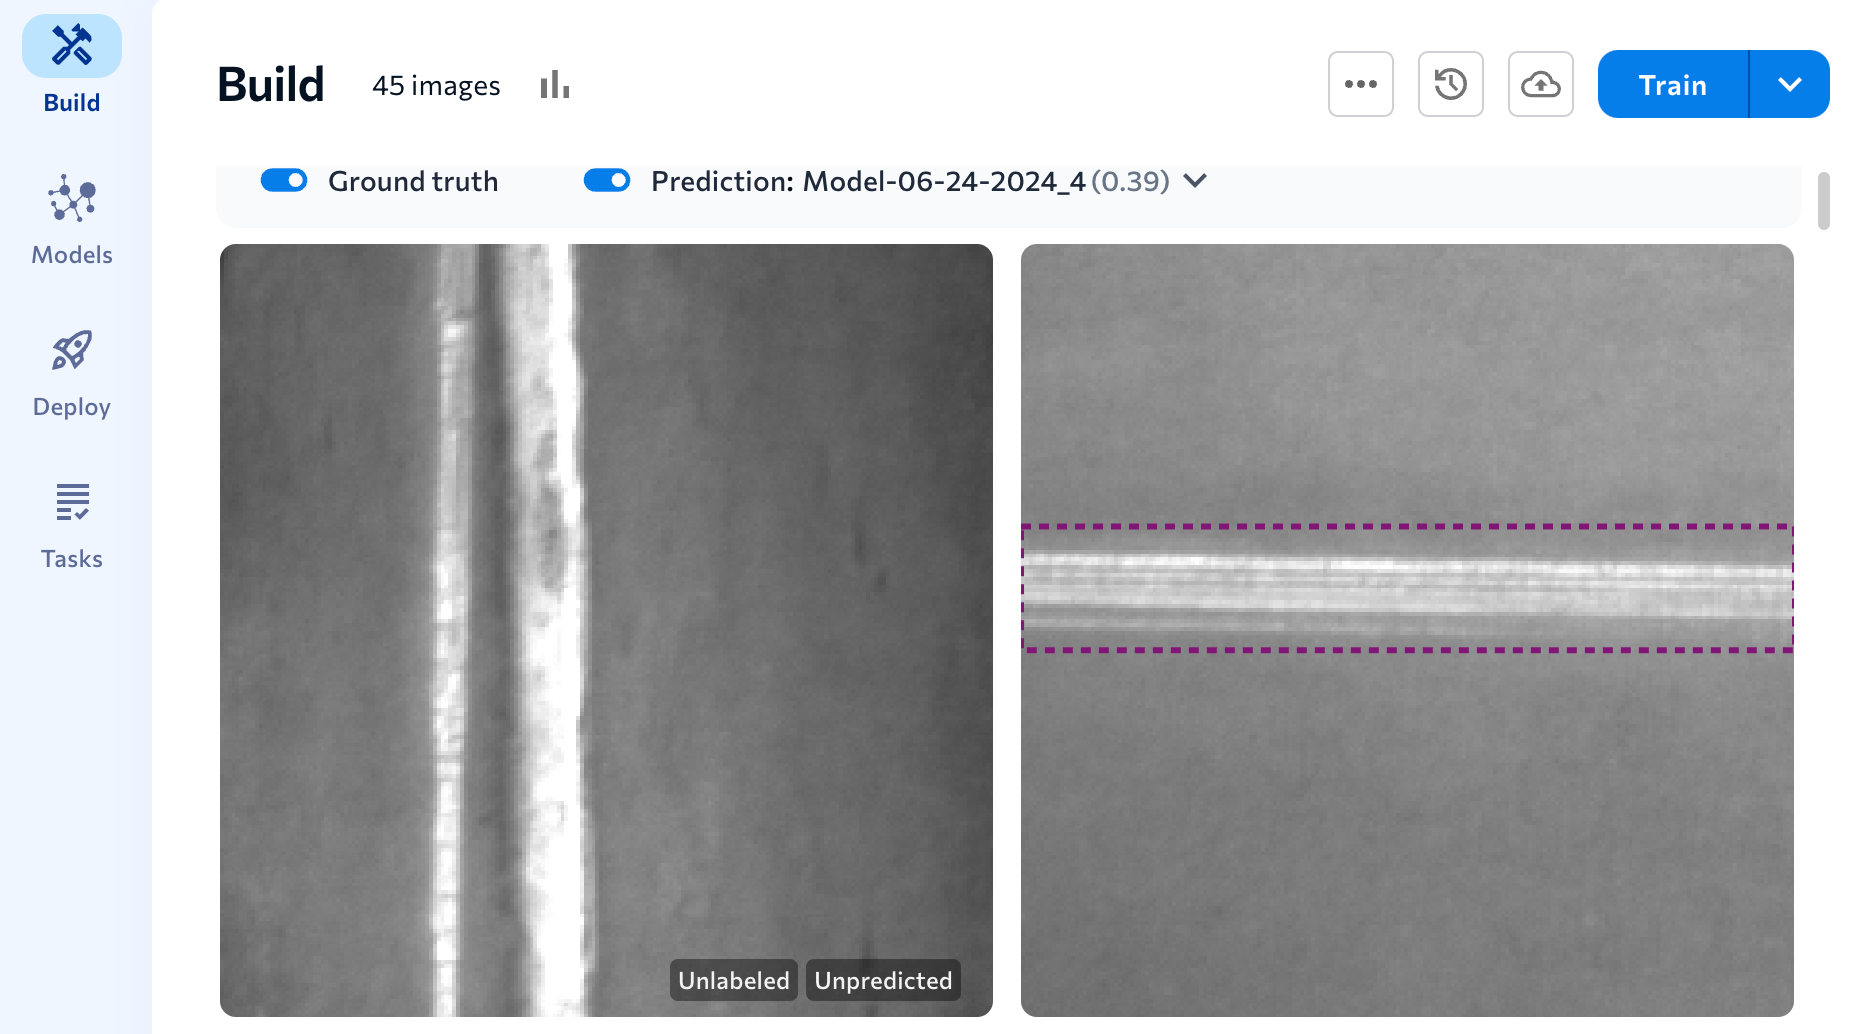 The Image on the Left Doesn't Have a Prediction Because it Was Uploaded After Model Training & "Predict at Upload" Was Off
When Does a Model Make Predictions?
When you train a model, the model makes predictions for the images currently in the dataset. But there are other situations that also trigger a model to make predictions on an image. Here is a list of all situations that cause a model to make predictions on an image:
- When you train a model, the model makes predictions on all images currently in the dataset.
- If Predict at Upload is enabled and you upload an image after training a model, the model makes a prediction on the image. (Predict at upload is not available in LandingLens on Snowflake.)
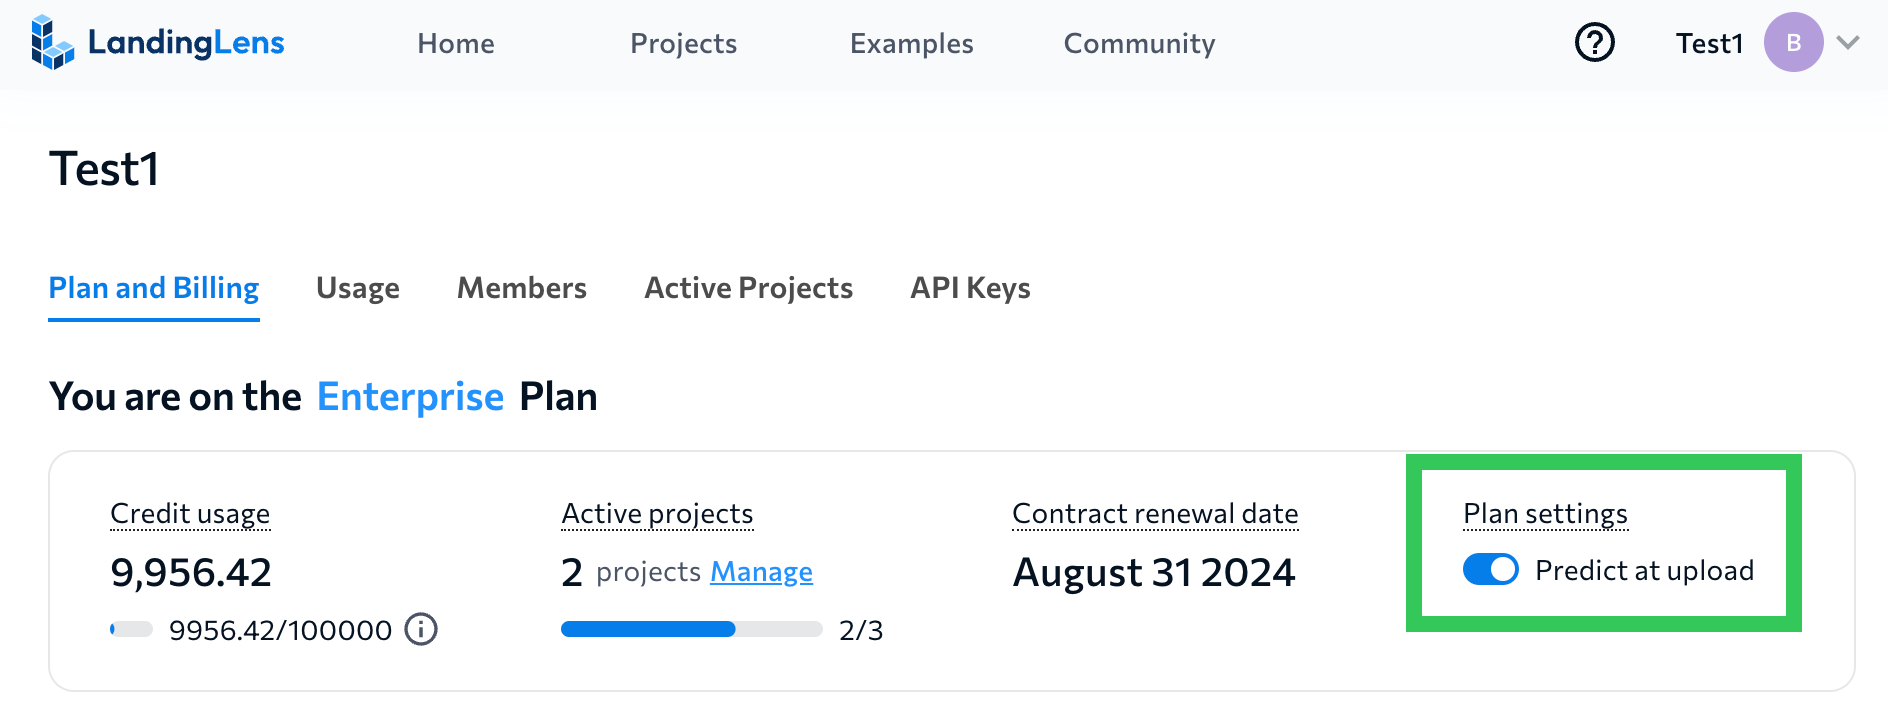 Predict at Upload
 - If you go to the Models page and run a model on an evaluation set, the model checks what images it hasn't "seen" before. If the model hasn't "seen" the image before, it makes a prediction on it. You can then view those predictions when you select that model on the Build tab.
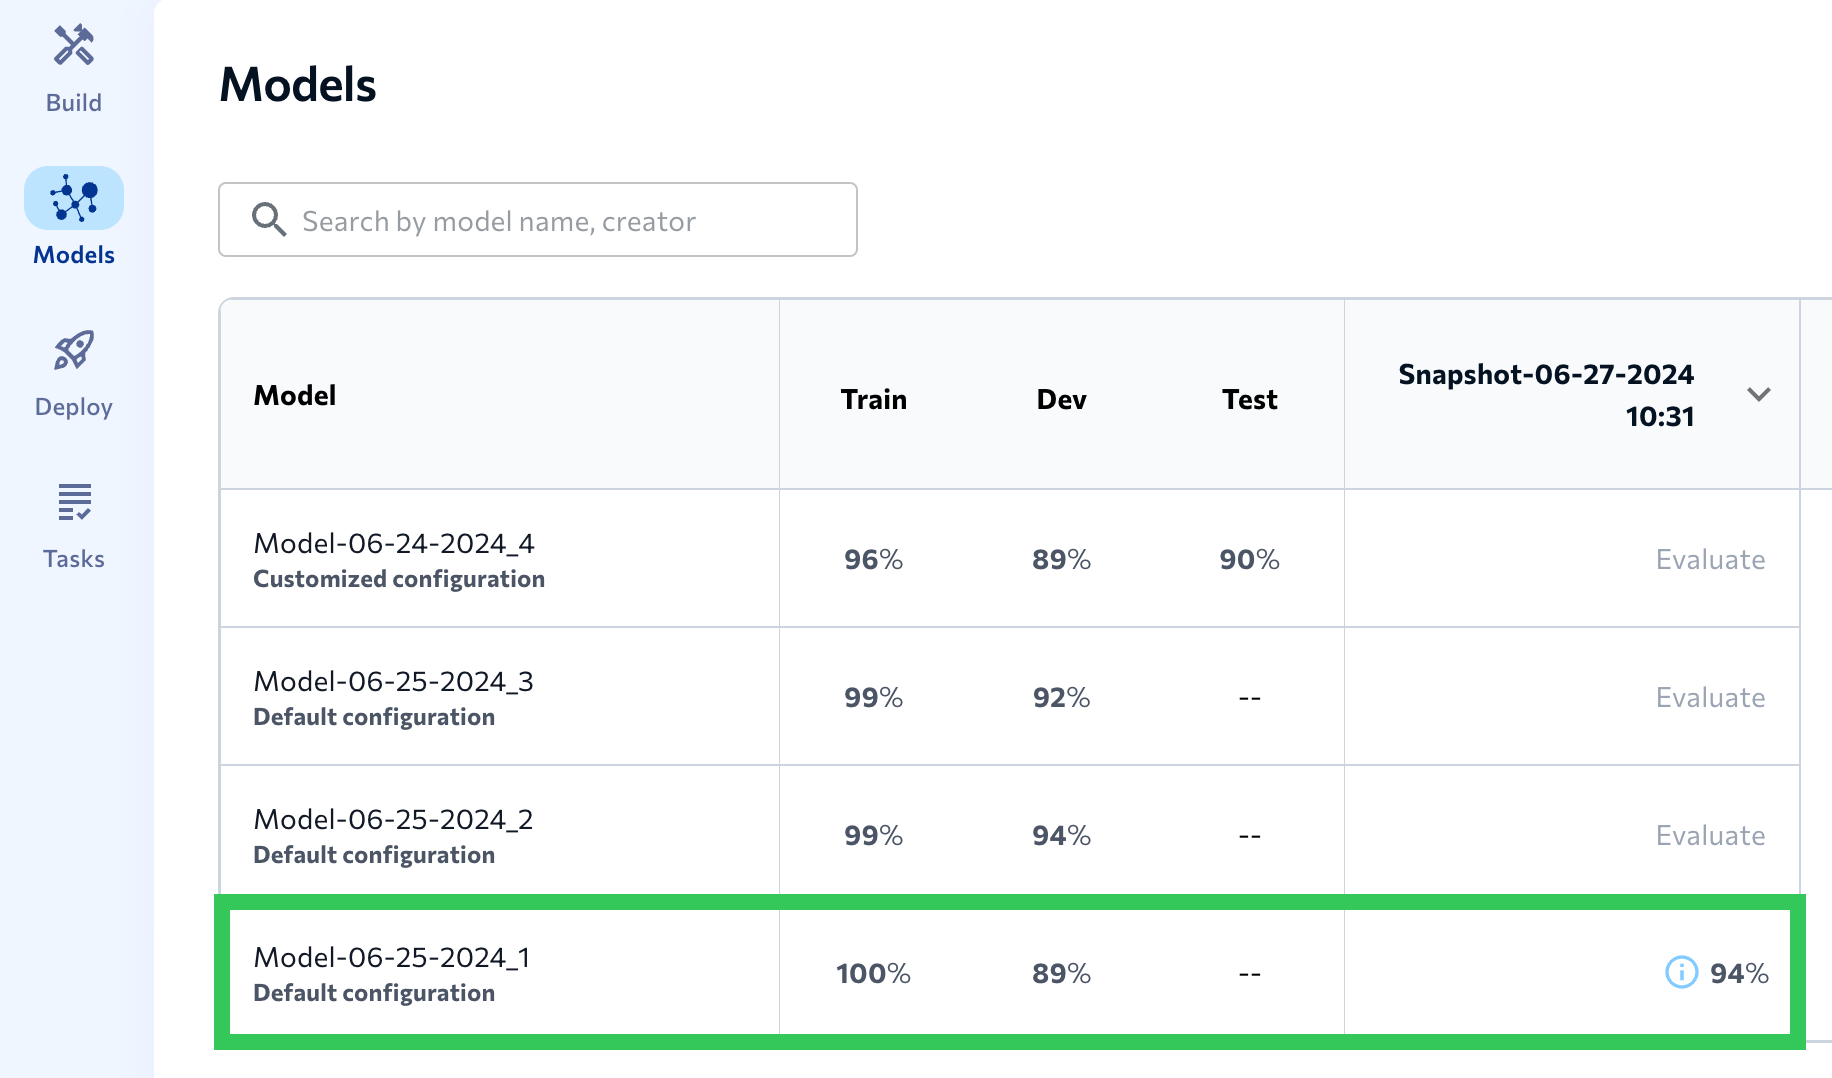 When the Model Was Evaluated on "Snapshot-06-27-2024 10:31", It Made Predictions on Any Images It Hadn't "Seen" Before
 - If you open an image and click Get Prediction, the selected model makes a prediction on the image.
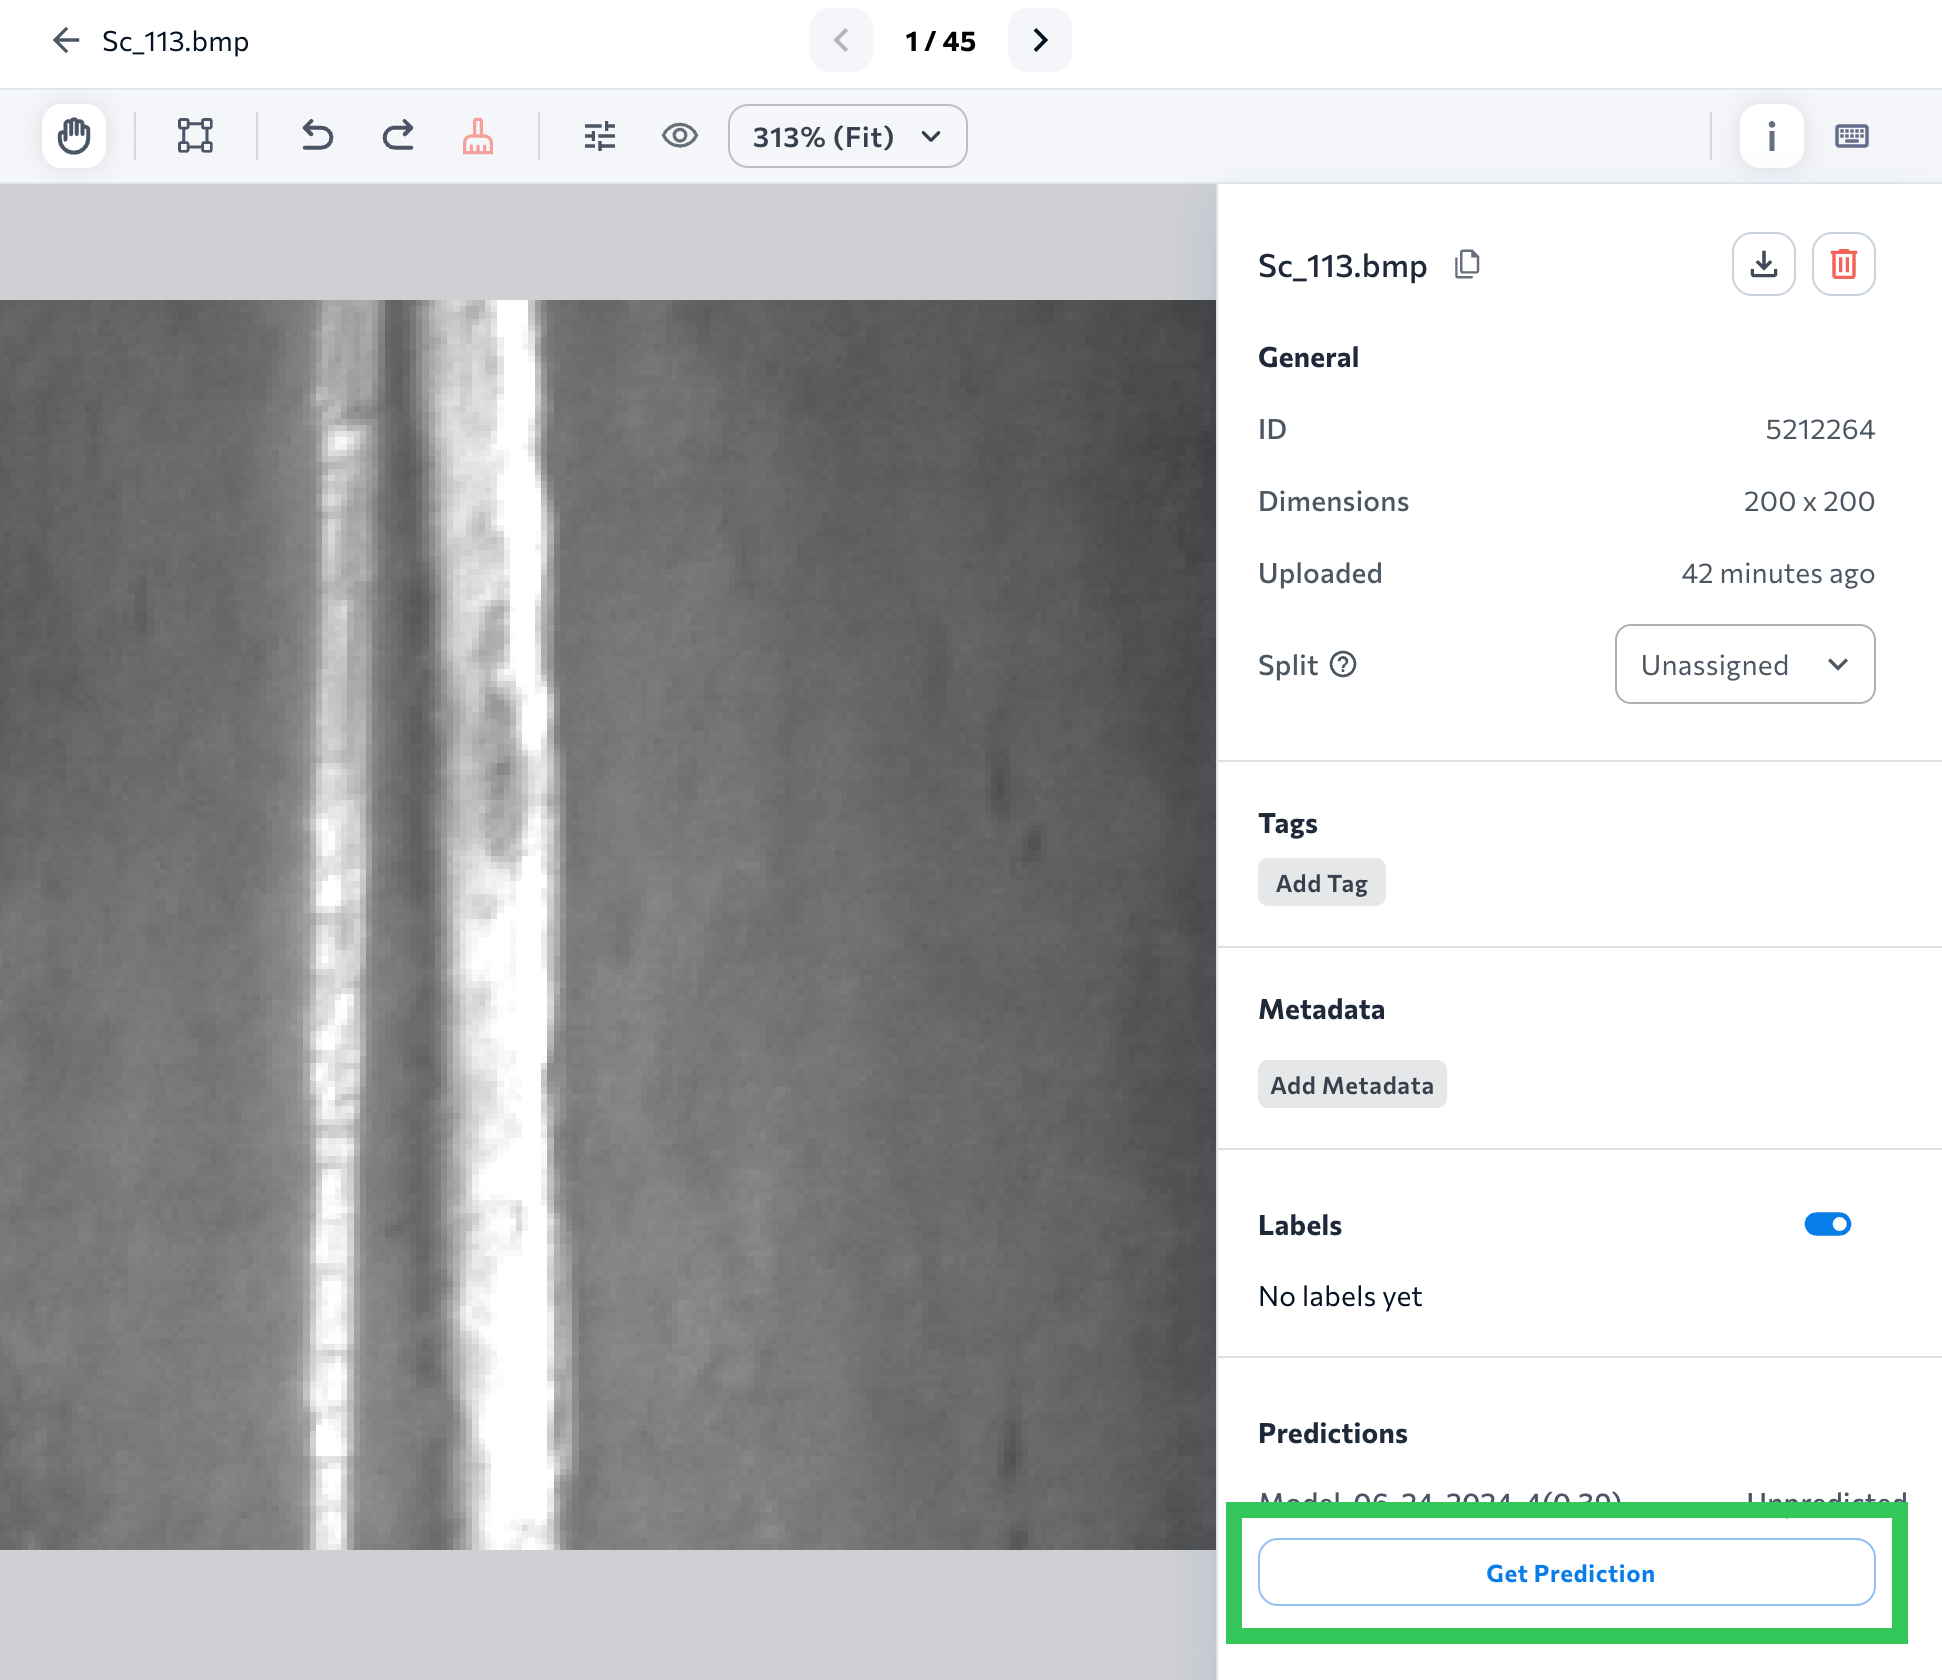 When You Click "Get Prediction", the Model Makes a Prediction on the Image


How Does LandingLens Determine if a Prediction Matches the Ground Truth? (Object Detection)
For Object Detection models, LandingLens uses the Jaccard index with a threshold of 0.2 to determine if a ground truth label matches a model's prediction. This means that if the overlap between the ground truth and the prediction is 20% or higher, the prediction is considered a match.
The Jaccard index, often called Intersection over Union (IoU), is a metric used to measure the similarity between two sets. In Object Detection, it’s applied to compare the area of overlap between a predicted bounding box and the ground truth box against the total area covered by both boxes (their union). Mathematically, the Jaccard index is expressed as:
Was this article helpful?