Visual Prompting
- 05 Aug 2024
- 11 Minutes to read
- Print
- DarkLight
- PDF
Visual Prompting
- Updated on 05 Aug 2024
- 11 Minutes to read
- Print
- DarkLight
- PDF
Article summary
Did you find this summary helpful?
Thank you for your feedback!
This article applies to these versions of LandingLens:
| LandingLens | LandingLens on Snowflake |
| ✓ | ✖ |
Visual Prompting is a paradigm shift in the field of computer vision. You label only a few small areas of an object in a few images, and the model almost immediately detects the whole object in all of your images. In most cases, the model’s predictions aren’t 100% accurate the first time around, but you can easily label a few more small areas, re-run the model, and check your results.
Visual Prompting is a highly accurate and fast model that enables you to quickly create and deploy your own custom computer vision model.
Because of its speed and ease of use, we encourage you to try Visual Prompting before creating any other project type.
 Visual Prompting Demo
Caution:
Visual Prompting is in Beta. It might not function as well as our other production-ready features.
What does the phrase “Visual Prompting” mean?
In the field of artificial intelligence (AI), prompting refers to providing input to an AI model for that model to generate a response. It's like prompting a person to answer a question, or giving a student a prompt to write an essay about.
You might have already heard about AI prompting without realizing what it was called. For example, the popular chatbot ChatGPT relies on prompting: you ask ChatGPT a question or tell it to describe something, and the Model responds. The application DALL-E is similar: you describe what you want to see, and the Model generates a digital image based on your description.
Both of these types of applications rely on textual prompts; you need to write a sentence or series of words for the AI Model to work. ChatGPT has a text-to-text workflow, and DALL-E has a text-to-image workflow.
Now, with the release of Visual Prompting, LandingAI has introduced an image-to-image AI prompting workflow. You give a visual prompt to the Visual Prompting model, and it provides a visual output. In practice, you label a small section of an object in an image, and Visual Prompting model is able to detect the whole object you marked, not just in the original image, but in others too.
Visual Prompting is the next step in broadening the applications of AI prompting.
Note:
LandingAI is not associated with ChatGPT or DALL-E.
Visual Prompting Workflow
The Visual Prompting workflow is an iterative process. After you label your first image, run your model. When you see the results, fine-tune your labels and re-run the model. It is normal for this process of re-labeling and re-running to occur a few times before your model is ready to be deployed.
Visual Prompting models run quickly, so even though this is an iterative process, you will be able to deploy even complex models in minutes.
Here's an overview of the Visual Prompting workflow:
- Upload images
- Label small portions of an image. Use at least two classes.
- Click Run.
- Review the predictions of that image.
- If the results aren't quite right yet, fine-tune your labeling and run the model again. Repeat until you're happy with the results.
- Deploy the model.
Label Images
If you've created computer vision projects before, you'll immediately notice that labeling images with Visual Prompting is drastically different—and easier and cooler—than with those other projects. Because of the powerful and intuitive algorithms built into Visual Prompting, you only need to label a few small areas to get lightning-fast accurate results.
Note:
Visual Prompting Projects support a maximum of 25 images.
Accurately Label Small Areas
Visual Prompting introduces a fast new way to label images called Prompting. Prompting is the act of only labeling a small area of the object you want to identify. Your model learns from each pixel you label, so it's important that your labels are precise.
Say you build a model to detect birds. Take a look at the image below. There are two classes labeled: Bird (purple) and Background (yellow). Do you notice anything wrong? If you look closely, you can see that the Bird class is not labeled precisely because the purple line stretches into the background. The model will think that portions of the background belong to the Bird class, and it won't be able to accurately detect birds.
 The Purple "Bird" Label Isn't Precise
Now let's look at the next image. The Eraser tool was used to delete the purple "Bird" label that included the background, so now the label only covers the bird. This labeling is more precise, and will create a more accurate model.
 The Purple "Bird" Label Now Only Covers the Bird
It's generally okay if you make a couple of minor mistakes in other project types, like Segmentation or Object Detection. However, if you make a mistake in Visual Prompting, the model won't be as forgiving and may show some inaccurate results.
Label at Least Two Classes
Visual Prompting Projects require at least two classes. By establishing two classes, the model will be able to "understand" where one class ends and another begins. Even if you only want to detect one specific object, you need to give the class some content to compare itself against. A Visual Prompting model predicts a class for each pixel in an image. So if you had only one class, the whole image would be predicted as belonging to that class. Therefore, you must have at least two classes.
If you only want to detect one object and aren't sure what to name your second class, consider creating a class with one of these names:
- Background
- Environment
- Unimportant
- Not [object]
- Nothing to Label
For example, let's say you want to detect apples during the manufacturing process. You don't need to detect the machinery, conveyor belt, workers, or anything else. You could set up a Visual Prompting Project that results in the following images. The first image shows the original image. The second shows the image with apples in pink, and all other items in blue. Even though the machinery and conveyor belt look very different from each other, they are both categorized as part of the background.
.png) Before Running the Model Before Running the Model | .png) After Running the Model After Running the Model |
Only Label a Few Images
Visual Prompting doesn't require many images. We recommend you run the model after adding labels to just one image. Review the Predictions, and relabel that image based on any incorrect predictions. Then run the model again, and view the predictions for a few other images. Label one or two more images, and run the model again. Continue to iterate like this until the predictions are accurate.
Use Case: Images Are Similar
If all of your images are of the same objects, with the same backgrounds, in similar conditions (like lighting), then you will need fewer labeled images.
For example, if you're creating a model to detect issues on PCB boards on an assembly line at the same inspection point, you can expect all of the images to be very similar to each other.
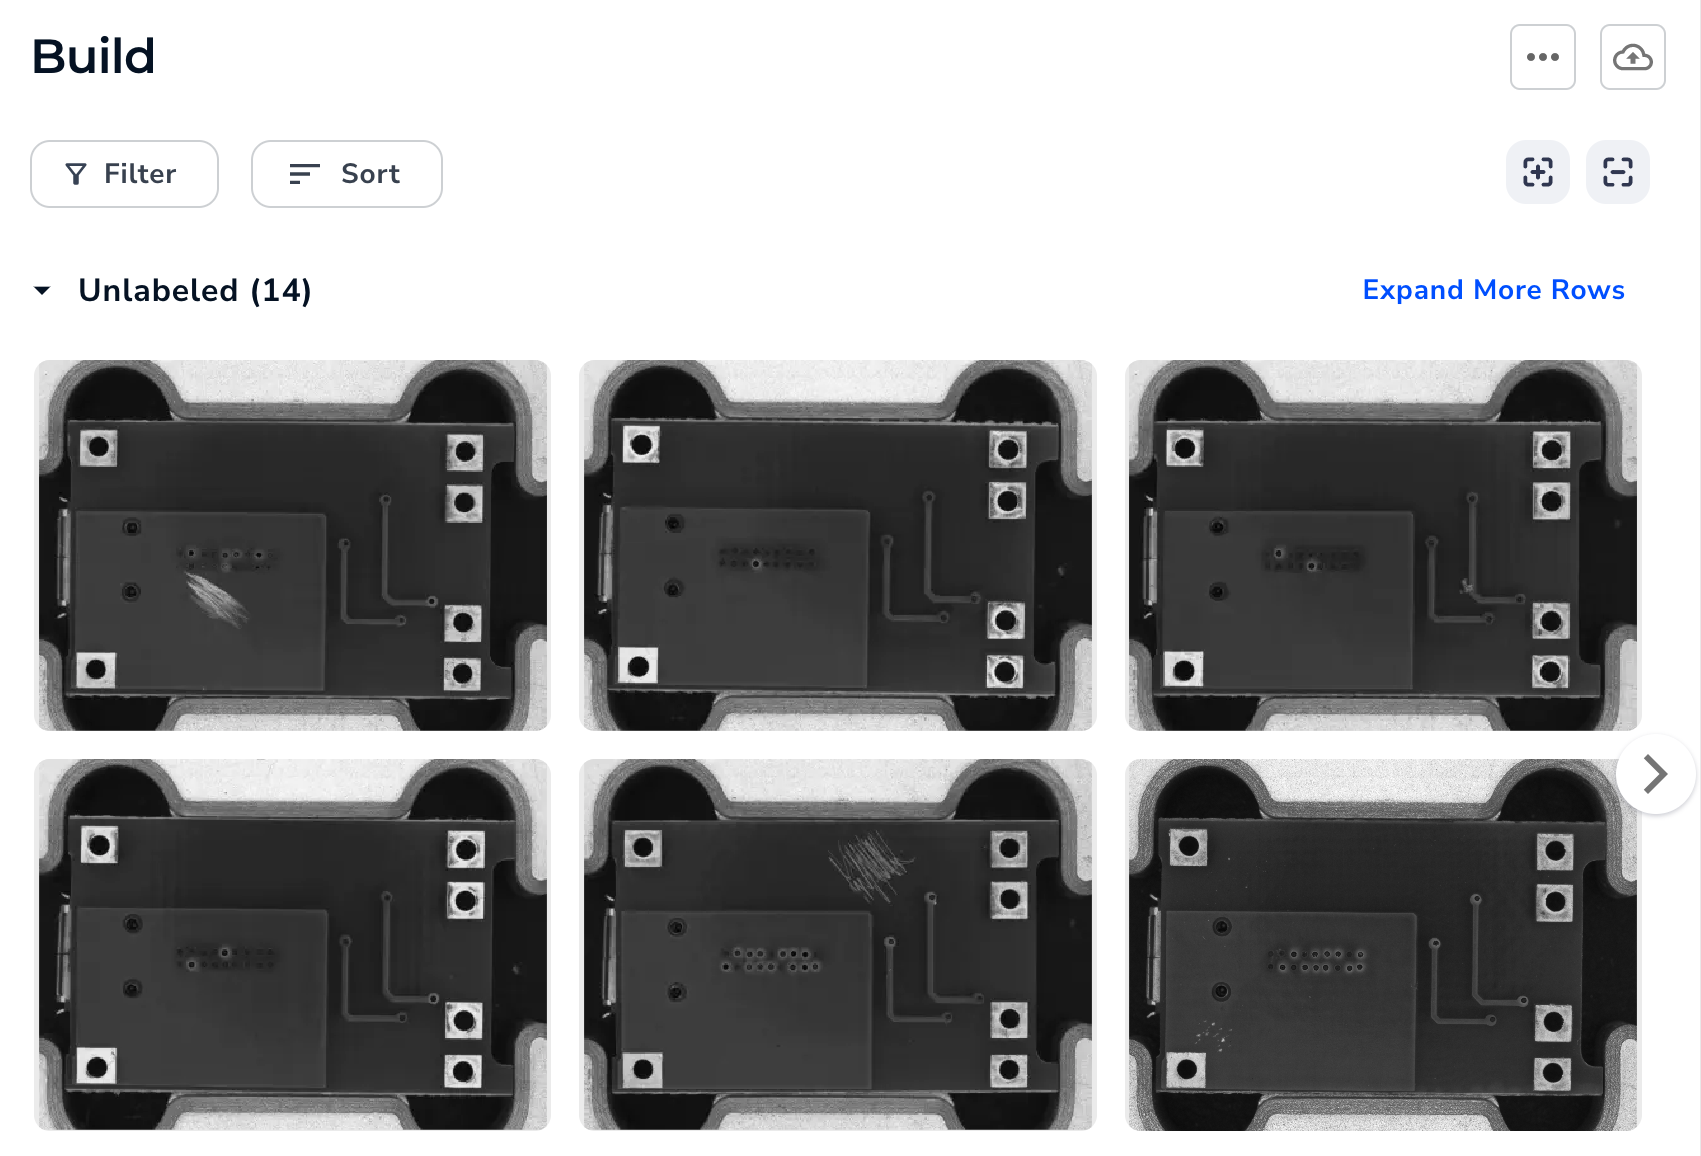 Will Only Need to Label a Few Images, Because They Are All Similar
Use Case: Images Are Very Different
If all of your images are of different objects, with different backgrounds, in different conditions (like lighting), then you will need more labeled images.
For example, if you're creating a model to detect dogs, you will need more images to account for all the different variables. You could upload images of the following:
- Different dog breeds
- Different colored dogs
- Dogs from different angles
- Dogs with collars
- Dogs without collars
- Dogs in different settings
- Dogs in sunny conditions
- Dogs in overcast conditions
 Will Need to Label More Images, Because They Are Very Different
Labeling Tools
LandingLens offers you several tools to help you label and navigate images. Refer to the image and table below to learn more about these tools.
 Labeling Tools
| Icon | Tool | Description | Shortcut |
|---|---|---|---|
 | Zoom | Zoom in and out. | Mouse wheel up: Zoom out Mouse wheel down: Zoom in |
 | Pan | Click the image and move it. This is especially useful if the image is zoomed in and you want to see part of the image that is out of the frame. | V: Select |
 | Brush | "Paint" over an area that you want to identify. | B: Select |
 | Eraser | Remove part of a brush stroke. | E: Select |
 | Size Slider | Move the slider to change the size of the Brush or Eraser. | ]: Make larger [: Make smaller |
 | Undo | Undo the last action. | Command+Z (Mac) Ctrl+Z (Windows) |
 | Redo | Redo the action that you undid. | Shift+Command+Z (Mac) Shift+Ctrl+Z (Windows) |
| Clear All Labels | Remove all labels from the image. | None | |
 | Labels | View the labels you added. This toggle is only visible after you run the model. | None |
 | Prediction | View the predictions from the model. This toggle is only visible after you run the model. | None |
 | Class | Select a class. Any labels added with the Brush are applied to the selected class. | Up arrow key: Select the class above Down arrow key: Select the class below |
 | Guides | Use the white dotted guides to align the Brush or Eraser with any vertical or horizontal features. (Not marked on the image above.) | None |
Navigate Images in Labeling View
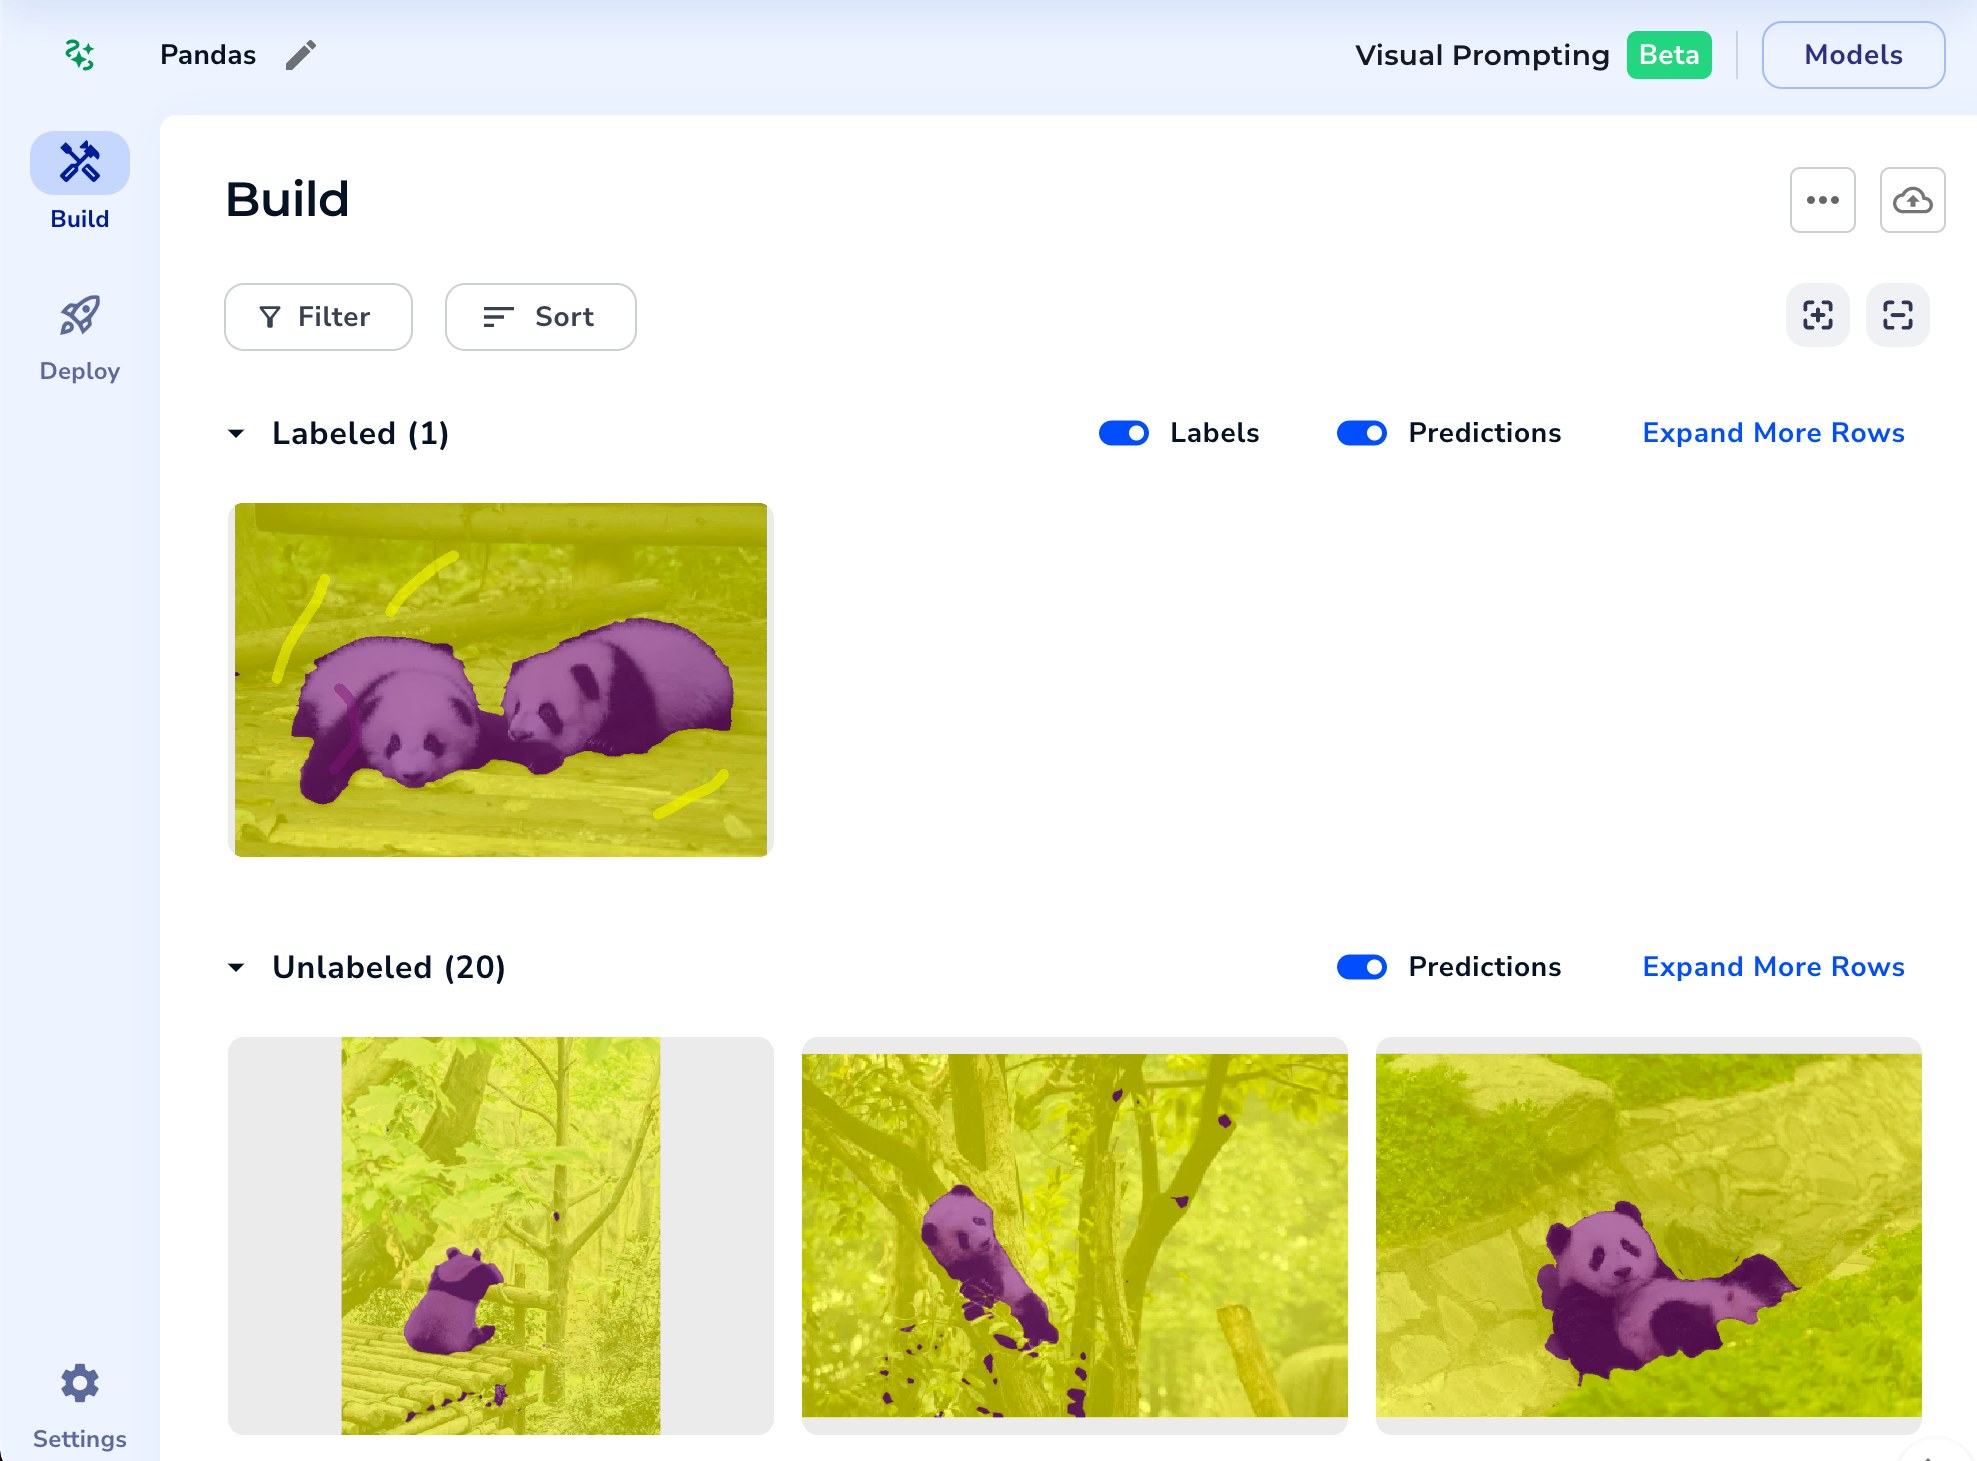
When you're labeling an image, you can easily see and navigate to the other images in your dataset.
Click the Browse Images in Sidebar icon to view the images in your dataset in a bar above the opened image. These images are grouped by whether they are Labeled or Unlabeled.
.png) Browse Images in Sidebar
Browse Images in SidebarClick the Previous and Next icons to navigate to other images. Use the left arrow and right arrow keys as shortcuts.
.png) Previous and Next
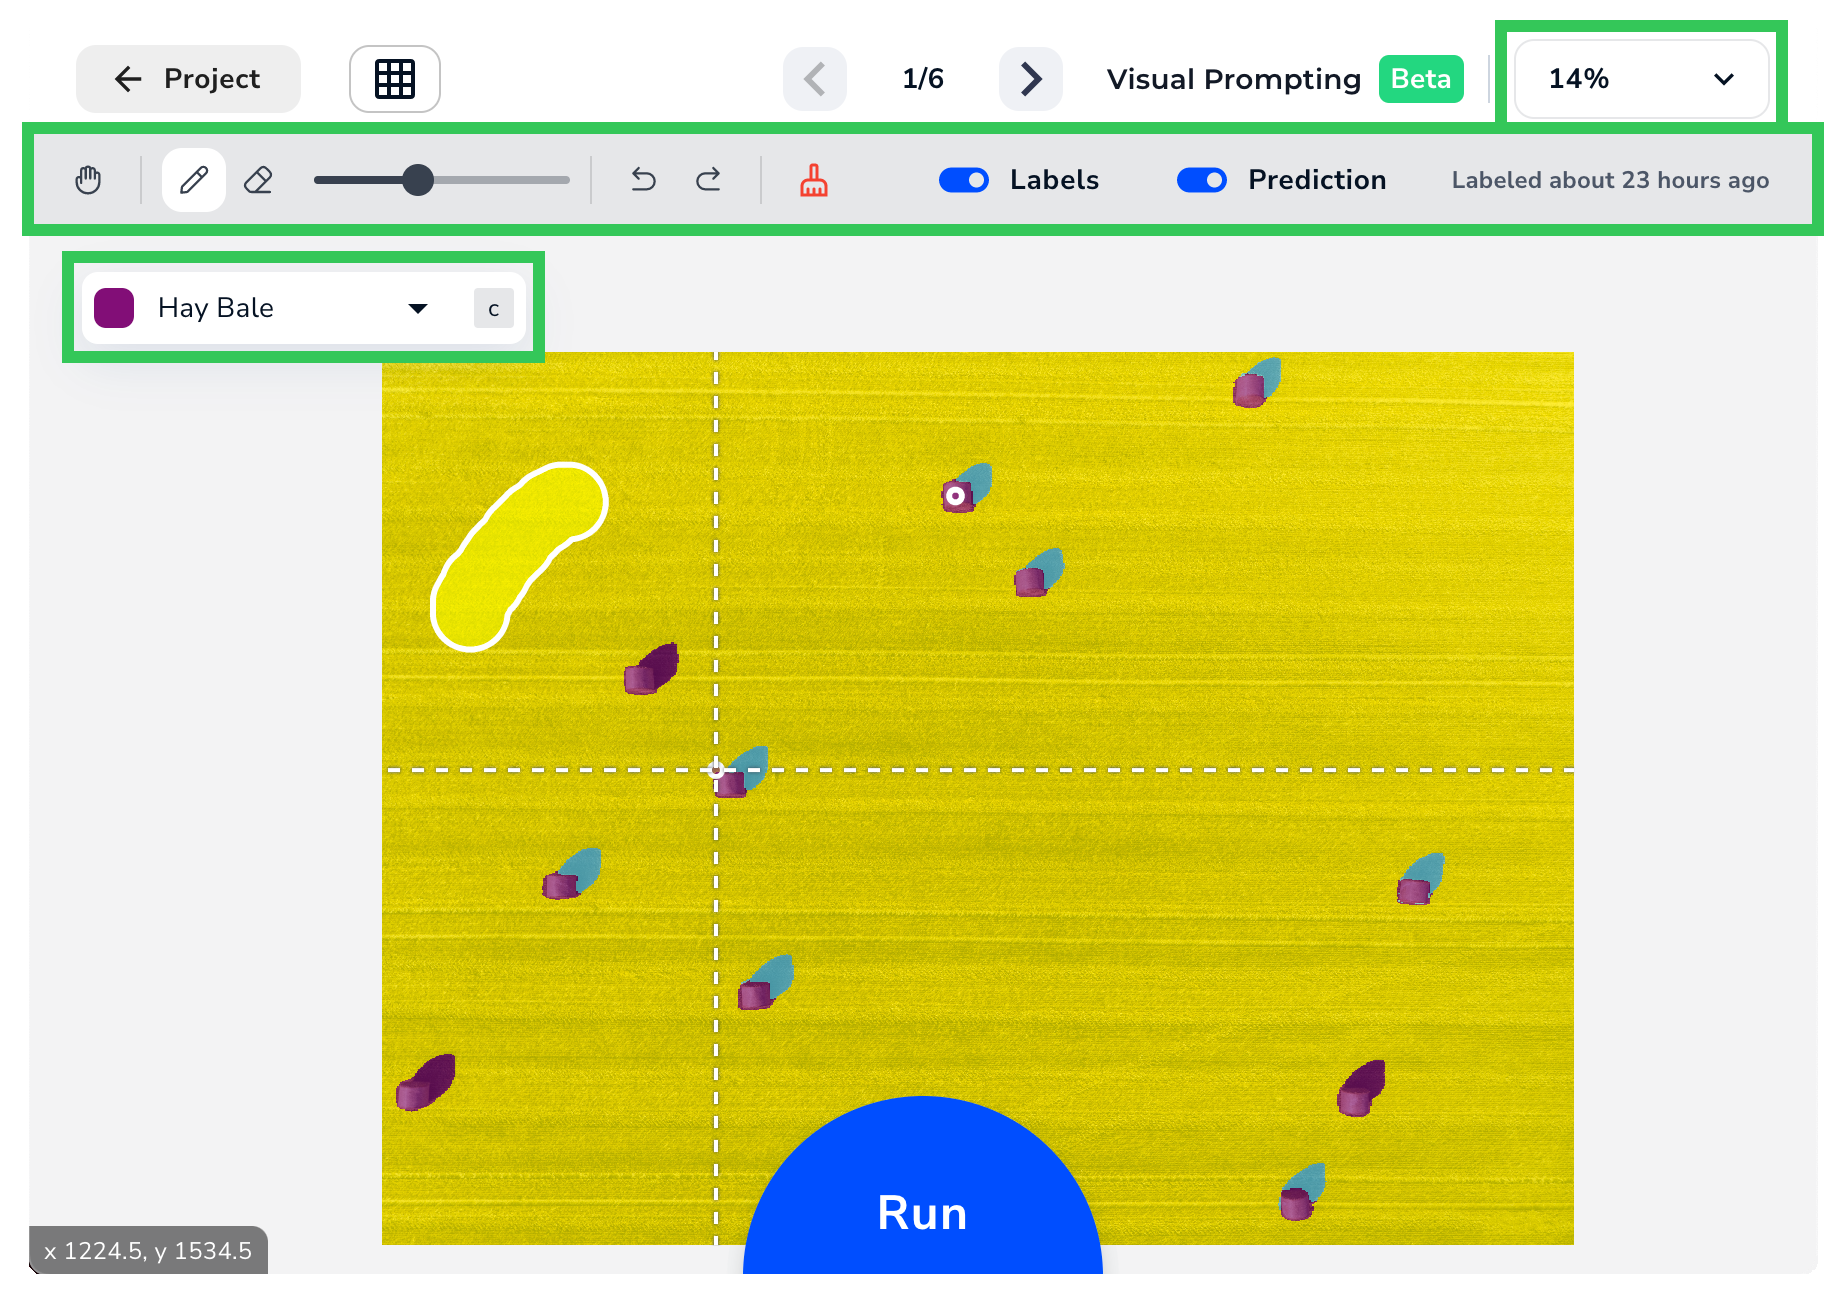
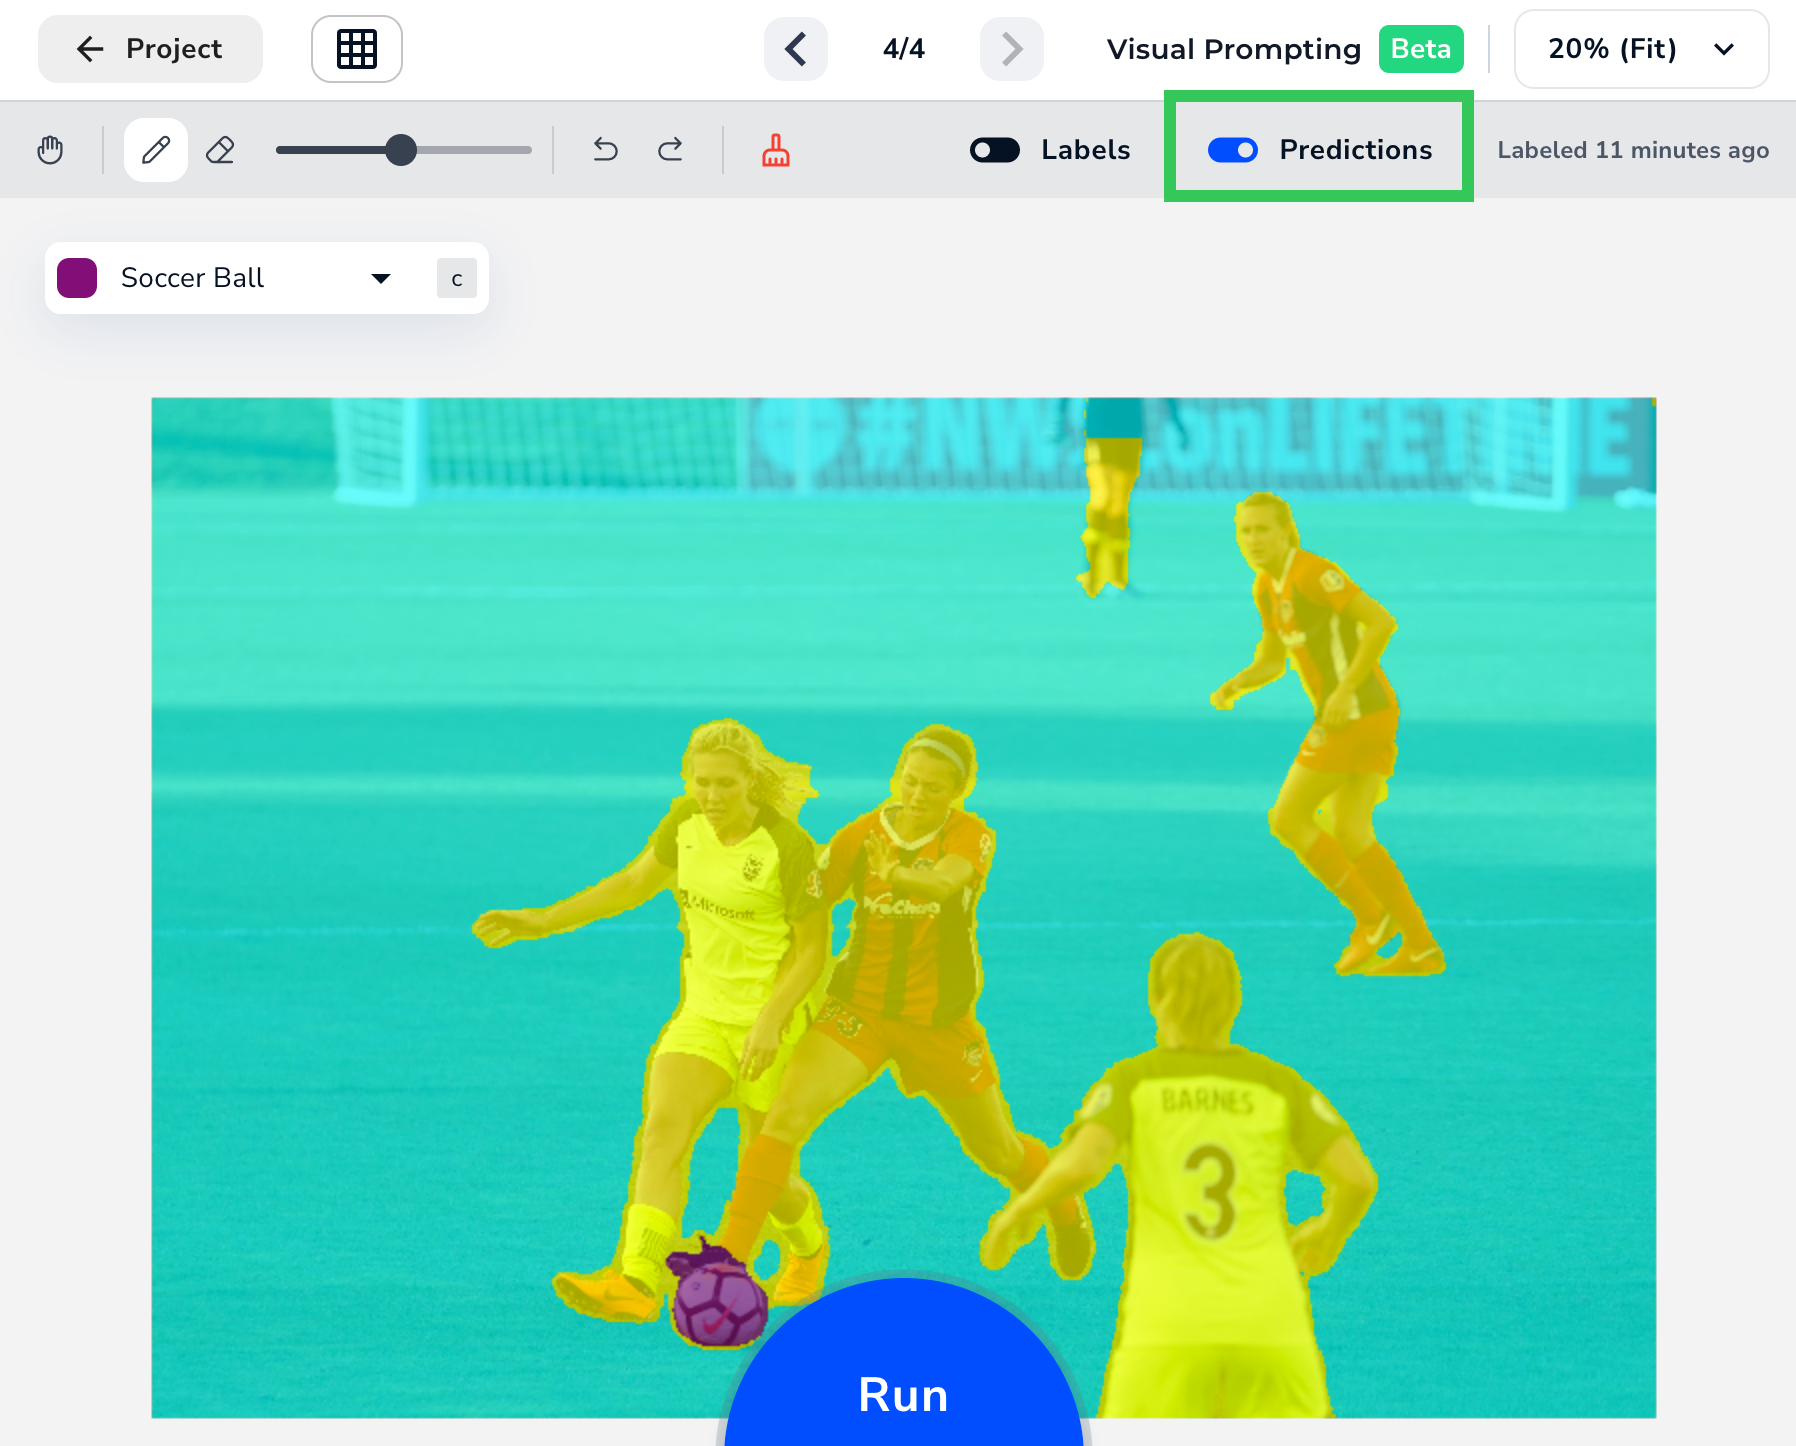
Previous and NextRun the Model, Review Predictions, and Iterate Your Labels
After you've labeled at least two classes, click Run at the bottom of the page (or press Enter).
 Run the Model After Labeling an Image
In only a few seconds, the model's predictions overlay on the image.
 Initial Predictions
You can use the Labels and Predictions toggles to compare the results with your labels. You can also review predictions for all images in your dataset. If some of the predictions aren't completely accurate—and we don't expect them to be after running the model only once—add a few more labels.
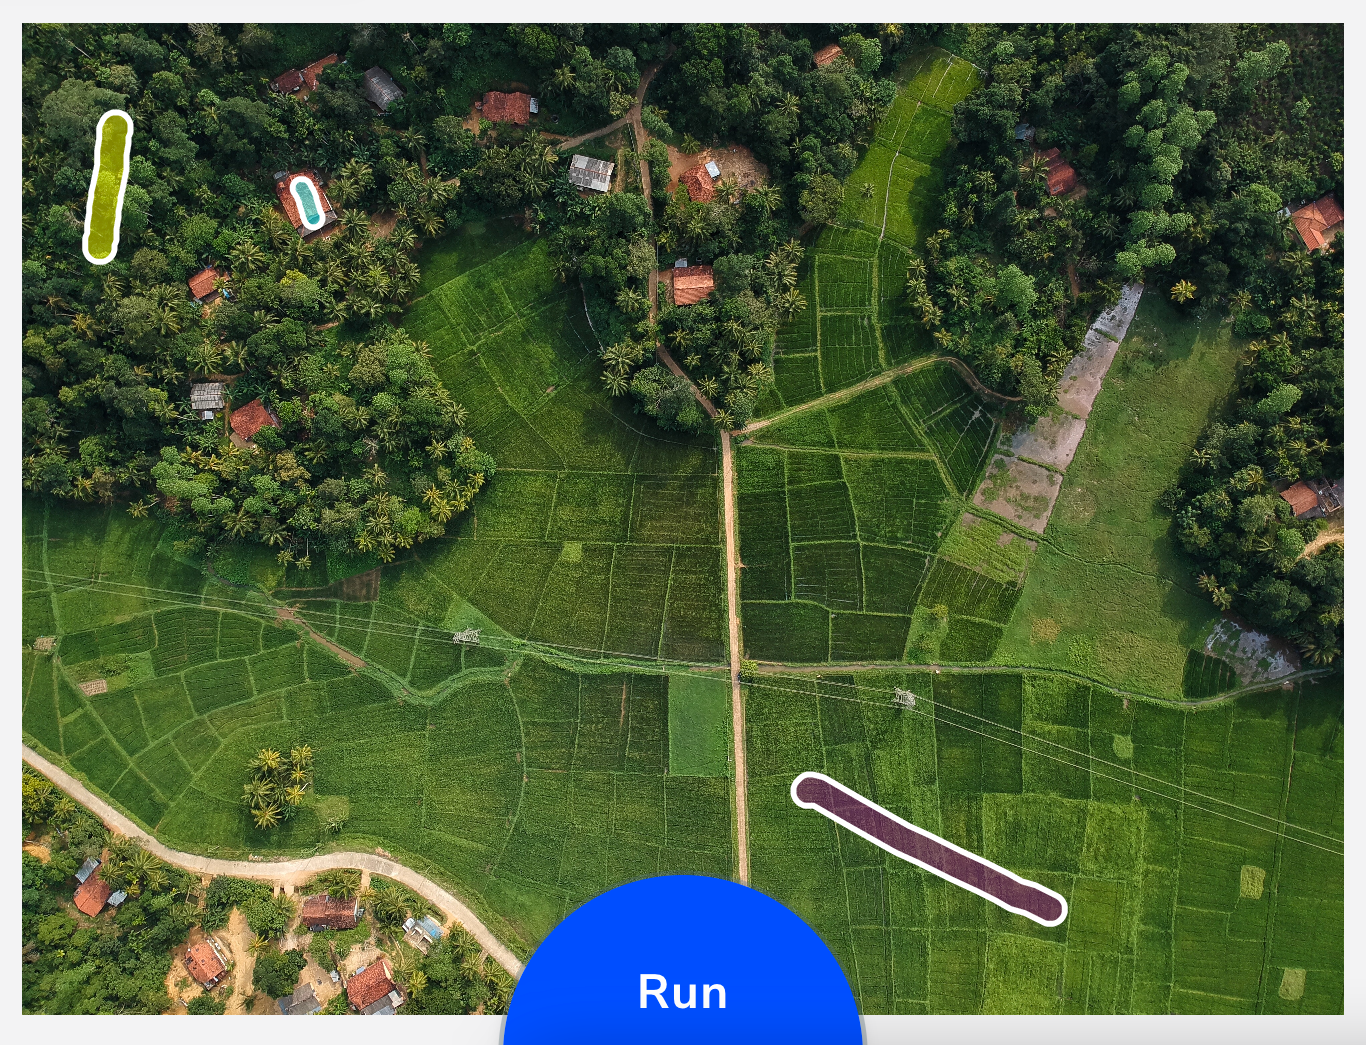
Start with labeling a few areas that have incorrect predictions. For example, in the GIF below, an area is incorrectly predicted as House (blue). To correct the model, I label that section as Farmland (purple) and click Run. You can see that the model now accurately predicts that area as Farmland (purple).
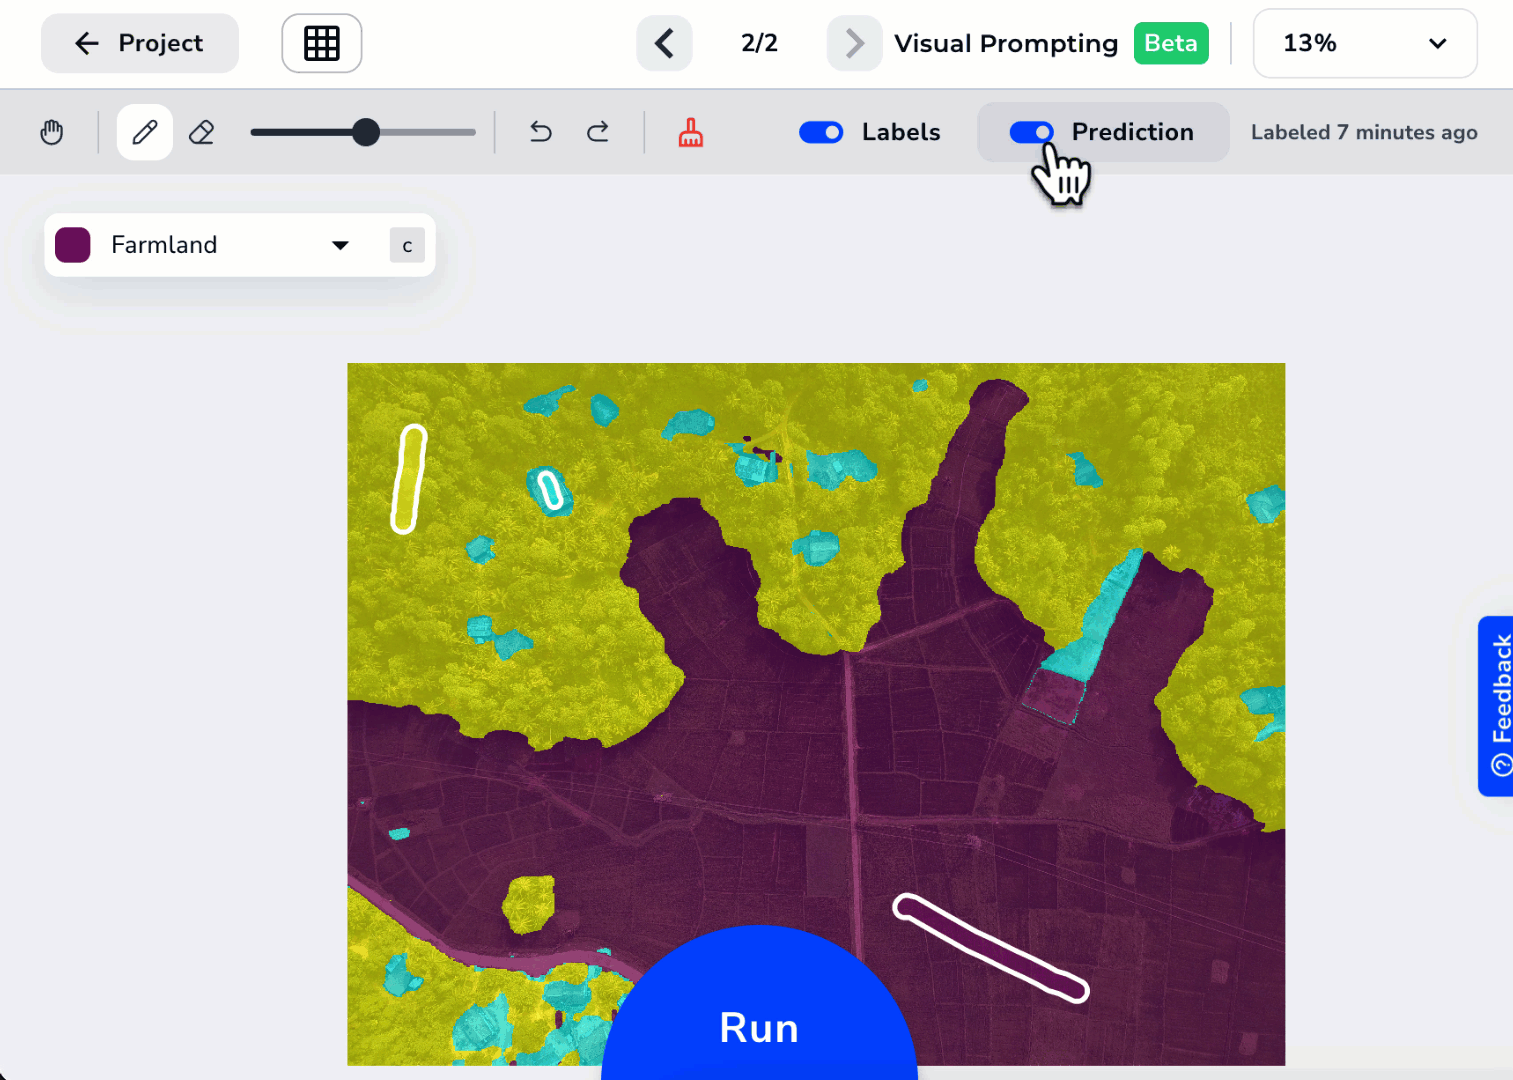 Fine-Tune the Labels
We recommend you run through this cycle a few times: run the model, review, label, repeat. For many datasets, this process only takes a few minutes.
Deploy Your Visual Prompting Model
After you're happy with your Visual Prompting model, you are ready to use it! To use a model, you deploy it, which means you put the model in a virtual location so that you can upload images to it. When you upload images, the model runs inferences, which means it detects what it was trained to look for.
Unlike other project types in LandingLens, you don't need to select a specific model when deploying Visual Prompting. This is because you're continuously iterating on the same model, and not creating a new one each time you run the model.
For detailed instructions for how to deploy models, go to Cloud Deployment.
Deployment Limitations in Beta
Visual Prompting is in beta, so we're still ironing out a few kinks. Here are known limitations for this beta release:
- The predictions in the user interface will have more distinct lines around detected objects than the predictions in the deployed model. We're working hard to get the predictions in the deployed model as good as what you see on screen.
- Models from Visual Prompting projects can't be deployed in LandingEdge or Docker.
Project View
When you're looking at and labeling an image (Labeling View), click Project to see all the images in your project.
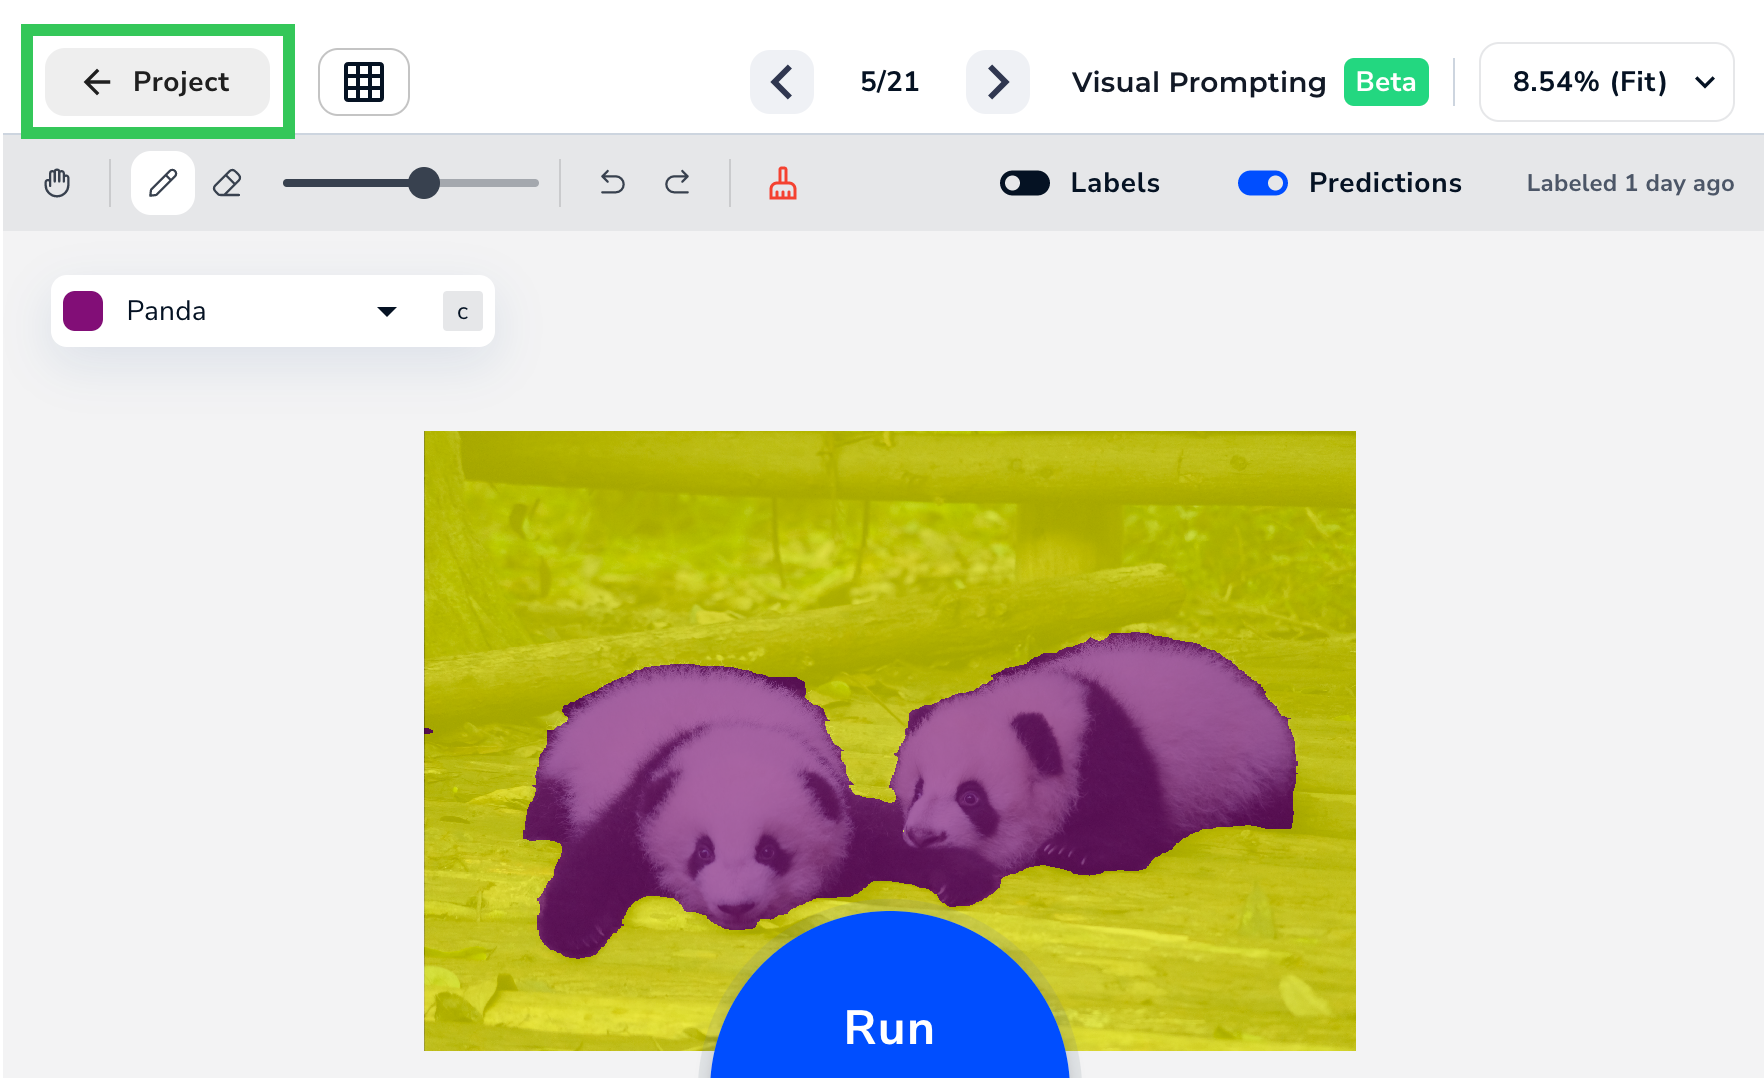 Click Project to See All Images in the Dataset
In Project View, you can view all images, organized by Labeled and Unlabeled.
 Project View
Labels and Prediction Toggles
After you've run your model at least once, these toggles display in both the Labeling View and Project View:
- Labels: View the labels you added.
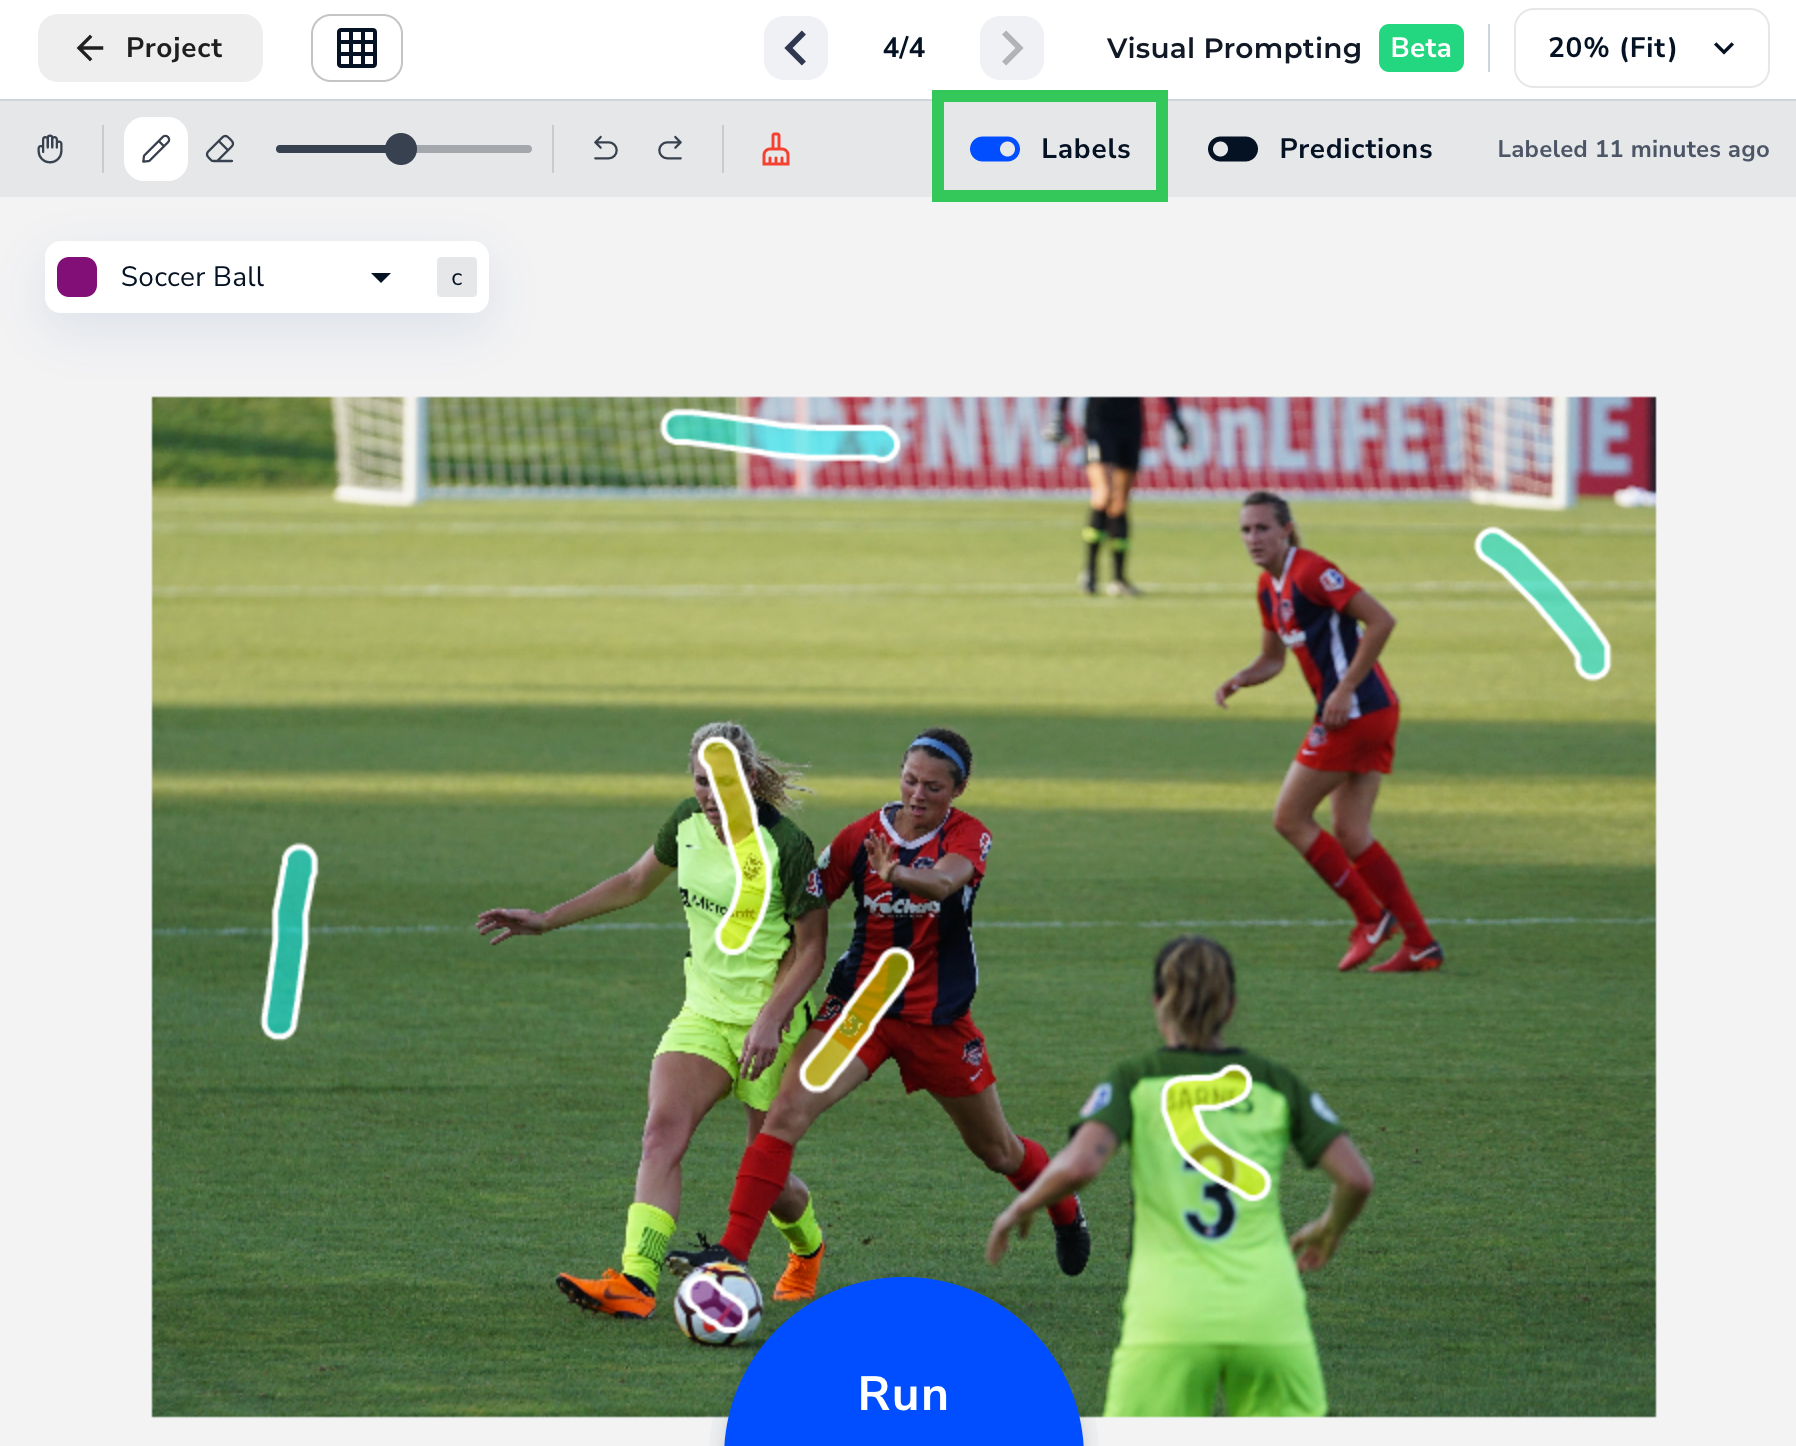 Labels Only
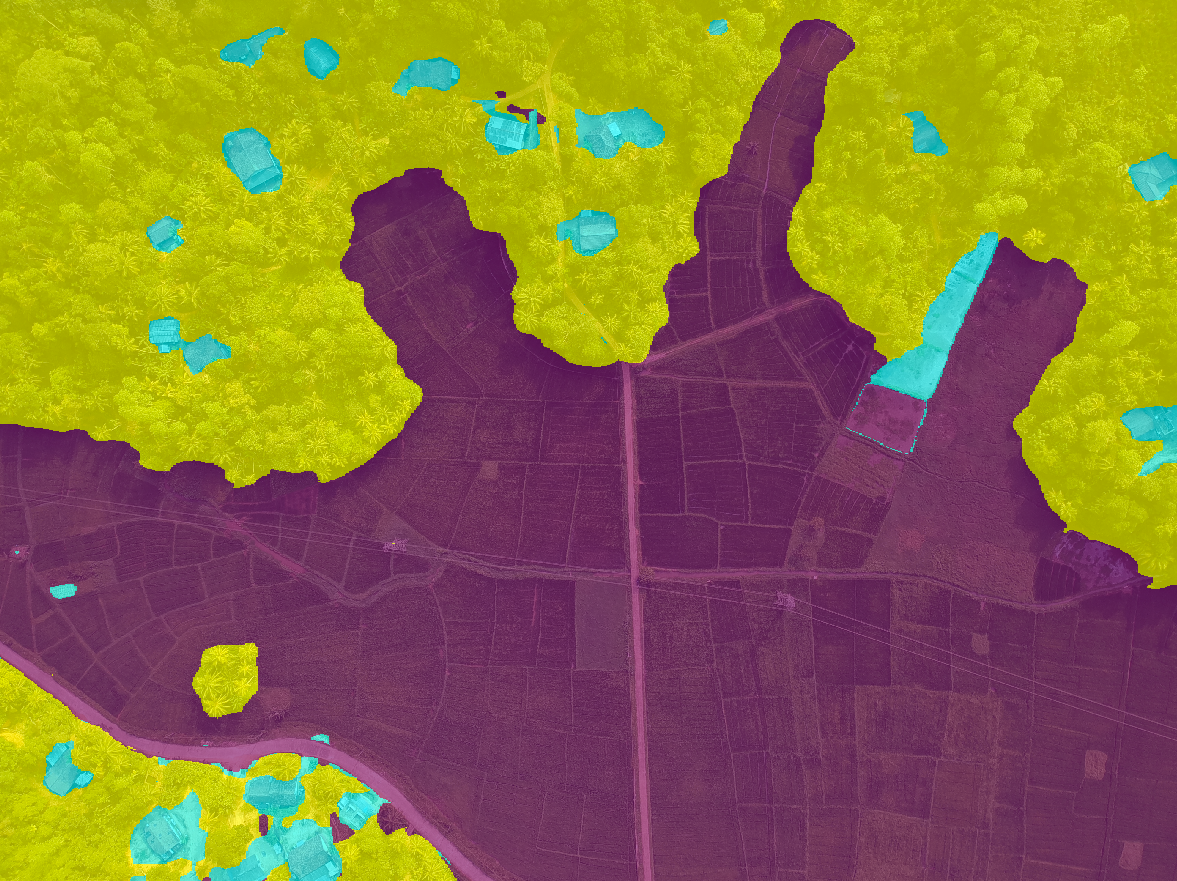
 - Prediction: View the Predictions from the model.
 Predictions Only


Visual Prompting FAQ
Is Visual Prompting a form of Segmentation?
Yes! Visual Prompting is a type of semantic segmentation, just like the Segmentation project type. Semantic segmentation is when the model learns from each pixel in an image. For example, say you have an image of New York City. You can label some pixels so the model can identify these classes: people, cars, buildings, billboards, and the sky. Furthermore, each object identified as a class will fall under one entity. In this case, every car detected will simply be labeled as "Car", instead of Honda, Toyota, Mercedes, etc.
So, how does Visual Prompting differ from Segmentation? In short, Visual Prompting only requires partial labeling, while Segmentation requires full labeling.
Is Visual Prompting going to replace Segmentation?
Not to worry, the Segmentation project type isn't going anywhere and will continue to be available.
Where is the "Nothing to Label" option?
Visual Prompting doesn't have a "Nothing to Label" option because the model only takes into consideration labeled pixels.
Why are there no metrics?
For the other project types in LandingLens, metrics are created by comparing the overlap between your labels (the Ground Truth) and the model's predictions. The metrics tell you how often the model predicted correctly.
Since Visual Prompting only requires you to label small areas of the object you want to detect—and not the full object—the model doesn't have a full Ground Truth to compare itself against. The metrics we use for other project types could be misleading.
Why can't I fine-tune the hyperparameters?
We've pre-selected hyperparameters to optimize the speed and accuracy of Visual Prompting, so that you can focus on labeling data.
Does Visual Prompting offer Agreement-Based Labeling?
No. Agreement-Based Labeling, which is available for other project types, allows multiple users to label the same set of images to analyze the consistency of their labels. That approach doesn't apply to Visual Prompting because you only need to label a few small areas of an object for the model to learn to detect it. If we used Agreement-Based Labeling in Visual Prompting, each user could label a different area of the same object. Even though each label would be different, they could all be correct.
Why don’t I see Predictions on an image I just uploaded?
If you run the model and later upload a new image, the model doesn’t automatically process that image. You must re-run the model to add a prediction.
Can I delete or rename classes in Visual Prompting projects?
No, classes cannot be deleted or renamed in Visual Prompting projects.
Was this article helpful?