Object Detection
- 30 Jan 2024
- 2 Minutes to read
- Print
- DarkLight
- PDF
Object Detection
- Updated on 30 Jan 2024
- 2 Minutes to read
- Print
- DarkLight
- PDF
Article Summary
Share feedback
Thanks for sharing your feedback!
Object Detection offers bounding boxes (rectangles) to outline the objects you want to detect. This project type is commonly used for the following:
- Tracking
- Counting
- Understanding the locations of objects
- Identifying objects and object types
 Use Bounding Boxes to Label Objects of Interest
 Keep Bounding Boxes Tight Around Objects
It is important to keep bounding boxes as close to the object you want to identify as possible. This method will help you avoid capturing unimportant areas, like the background. During model training, the model will look at every pixel inside a bounding box. If you include extra, unimportant pixels, the model might think these pixels are also important. This may cause complications when the model is deployed and is looking for objects in the real world.
For example, in the image below, the two wind turbines are labeled with one bounding box. While this approach successfully captured both wind turbines, it also included a significant amount of background.
 This Bounding Box Example Captures a Significant Amount of Background
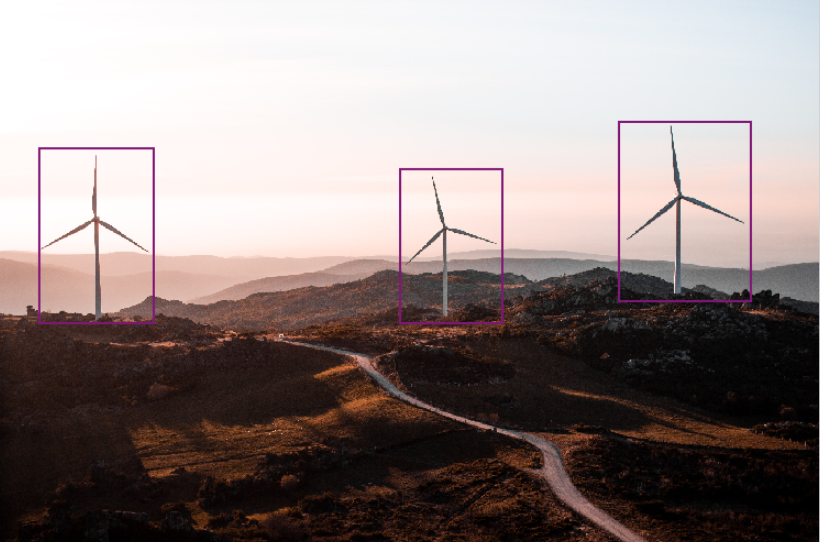
 The image below shows an improved labeling strategy where two bounding boxes are used to label each wind turbine. This method ensures a more focused and accurate representation of wind turbines, minimizing the inclusion of irrelevant areas.
 This Bounding Box Example More Accurately Captures the Objects of Interest
Label Images with Bounding Boxes
To label images with bounding boxes:
- Open the object detection project you want to label images for.
- Click to open an image.
- Click the bounding box tool if it's not already selected.
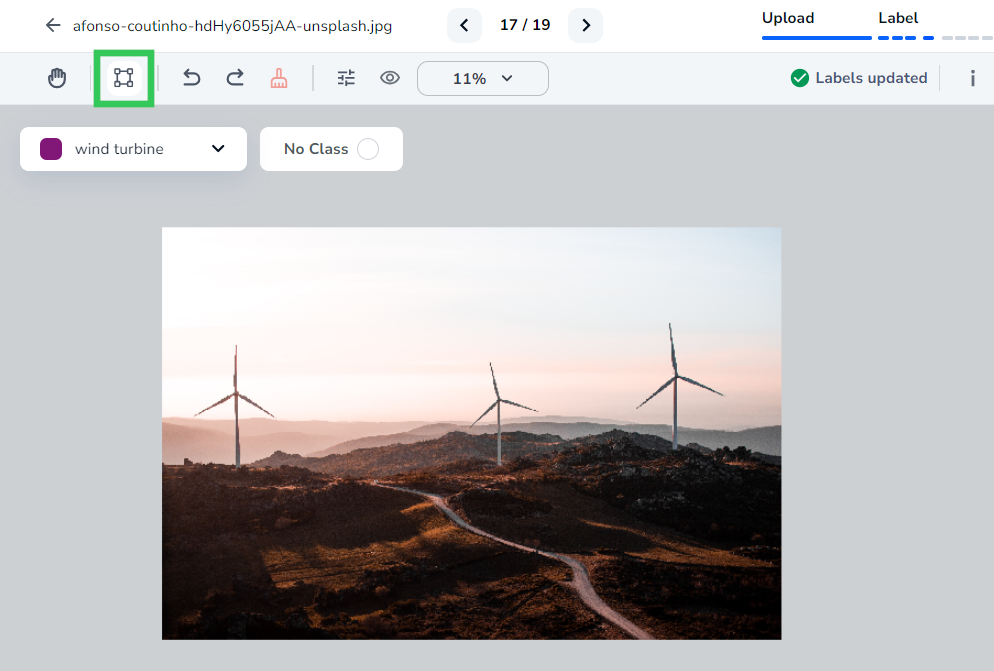 Click the "Bounding Box Tool" Icon
 - Use the guides to line where you want to start the bounding box.
- Click and drag the box around the object of interest.
- If you drew this bounding box before you've created a Class, LandingLens prompts you to enter a name for the class.
.gif) Draw a Bounding Box Tightly Around the Object of Interest
Draw a Bounding Box Tightly Around the Object of Interest - Continue labeling all objects of interest.
 Label All Objects of Interest

.gif)

Delete Bounding Boxes
Let's say you accidentally added a label that doesn't belong. You can delete that label. To do this:
- Open the image that has the label you want to delete.
- Click the bounding box you want to delete. When selected, the bounding box will be highlighted.
- Press the Delete or Backspace key on your keyboard. LandingLens automatically removes the label.
(This video has no sound.)
Resize Bounding Boxes
You can adjust the size of a bounding box to more accurately identify the object of interest. Remember you want to draw bounding boxes as close to the objects of interest as possible.
To resize a bounding box:
- Open the image that has the label you want to resize.
- Move your cursor to the corner of the bounding box that you want to adjust. Your cursor will display a double-sided arrow cursor (resize cursor).
- Click and drag the bounding box until you see the results you want.
(This video has no sound.)
Was this article helpful?